Create a Commitment (Part 2 of 3): Completing the SOV
Create a Commitment (Part 2 of 3): Completing the SOV Section
For Part 1 click here.
For Part 3 click here.
NOTE: There are two methods to input information into the SOV tab: (1) Add Bid Items to SOV and (2) Add Manual SOV
METHOD 1: Add Bid Items to SOV
The menu option to "Select Bid Items" will not come up until the vendor section has been completed and Save has been clicked.
Once a Bid Item Line has been added to a Commitment, it is no longer available in the List of Values, even if it is not entirely bought out.
If you need to enter this cost code again for another sub it will need to done manually (see Method 2 below).
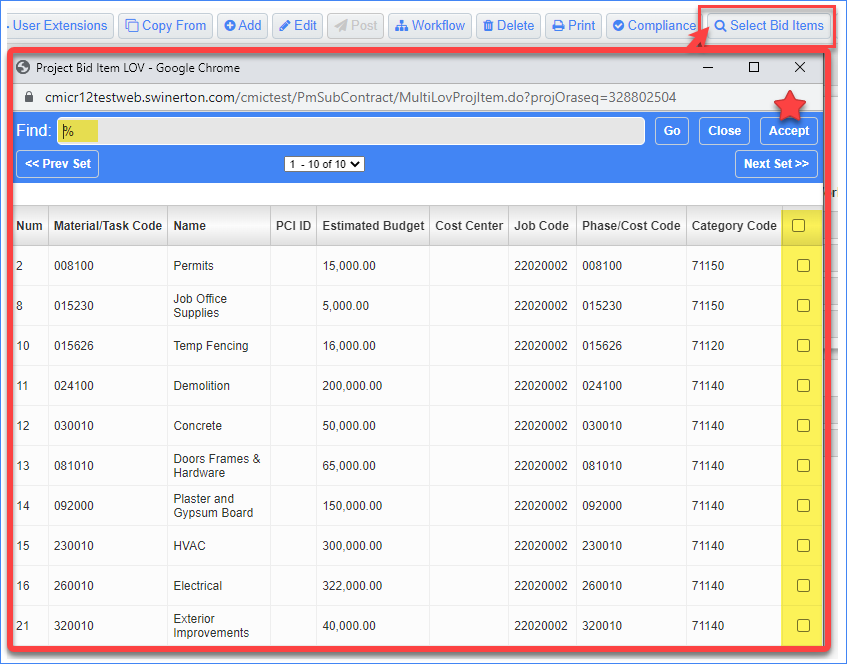
STEP 1: Click the Select Bid Items button in the upper right corner.
STEP 2: In the pop-up window, use the Find function or scroll the list of available phase codes on this project.
STEP 3: Check the box for the desired Bid Item(s) to be added to the SOV
STEP 4: Click the Accept button. The pop-up window will disappear and the Bid Items added to the SOV section.

STEP 5: The contract is now in Edit mode. Review the Schedule of Values section and make adjustments to the Amount field to reflect any buyout savings.
STEP 6: The Retainage % field is populated from the header Default Retainage field. DO NOT CHANGE.
STEP 7: Click Save.

METHOD 2: Add Manual SOV
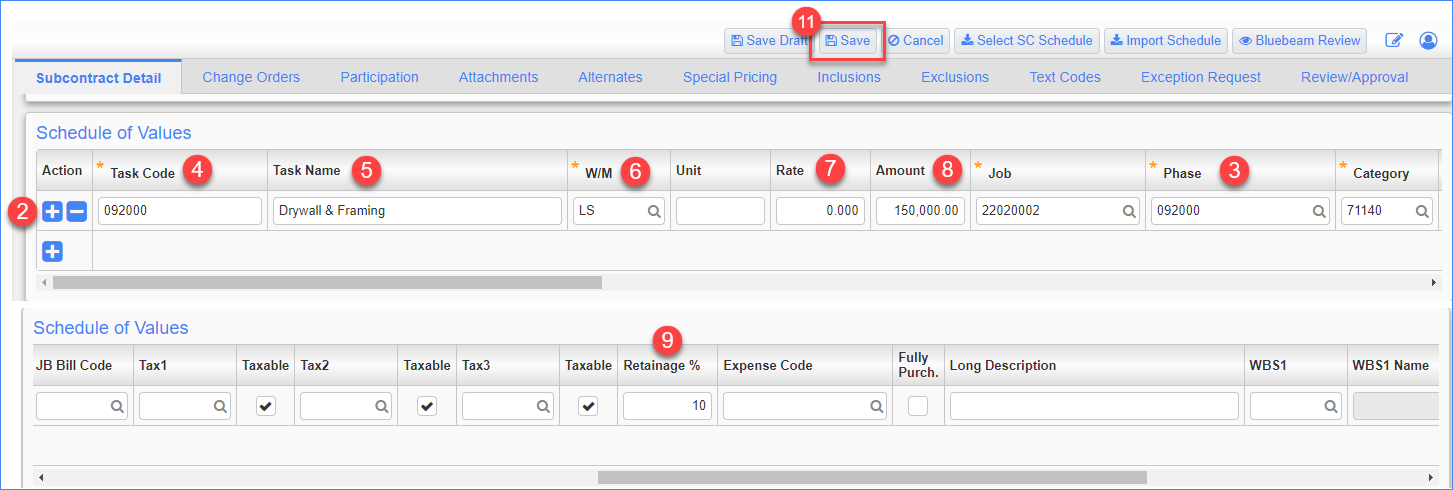
STEP 1: Click the Edit button at the top of the screen
STEP 2: In the Action column of the Schedule of Values (SOV) section, click the blue + symbol
STEP 3: Start with the Phase section. Manually enter it or use the magnifying glass to open a pop-up window and search within the phase codes assigned to the project. The Job and Category sections will auto-populate. NOTE: if there is more than 1 category assigned to the phase code you will need to enter it.
STEP 4: Task Code field should be the same value as the Phase code field
STEP 5: Task Name - Enter a short description. This usually aligns with the Phase code name.
STEP 6: W/M - enter the Weight Measure for this line item in the SOV. Typically this will be LS (lump Sum). click here for a definition of ALL Weight Measures available.
STEP 7: Rate is not used with W/M LS and will default to 0
STEP 8: Amount - enter the amount of this commitment line item into this field
STEP 9: Retainage % field will default to the % noted in the Accounting section. The Accounting section defaults to 10% unless something else is manually entered.
STEP 10: The remaining fields are not used and should be left blank
STEP 11: Click Save
STEP 12: Repeat as needed to create multiple lines in the SOV.

Click HERE for Part 3 to complete the multiple tabs at the top of this screen and to workflow the commitment.