Create a Commitment (Part 3 of 3): Remaining Tabs and Workflow
Create a Commitment (Part 3 of 3): Remaining Tabs and Workflow
Click here for Part 2
TEXT CODES TAB
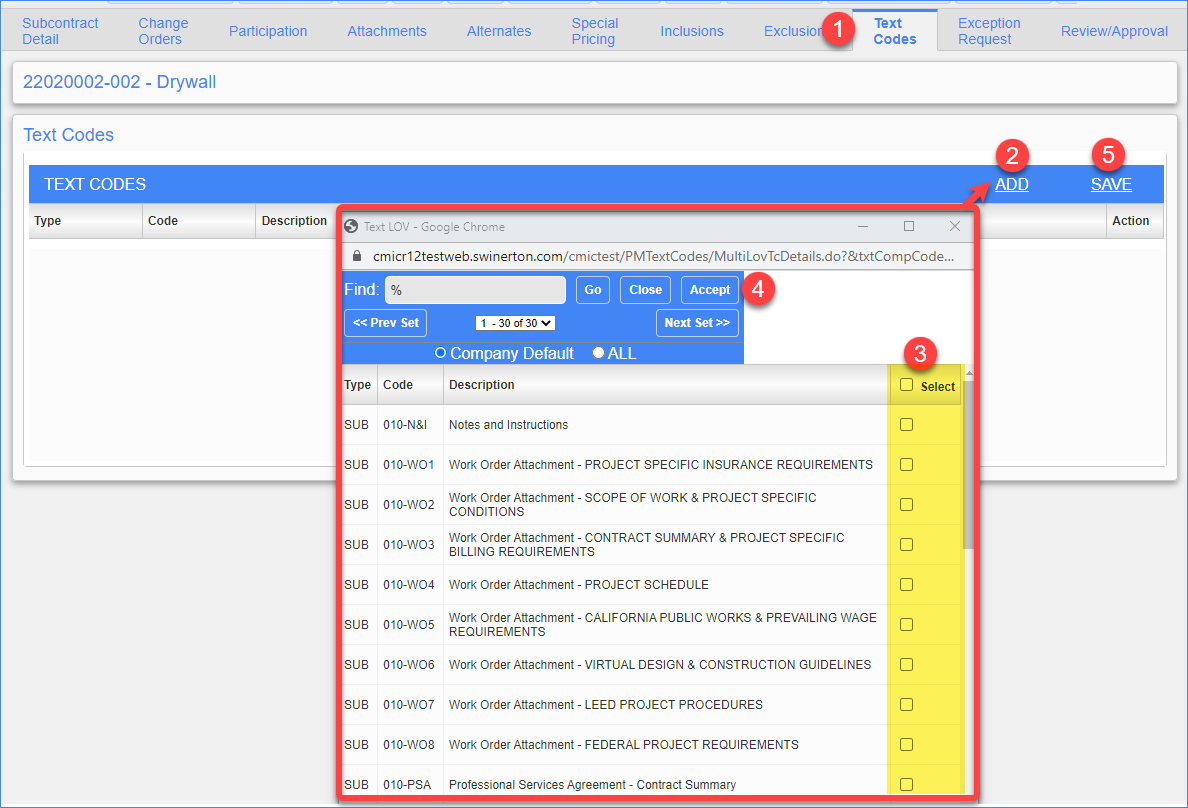
STEP 1: Click the Text Codes tab.
STEP 2: Click Add
STEP 3: In the pop-up window select ALL of the attachments that will be included in the commitment
STEP 4: Click Accept. These will then populate on the Commitment Cover Sheet.
STEP 5: Click SAVE before leaving the tab

ATTACHMENTS TAB
STEP 1: Click the Attachments tab. Upload any contract specific documents that you identified in te Text Codes tab here (i.e. Scope of Work, Schedule of Values). Click here for the complete list of SOW Templates on SwinNet.
NOTE: The Bluebeam Review button in the Attachments Tab does not work. Click HERE for more info.
STEP 2: Click the Upload Multiple button
STEP 3: Follow standard upload procedures

EXCEPTION REQUEST TAB
NOTE: The Exception Request tab will need to be completed on any commitment that exceeds the Subcontractor’s Single Project Limit Remaining and/or Aggregate Project Limit Remaining or their EMR is greater than 1.24. Refer to this How-To Guide for more information.
In the Subcontractor Detail Tab, User Defined section, if YES is populated in the Financial and/or Safety Exception Request fields, go to the Exception Request tab and complete the relevant fields.

STEP 1: Click the Edit button in the upper right corner of the screen.
STEP 2: Complete the appropriate fields
- Financial ER Reason: State why you want to use this Subcontractor for this project (e.g. low bidder, Owner-preferred vendor)
- Change Order ER Reason: This will need to be completed if ER is triggered by a Change Order
- Financial ER Mitigation Plan: REQUIRED when either the Financial or Change Order ER sections are filled. State what you will be doing to mitigate the risk (i.e. Indemnification by Owner, Allowance Item in Contract, Joint Check all sub-tier vendors, closely monitor Subcontractor’s progress payment percentage complete). NOTE: Best practice is to work with your PX, OM, or DM on a mitigation plan prior to Work flowing the contract.
- Safety ER Reason: State why you want to use this Subcontractor for this project (e.g. low bidder, Owner-preferred vendor).
-
Safety ER Mitigation Plan: REQUIRED when the Safety ER section is filled. State what you will be doing to mitigate the risk (i.e. sub will have a full time safety manager onsite at all time). NOTE: Best practice is to work with your Division Safety Manager on a mitigation plan prior to Work flowing the contract.
- Non-WO Reason & On-site Labor? Required for Purchase and Rental Agreements if your Sub has a Master Subcontract Agreement with Swinerton. State the reason why a work order is not being issued.
STEP 3: Click Save

COMPLETING & WORKFLOWING THE COMMITMENT/SUBCONTRACT
Click here to View Flowchart
PART 1: WORKFLOW COMMITMENT (PROJECT MANAGER’S RESPONSIBILITY)
STEP 1: Click back to the Subcontract Detail tab. This allows all the required buttons to appear in the upper right corner of the screen.
STEP 2: Click the Save button if still in edit mode.
STEP 3: Click the Workflow button.
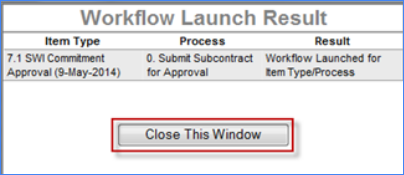
STEP 4: Click Close This Window button in the pop up window that appears.

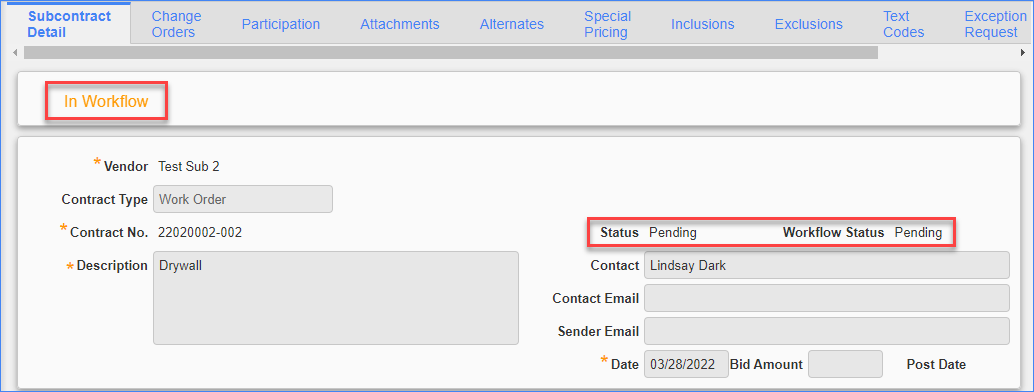
STEP 5: There is now a bar across the top of the commitment that states it is “In Workflow”.
STEP 6: The Workflow Status has changed from “Unsubmitted” to “Pending”.

STEP 7: Click on the Review/Approval tab. This tab reflects the current status of the workflow process. It will also tell you the reason the workflow may have been rejected.
STEP 8: The standard workflow will send a notification to the designated Field Administrator for drafting and approval. Once approved by the F.A., it will route back to the PM for the final approval. Once the PM approves, it will Post.
NOTE: Posted commitments/subcontracts CANNOT be unposted, click HERE for how to cancel a posted agreement
PART 2: DRAFT COMMITMENT (FIELD ADMINISTRATOR’S RESPONSIBILITY)
STEP 1: Field Administrator receives Workflow Notification to complete commitment.
STEP 2: Review Subcontract Detail tab, Text Code Tab and Attachments tab to ensure required fields were completed by the Project Manager.
STEP 3: Print Commitment Cover page and Terms & Conditions from CMiC.
STEP 4: Prepare Commitment Attachments (some from Attachments tab and others from the Legal Page on SwinNet).
STEP 5: Compile and attach Commitment Agreement in CMiC / Subcontract / Attachment Tab.
STEP 6: Approve the Workflow Notification.
PART 3: FINAL REVIEW AND APPROVAL OF SUBCONTRACT (PROJECT MANAGER’S RESPONSIBILITY)
STEP 1: Project Manager receives Workflow Notification to review the final version of the Commitment. If an Exception Request was required, the PM cannot approve until the Exception Request has been approved.
STEP 2: Project Manager reviews the Commitment and works with Field Administrator for any adjustments to the final document.
STEP 3: Project Manager approves the Workflow in Workflow Notification. This will post the commitment, change the Workflow Status to “Approved” and Status to “In Process”.
PART 4: DISTRIBUTE COMMITMENT (FIELD ADMINISTRATOR’S RESPONSIBILITY)
STEP 1: Field Administrator receives Workflow Notification that the Commitment has been approved.
STEP 2: Distributes Commitment via DocuSign
STEP 3: Save the “out the door” document in the CMiC / Subcontract / Attachment Tab.
STEP 4: Once the Commitment Agreement is signed by all parties, attach in CMiC and save in the project shared drive.
STEP 5: Enter Executed Date in the Subcontract Detail Key Dates section.
The process is now COMPLETE!