Changing the Numbering Masks on a Project in CMiC
OVERVIEW
Masks are the default numbering and date formats for various Documents and Reports throughout the CMiC system. Standards are set up at the creation of your project in the system. It is NOT Recommended that you change these defaults, should you desire to modify defaults or to shut off auto numbering for specific modules (objects) such as Submittals, this can be performed here (refer to the bottom of this how-to). This document first describes each mask’s default set up section followed by instructions to modify and save changes section.
STEP 1: From the main Project Maintenance screen, click the Masks button located in the upper right corner. The Masks window will appear.
STEP 2: Masks Window - Default Settings:
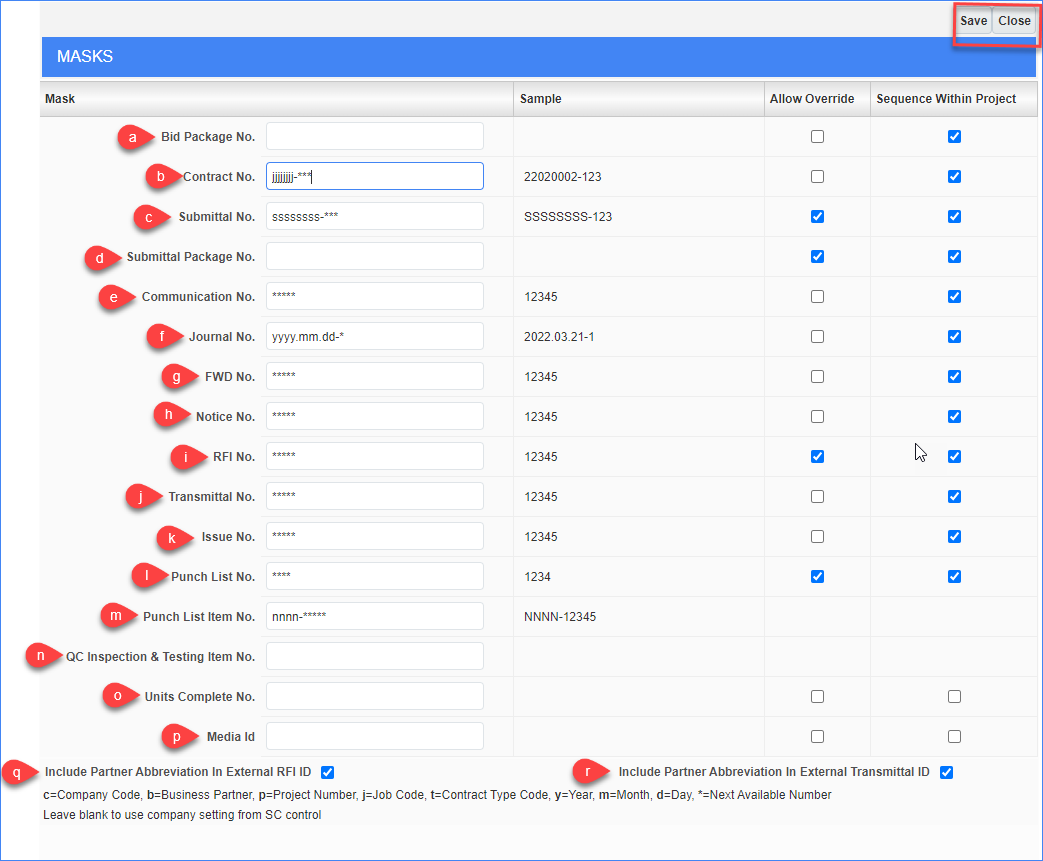
- The Legend for each field is shown at the bottom of the window as you click into each field
- Allow Override Column: if box is checked this opens the numbering field up and allows users to modify/override in entry screen for the noted Mask
- Sequence Within Project: Boxes are all checked by default. This pulls the next number from within your project within that specific module (RFIs, PCIs, OCOs etc).
NOTE: Alphabetical masks must always be entered as lowercase. Otherwise the system thinks you want to print the series of uppercase letters next to the numbering value so uppercase will be assigned to and print out on your forms and documents.
- Bid Package No: Leave Defaults as-is. Bid Package No. is not being used
- Contract No.: Leave as is. This is the default for how Subcontracts / Purchase Agreements / PSA etc will be numbered.
- Submittal No: Default allows up to 8 digit specification section – followed by 3 digit next number next numbers start at 001 and go up to 999 for each different spec section. (Ex: 00150000-001 system will assign preceding zeros.)
- Submittal Package No: Default disables auto-numbering and is assigned by user.
- Communication No: Default set up as 5 digit next number and system assigns a value beginning at 00001 going up to 99999.
- Journal No: Default is a date default followed by a single digit numeric value. The reason it starts with year is for sorting purposes. If date begins with month, then 01-01-10 will fall between 01-01-09 and 01-01-11. (Example: 2011.05.18-1, 2011.05.19-1 2011.05.20-1; in this example May 18, 2011 is followed by May 19, 2011 then May 20, 2011. The actual Journal date is in standard mm/dd/yy format, file name (Journal No. is the default).)
- FWD No: Default set up as 5 digit next number and pertains to the forward function, if a form is forwarded in the system, it assigns a new next number and references the prior form number. (Example: If I forwarded RFI number 00009, the system would create a duplicate of RFI 00009 and assign it RFI 00010)
- Notice No: Default set up as 5 digit next number and system assigns a value beginning at 00001 going up to 99999.
- RFI No: Default set up as 5 digit next number and system assigns a value beginning at 00001 going up to 99999.
- Transmittal No: Default set up as 5 digit next number and system assigns a value beginning at 00001 going up to 99999.
- Issue No: Leave Defaults as-is.
- Punch List No: Not using.
- Punch List Item No.: Not using
- QC Inspection & Testing Item No.: Not using
- Units Complete No.: Not using
- Media ID: Not using
- Include Partner Abbreviation in External RFI ID: It is recommended that this checkbox be “CHECKED”, this affects COLLABORATION users and assigns a unique RFI number consisting of FROM: Business Partner number and a next sequential number as a unique RFI Number. It is helpful to use this function so Swinerton has the opportunity to modify or cancel the RFI prior to pulling the next Swinerton Number. If left unchecked, collaboration users will get the next Swinerton RFI number, however the system will not track any changes Swinerton makes to that RFI prior to sending it to the Architect/Consultant.
- Include Partner Abbreviation in External Transmittal ID: It is recommended that this checkbox be “CHECKED”, affects COLLABORATION users and assigns a Transmittal number consisting of FROM: Business Partner number and a next sequential number as a unique Transmittal Number.
STEP 3: Click the Close button to exit Default Masks and return to Defaults tab in the main Project Maintenance module (object).
OR
STEP 4: MODIFYING MASKS
This section takes you through modifying and removing Auto-Numbering Masks. It is not recommended that Masks be modified but in the event you must modify to be unique to your specific project the following two examples will show you how.
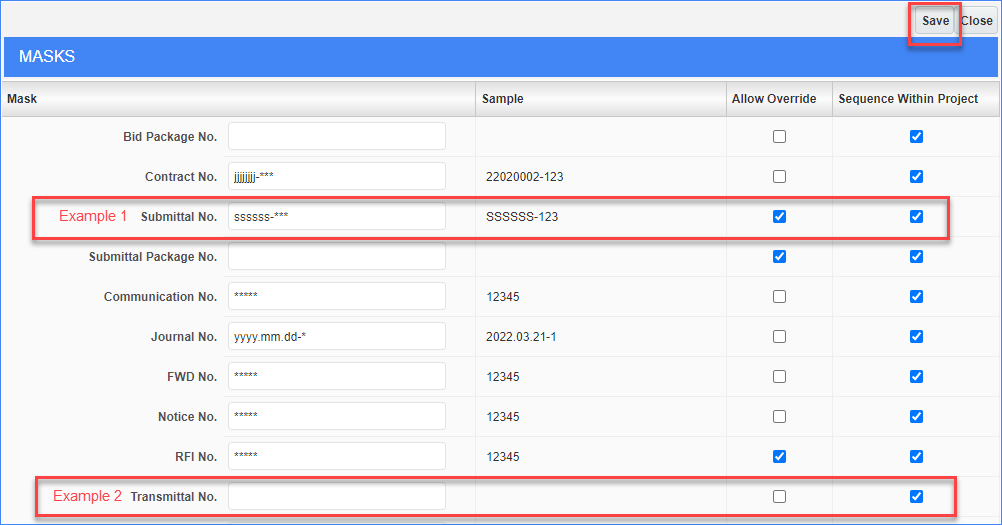
EXAMPLE 1:
I want to change the default 8 Digit Submittal Section to 6 digits following by a 3 digit next number
-
Submittal No Mask: Delete existing mask and type ssssss-***
- Click out of the mask to see the sample update
EXAMPLE 2:
I want to assign my own transmittal numbers
-
Transmittal No Mask: Delete existing mask and leave blank
- Click out of the mask to see the sample update (it will be blank)