Create a New Meeting Track with Agenda
Create a New Meeting Track with Agenda
OVERVIEW
A project has many different types of meetings, such as Weekly Owner Meetings, Subcontractor Meetings, Safety Meetings, and Staff Meetings. CMiC makes tracking meeting information easy by providing for different meeting tracks and frequencies. Each meeting tracks attendees, agenda items, their status, and responsible parties.
Go to the Daily Documentation page on SwinNet for more information and best practices related to Meeting Minutes
Go to the Pre-Installation Meetings page on SwinNet for Instructions and an Agenda template (word document)
STEP 1: Click on Communication Management
STEP 2: Click on Meeting Minutes
STEP 3: Click Add Meeting

STEP 4: In the Meeting Minutes screen update the following fields in the Create New Meeting section
-
Track: Click on the Arrow to view the drop down menu and select the Track type of Meeting Minutes are being entered. For this example we will use OAC. This track name will print at the top of the Meeting Minutes report.

-
Subject: Enter Title/Subject for the Meeting Track. Example: "Project Number - Project Name - Weekly OAC Meeting"
- Location: Where will this meeting typically be held
- Meeting Date: Date of the 1st meeting in this track (if unknown, this can be updated later)
- Start Time: Time the meeting will start
- End Time: Time the meeting is scheduled to end
-
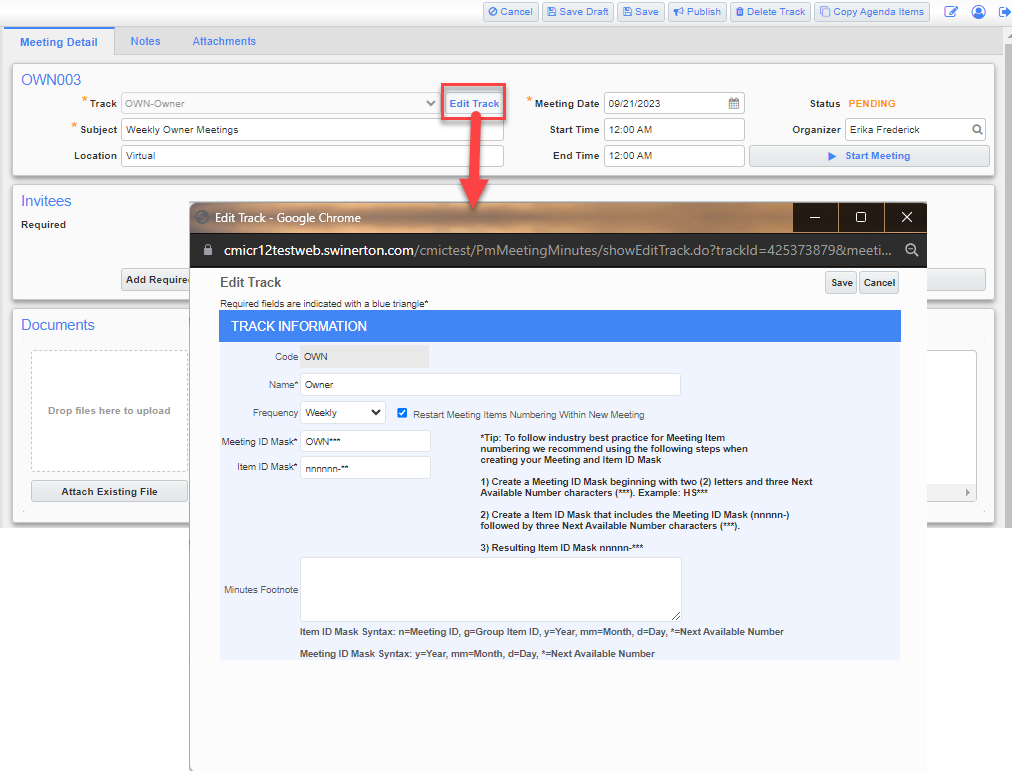
NOTE: While in Edit Mode, you can click on the Edit Track button next to the Track field to edit the Name, Frequency, Meeting ID and Item ID sequencing format (aka Mask), Footnote for your Track. For example, if you want to allow for more than 99 allowable Items to be added in one meeting, add a third asterisk to the convention depicted in the Item ID Mask field.
STEP 5: Click Save

STEP 6: Click Edit in the newly created OAC001 and go to the Invitees section
STEP 7: Click the Add Required Attendees button
STEP 8: In the pop-up window select all required attendees using either Project Contacts or Distribution Lists and click Accept

STEP 9: Repeat step 8 for Add Optional Attendees if needed for your meeting

STEP 10: Click Add Guest if you know you have a guest coming to the meeting. This can also be done later when updating the meeting minutes.
NOTE: Guest is not a project partner but a manually entered person. When Guest is selected, the Name field turns into a free form field.

STEP 11: Once all Invitees have been entered, click Save Draft
STEP 12: Scroll down to the Agenda section and click Add New Topic

STEP 13: Click on the magnifying glass to open a complete list of available topics

STEP 14: If there are topics you need on your meeting minutes that are not listed, click on Add Topic.
- Enter in the Order Num (the order that the Topics will print on the meeting minutes - if left blank they will print alphabetically).
- Enter in the new Topic
- Click Save

STEP 15: Once you have created all additional topics needed, the Topics need to be ordered. To do this, click on the Pencil icon to the left of the Topic Name. Then, enter a number in the Order Num field. Repeat until all topics are numbered then close out of the window.

STEP 16: Next Step is to Create the Agenda
STEP 17: Add New Topic and fill in all the blanks. Note that fields with magnifying glass must use the search function (Topic and Responsibility fields).
- Add a Topic
- Add Agenda Item
- Assign Responsible Company
- Assign Responsible Person
- Update Status as needed
- Enter Due Date (if there is one)
- In the Minute section, enter any items you want included in the initial agenda. For more details go to the Update Meeting Minutes how-to guide.

STEP 18: Once this item is complete you have 2 options:
1. Click Add New Item to add an addition Agenda Item within the current Topic (repeating steps 17b-17g)
2. Click Add New Topic to create a new section then repeat all of Step 17
STEP 19: Once all Agenda items have been added click Save
STEP 20: Click Start Meeting near the upper right corner

STEP 21: A few things happen at this point:
- The Status will change from Pending to Active.
- The Create Next Meeting button will appear at the top of the screen
- The Next Meeting Date & Time will appear. It will default to 7 calendar days from the current meeting date. If this is incorrect or needs to be changed, click Edit at the top of the screen and an Edit button will appear. Click on it to update the information as needed.

STEP 21: Click the Print Report button in upper right corner to print your agenda.
STEP 22: Report Type should be "Meeting Minutes", then click Print, then Run Report to generate the Meeting Agenda as a PDF

NEXT STEP: After you hold your meeting, click here for How-To Update Meeting Minutes