Create a New Daily Journal in CMiC
How To Create a New Daily Journal in CMiC
OVERVIEW
Daily Journals can only be backdated one week, can be created for the current date and one week into the future. It is recommended that Daily Journals are opened for a week in the future at all times. Best practice is to have no more that 7 open / unsubmitted Daily Journals. Click HERE to see how to filter for Pending Daily Journals.
The following walks through the complete process of creating and submitting a daily journal in CMiC
STEP 1: Click on the plus 4 next to Site Management
STEP 2: Click on Daily Journal
STEP 3: Click the Add Daily Journal button in the upper right hand corner of the screen The new Daily Journal form will open.

STEP 4: Enter the Information at the top of the form:
Daily Journal Number: This defaults to the date of the daily Journal-1 and can't be edited.
NOTE: If your project has multiple buildings / areas and requires there to be multiple daily journals each day you must submit a ticket. If your site has multiple superintendents follow these instructions.
Date: This defaults to today’s date. NOTE: This date can be backdated up to 7 days or forward dated up to 7 days.
Prepared By: Defaults to your name. This can be changed to any contact assigned to the project by clicking on the magnifying glass. This should only be changed if you are entering the Daily Journal information prepared by someone else.
- Low Temperature: Enter the low temperature
- High Temperature: Enter the high temperature
Wind: Click the magnifying glass and choose the appropriate wind from the list of values. Do not add new values to this list.
Sky: Click the magnifying glass and choose the appropriate sky from the list of values. Do not add new values to this list.
- Potential Weather Impact: Check this box if there was a potential weather impact (rain, wind, snow etc) to the project on this date.
- Precipitation: Enter the precipitation in inches

STEP 5: Enter the Information in the Daily Journal Detail Tab. For all fields, click in the box and begin typing.
Activities: This field is for general activities on the project for that date. DO NOT put a list of subs and man count here. Those will be entered in the Field Labor tab (see STEP 7)
Inspections: Enter inspections
Deliveries: Enter deliveries
Delays/Impacts: Enter Delays/Impacts. Be sure to include PCI number if appropriate
Field Directives/Extra Work: Enter Field Directives or extra work performed. Be sure to include PCI number if appropriate
Overtime: Enter any overtime performed
Visitors: Enter visitors
STEP 6: Click the Save Draft button in the upper right hand corner of the screen.
NOTE: Best practice is to always save your work before changing tabs in any CMiC module.

STEP 7: Click the Field Labor Tab. This is the area where all Subcontractors, Suppliers and Vendors will be added. Additionally, any admin or field labor for our company is listed here. The hours worked and activities are tracked here for each company.
NOTE: The orange Not Submitted flag has appeared at the top of the Daily Journal. This will remain on the screen until the Daily Journal is submitted. A daily journal is locked once it is submitted. Daily Journals should not be submitted until they are complete.
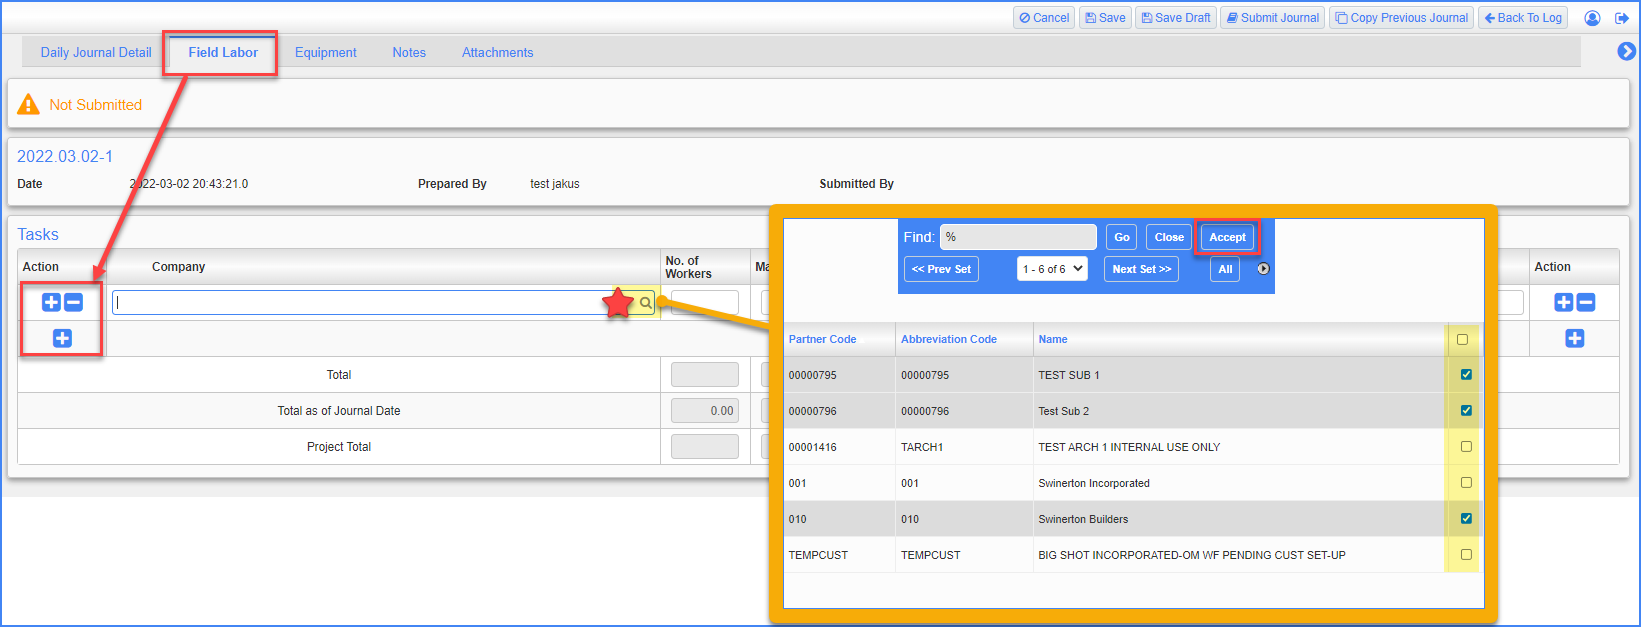
STEP 8: Click the blue plus (+) sign under Action to add the companies working on site for this day.
STEP 9: Click on the magnifying glass in the Company field to view a pop up window with the complete list of companies listed in the project directory. If a company is missing, coordinate with your field admin to have the directory updated.
STEP 10: Select ALL companies that were onsite this day (including us) and then click Accept.
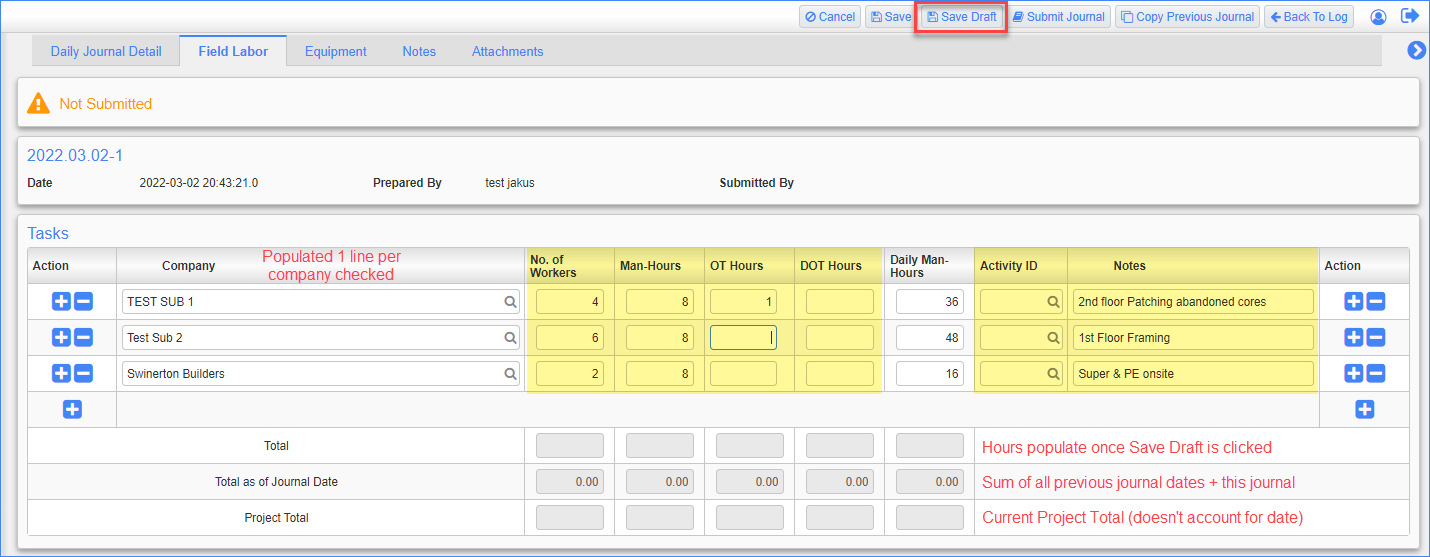
STEP 11: Enter Number of workers, Number of Hours worked (Per each worker), Overtime (OT) hours if appropriate, Double Overtime (DOT) if appropriate. The totals will be automatically calculated based on the number of workers times the hours entered. Hours entered are applied to all workers. If some workers work a different amount of hours than others, they will need to be entered on two separate lines by adding the company name again.
STEP 12: Activity ID: If the project schedule activity IDs were entered in job set up, then the list of values for project activity IDs will be available. Click the magnifying glass to select the appropriate activity the Company on that line was performing on that date. This functionality is limited to only one activity per line/Company.
STEP 13: Notes: Enter detailed information of what activities each company performed, in what areas, pertinent facts and information.
NOTE: The data entered here will then populate on the Daily Journal Log - By Subcontractor. Click HERE to learn more.
STEP 14: Once all Labor Hours, Activities and Notes are entered for all companies, click the Save Draft button on the upper right hand corner of the screen.
STEP 15: Click the Equipment Tab. This is where all equipment is listed.
STEP 16: Click the blue plus (+) sign to add Equipment.
STEP 17: The following fields will appear to allow equipment to be entered: Owner, Equipment, Hours & Description.
STEP 18: Click the magnifying glass and a pop-up box will appear. Select the Company that owns or rented the equipment.

STEP 19: The Company code will appear in the Owner field You can now enter the Equipment name, Hours worked and appropriate Description.
STEP 20: Repeat Steps 16-19 to add more equipment.
STEP 21: Once all Equipment is entered, click the Save Draft button on the upper right hand corner of the screen.

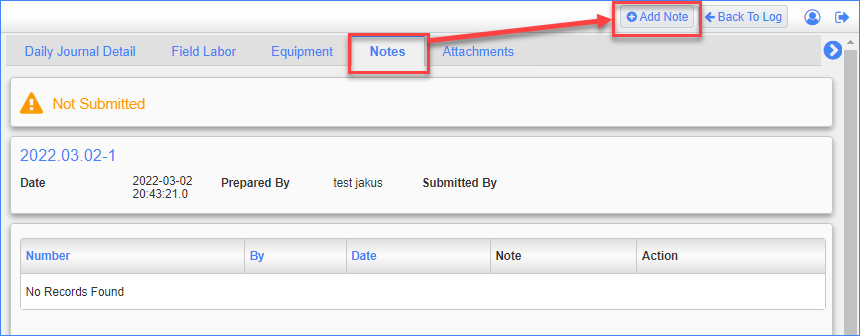
STEP 22: If Notes need to be added to the Daily Journal, Click the Notes tab then click Add Note.
NOTE: Notes can be add to BOTH open and submitted Daily Journals. A good example for adding a note to a submitted Daily Journal would be to note concrete break results for a pour day.
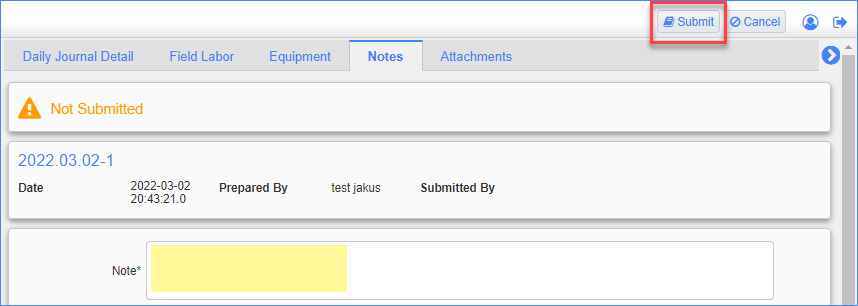
STEP 23: Enter notes in the Notes field and click Submit.
STEP 24: If Attachments such as Photos or Subcontractor Daily Reports need to be added to the Daily Journal, Click the Attachment Tab. The Bluebeam Review button does not work. Click HERE for more info.
NOTE: Documents, photos & reports can be attached to the Daily Journal even after it is submitted.
STEP 25: Click on Upload Multiple and drag and drop the documents onto the pop up screen and click Upload
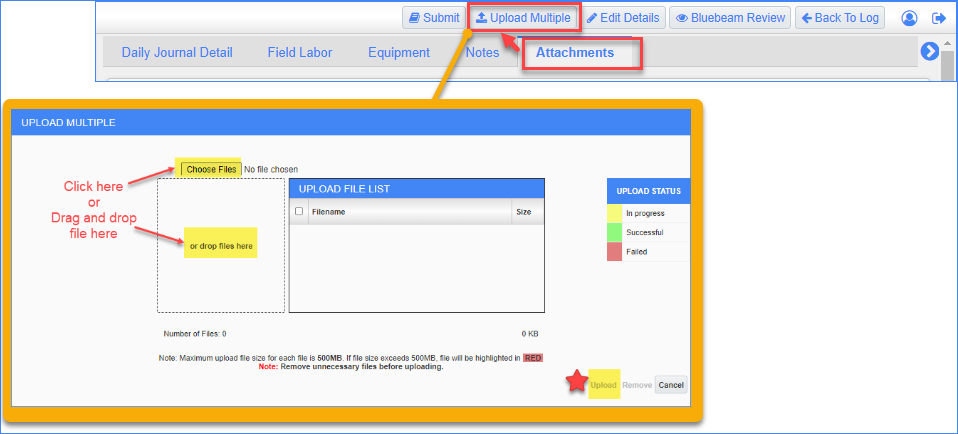
STEP 26: Click Proceed on the next screen and now your documents are shown in the Attachments tab.

STEP 27: Review all the data entered and when COMPLETE, click the Submit Journal button in the upper right hand corner of the screen. The Daily Journal is now submitted and LOCKED.
NOTE: The only modifications that can be made to a SUBMITTED and LOCKED Daily Journal is adding a note or additional attachments.
