Print a Commitment from CMiC
Print a Commitment from CMiC
The following commitment agreements should be printed from CMiC:
- Professional Services Agreement
- Purchase Order Agreement
- Short Form Agreement
- Work Order to MSA - SB
- Work Order to MSA - Self Perform to Sub Tier - SB
The following commitment agreements are entered as a commitment in CMiC but DO NOT print from CMiC. You will need to go to the Legal - Subcontractors, Vendors & Designer Contracts.
- Contract Labor Agreement
- Design Build Agreement
- Peer Review Services
- Rental Agreement
- Teaming Agreements
- Trucking Agreements
NOTES:
- Click HERE for the How-To document for setting up project defaults. Pay specific attention to Prime Contract # and Prime Contract Date on the Project Maintenance/General tab as this information prints on the Commitments.
- Click HERE to make sure you have assigned only one Business Partner to the “Owner” group and only one Business Partner to the “Architect” group. The Group is assigned by clicking on the Pencil icon. These Business Partners print on the Commitment Agreements and will not auto fill if more than one is selected.
-
Click HERE for the How-To document for setting up Sub-To-Self project defaults. Pay specific attention to the Customer and the Project Owner fields as this information will modify what prints on the Commitments.
STEP 1: Click on the Specific Commitment you are working on.
STEP 2: Confirm the following information:
-
Status: If you are printing a draft, the Status is “Pending”. If you are printing to send to Vendor for signature, then the Status must be “In Process” (which means the commitment is posted).
-
Workflow Status: If you are printing a draft, the Workflow Status is “Pending”. If you are printing to send to Vendor for signature, then the Workflow Status must be “Approved”.
-
SOV Section: The Amount, Phase and Category field must be completed


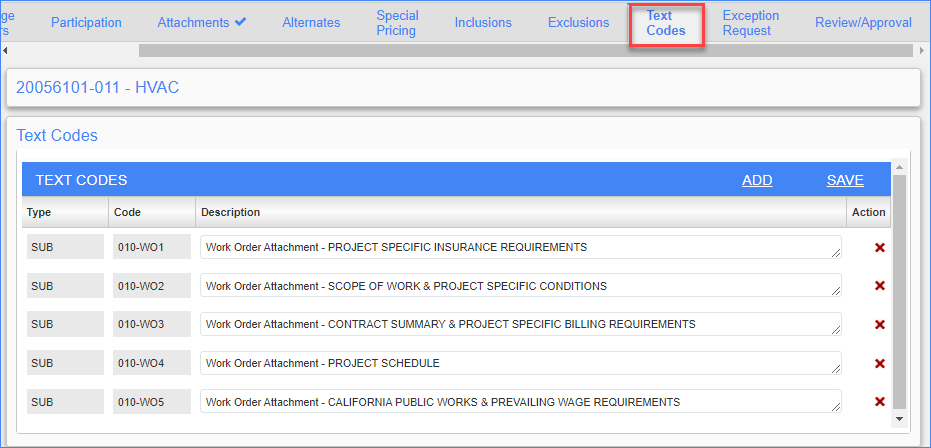
STEP 3: Check that the Text Code tab should have listed:
- All the appropriate attachments to be included with this commitment should be listed. If any appear to be missing, reach out to the project's PM.
- Remember, if your project is bonded or has certify payroll, the check boxes for those attachments are at the very bottom of the Task Codes list.

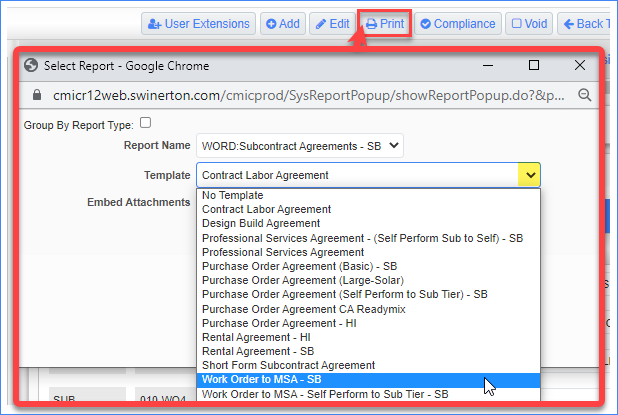
STEP 4: Once you have confirmed this information is all listed, click the Print button.
STEP 5: Report Name should remain “WORD: Subcontract Agreement-SB”.
STEP 6: Select the Template for the agreement type you need to print

STEP 7: Click Print

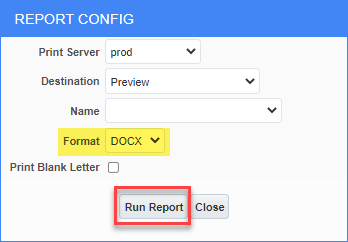
STEP 8: on the Report Config Screen, ensure the
Format is set to
DOCX
STEP 9: Click Run Report

STEP 10: Open or Save the new Downloaded commitment
As a reminder, commitment documents that are printed out of CMiC are locked for editing. There are small sections on some of the commitments that can be modified, based on project specifics (see Work Order exceptions below as an example). It is important for Projects to be set up correctly in the system in order for the commitments to print correctly.
STEP 11: For a Work Order. Complete the highlighted fields:
- If Architect does not pull in from CMiC (often on SPD or SPW jobs). simply add in "N/A on this project" (don't forget to remove the comma).
- Enter the MSA date for the Subcontractor (the MSA Issued Date can be found HERE).
- Enter date for each Attachment that is checked. (Reminder: the “X” in the box for Attachments comes from the Text Code tab on each commitment).
- When using the Public Works and Prevailing Wage attachment, update whether they are Public or Private Requirements.

NEXT STEP: Distribute a Commitment via Docusign