Create a Commitment (Part 1 of 3): Completing the Subcontract Detail Tab
Create a Commitment (Part 1 of 3): Completing the Subcontract Detail Tab
Overview
Project Managers enter key information into CMiC and initiate Workflow. The workflow will facilitate the initiation, production and review of commitments. It is the Project Manager’s responsibility to manage the commitment process from start to final execution. Click HERE to see the Commitments Roles and Responsibilities.
NOTE: The following items MUST be completed / reviewed PRIOR to creating the first commitment.
Project Setup:
- The Project Maintenance defaults tab MUST be complete prior to starting a commitment workflow. Click HERE for the How-To document for setting up project defaults that relate to Commitments.
- Self Perform Projects - An additional step is required when setting up the Project Maintenance for a Self Perform project. Click HERE for the How-To document for setting up project defaults.
Regarding Vendors:
- All Subcontractors must have a executed Master Subcontract Agreement on file in order to issue a Project Specific Work Order. If you do not know which type of commitment to issue, please see the explanation of the different types HERE.
- All Subcontractors must be prequalified prior to starting the commitment entry process. The commitment will not save if the Subcontractor is not prequalified or the prequal has expired. Review the Vendor Prequalification Flowchart and how to Check the Status of a Subcontractor's Prequal for more information.
-
Encourage the Subcontractor to go to the Self-Service Prequalification site located in the SubCenter section of www.Swinerton.com. Link: https://swinerton.com/subcontractors/
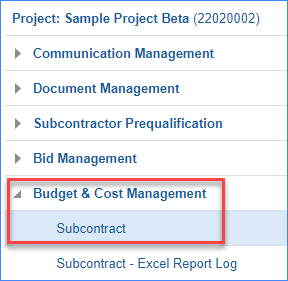
STEP 1: From the tree view, go to Budget & Cost Management 4 Subcontract
STEP 2: Click the Add Subcontract button on the top right of the screen. This will open a new Commitment in the Edit mode. 
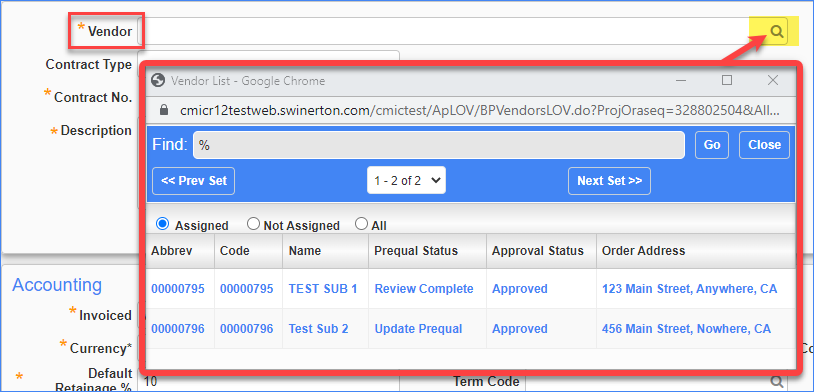
STEP 3: Click the magnifying glass to the right of Vendor
- The pop-up Find box will default to search the Assigned Vendors. If your vendor isn't showing go back and add them to the project directory. Once assigned to the project then you will find them here. (NOTE: You can all search for vendors under Not Assigned or All.)
- Click on the Name of vendor you are selecting for this commitment.
- The pop up window will close and the Vendor box will be populated with the vendor you selected (it will show the vendor code).
STEP 4: Select
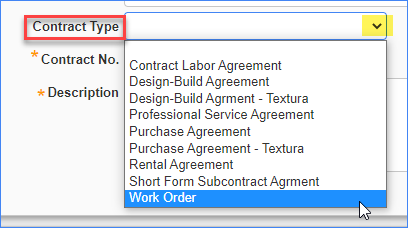
Contract Type from drop down menu.
If the subcontractor has onsite labor, a Work Order must be issued. Click
HERE to see an explanation of available contract types. Click
HERE to learn more about Rental and Purchase agreements.
STEP 5: The Contract No. field is auto populated with the next available contract number. This field cannot be edited. Contracts are numbered with the Job Number and the next available sequential number
STEP 6: Enter Description field. This field appears in the CMiC log view and does not print on the agreement. (Example: "Drywall")
STEP 7: The Status field changes based on posting status. You do not need to change this field manually as workflow will change it
- Pending = Not Posted
- In Process = Posted
- Closed = Commitment completed and closed
- Void = Commitment voided
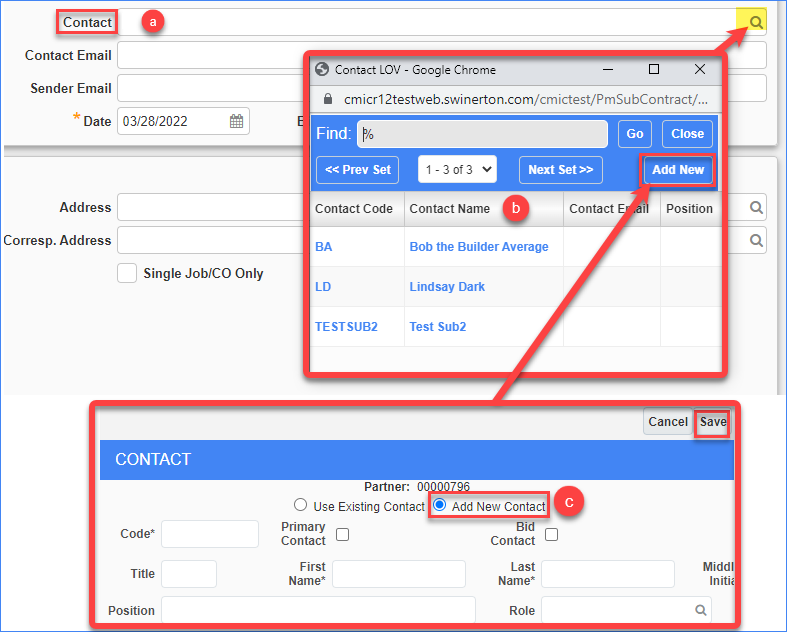
STEP 8: Click into Contact field. This Contact will be the name on the Commitment and any subcontractor change orders assigned to this Vendor.
- If a person has been added as a primary contact in the Project Partner Directory, then the Contact Code will automatically fill into this box.
- If a contact does NOT auto-fill or you want to change the Contact, click the magnifying glass in the Contact field. A list of available contacts will appear. Select one name by clicking on the blue words under Contact Name.
- If the Contact you need is not listed, click the Add New button. In the pop-up window, select Add New Contact and follow the directions per the Add Project Contacts how-to guide. REMEMBER: when adding someone for the first time this will become the CMiC System Wide default information.
STEP 9: DO NOT CHANGE the Date field as it is intended to be the date the record was created. Use the “Issued Date” in the Key Dates Section to specify the actual document date to be printed on the commitment.
STEP 10: Enter the Bid Amount (Optional)
STEP 11: Review and update the Accounting Section if needed
Invoiced field should default to Via – Subcontract. DO NOT CHANGE.
Currency field should default to US Dollars and should not be changed.
Default Retainage is 10%. Change only if special terms are agreed upon (typical with rental & purchase agreements) or owner contract is different.
Deposit Amount: enter if applicable to contract
-
Down Payment Percentage: enter if applicable to contract. NOTE: this is diiferent than a mobilization fee which would be part of the standard SOV.
- SOV Level Retainage Release option is not used.
Bank Account & Bank Department fields are not used.
Term Code: use the magnifying glass to open a pop-up window with available options. NOTE: For Work Order contracts, term code will typically be SUB - Subcontractor, Pay When Paid. For all other contracts, select the agreed upon term.
Address field defaults to the Remit address managed by Corporate Accounting. DO NOT CHANGE.
Corresp. Address is an alternate address to be used for all correspondence including this agreement. To add a new correspondence address, please click
HERE for the how-to guide.
Default Taxes option is not used.

STEP 12: Review and update the User Defined section if needed
Enter Committed Delivery Date field when issuing a Purchase Order Agreement as it will print as the Delivery Date. Do not use for other agreements.
Confirm the Subcontractor’s Single Project Limit will fall within the requirements of the contract value. (i.e. will not exceed the maximums of the “Limits Remaining”). This information populates from the Prequalification information for the vendor. If the contract value exceeds the maximum, complete the Exception Request tab defined later in this document.
The Financial Exception Request and Safety Exception Request fields will auto-populate once you add the SOV and click Save Draft.

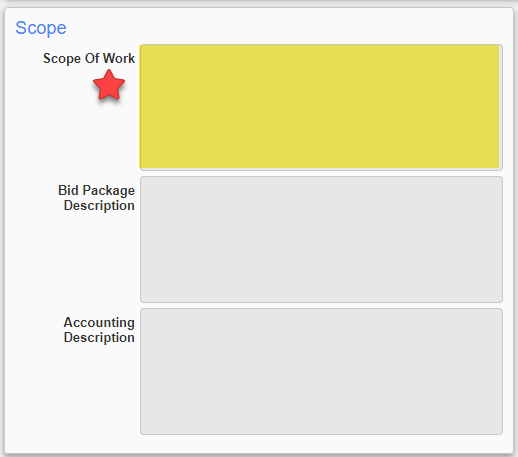
STEP 14: Update the Scope section
STEP 15: Update the Key Dates Section
Enter a Start Date for this agreement.
Enter an End Date for this agreement.
Enter the Issued Date of this agreement. It will print as the “Contract Date” on the agreement cover sheet.
The Received Date is entered by the Field Admin only after the agreement is received back signed by the Subcontractor but not yet fully executed by Swinerton.
The Executed Date is entered by the Field Admin only after the agreement is fully executed by both parties. This date affects progress payments to the Subcontractor.
STEP 16: Review and update the Payments section if needed
Pay when Paid field is defaulted to be checked. DO NOT CHANGE. This is managed by Corporate Accounting.
Hold Payment for X Days are not used. DO NOT CHANGE. This is managed by Corporate Accounting.
Check Hdl. DO NOT CHANGE. This is managed by Corporate Accounting.
CDI (Subguard) is a view only field and is checked by default. CDI stands for “Contractor’s Default Insurance” (aka Subguard). If a Subcontractor is not a part of CDI, then complete the Subguard waiver process. (Unless the sub is a Sub To Self Business Partner - CLICK HERE for more detail)
Compliant is a view only field and will be checked when the vendor is compliant. This field becomes active upon saving the agreement.
STEP 17: Click the
Save button in the upper right corner of the screen.

You have completed the major information of this commitment on the Subcontract Detail tab.
Click HERE to view the next step - completing the SOV for this commitment.