Manually Add a Phase / Category in Bid Items
Manually Add a Phase / Category in Bid Items
This procedure can only be completed before your budget has been locked by your Financial Manager. Once your budget is locked, new phase/category codes and budgets can only be added via PCI. Click here to view the solution to Add a Phase/Category via PCI.
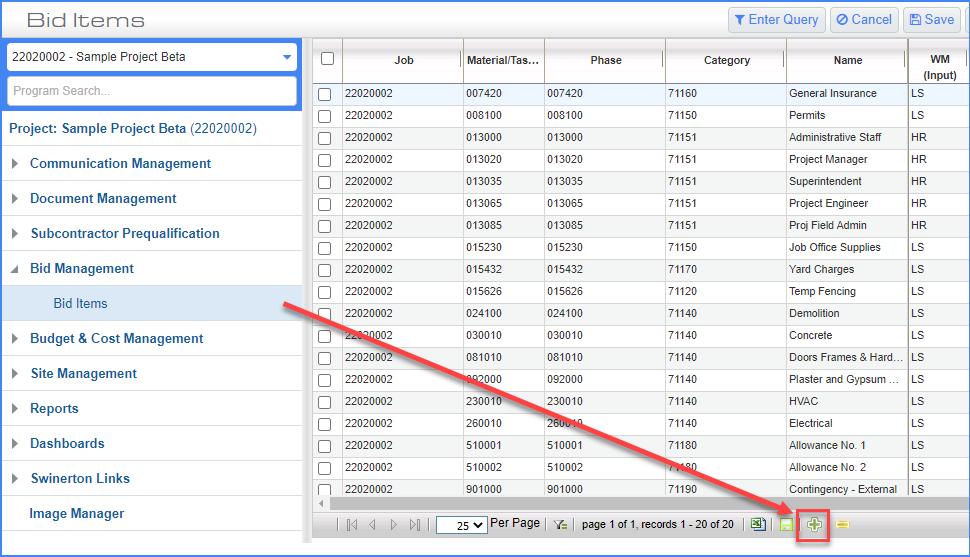
STEP 1: From the Bid Items Screen, click the (+) link at the bottom of the screen.
STEP 2: Enter on your Project Number that auto populated and click the Tab key to move to the next column
STEP 3: Leave the Material/Task field blank, click the Tab key
STEP 4: Click the magnifying glass in the box for Phase code
STEP 5: In the popup window enter the desired information into the Find: field. Example (Enter "32%" for division 32). Click Go or Enter
STEP 6: Click the desired Phase Name (example: Exterior Improvements, Landscape Maintenance, etc). The popup will close automatically.
STEP 7: Copy and Paste the populated 6 digit Phase code into the Material/Task Column

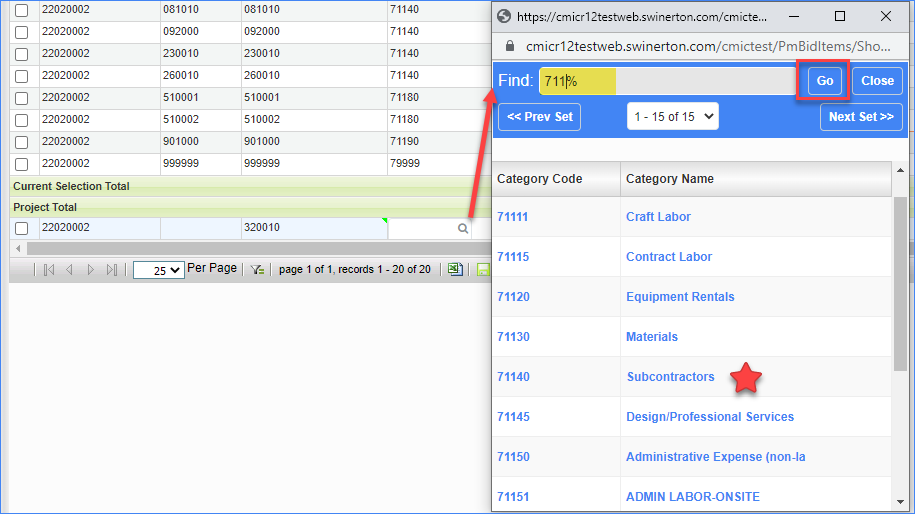
STEP 8: Click the magnifying glass in the box for Category code
STEP 9: In the popup window enter the desired information into the Find: field. (Example: 71140 for a subcontractor). Click Go or Enter
STEP 10: Click the desired Category Code (example: Craft Labor, Materials, Subcontractors, Admin Labor-Onsite, etc). The popup will close automatically.
STEP 11: Enter the Item Name. This should be your Phase Code Description. Click Tab
STEP 12: Click the WM (Weight Measure). Typically lines are going to be Lump Sum (LS). Use the magnifying glass to select your type. Click Tab
STEP 13: Enter the Phase Type (Typically GC, GR or blank)
STEP 14: Enter the Retainage % (best practice is to match the rest of your contract retainage rate)

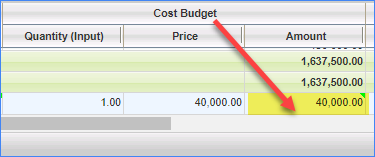
STEP 15: Click the Cost Budget Amount. The Quantity and Price will autofill. (If this is a Labor Productivity project then the quantity would be the hours it was going to take to complete and the price would be the budgeted amount per hour.)
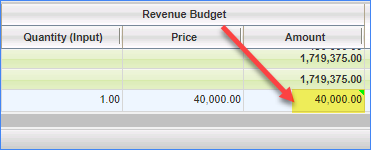
STEP 16: Enter the Revenue Budget Amount
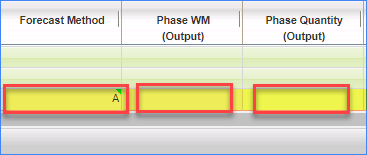
STEP 17: Enter the Forecast Method.
"A" for all projects except Labor Productivity (skip to step 20)
"P" for all labor productivity projects (go to step 18)
STEP 18: The Phase WM (Output) is for labor productivity projects only. This would be for LF, SF, CY etc. You can click the magnifying glass for all options.
STEP 19: The Phase Quantity (Output) is for labor productivity projects only. It is the total amount to be completed by the end of the project. (Ex.: 2400 CY of concrete)
STEP 20: Click the Save button at the top of the screen and confirm your new line item was added successfully (It will be the bottom line)

STEP 21: Click the checkbox on the left-hand side (ONLY FOR THE NEWLY ADDED LINE)

STEP 22: Click the Update Budget

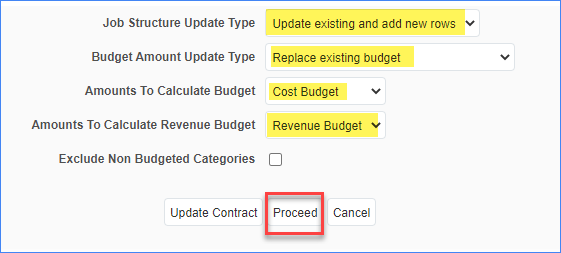
STEP 23: Confirm the 4 highlighted items match the screenshot below (these should be the default)
STEP 24: Click Proceed
STEP 25: Return to Bid Items
STEP 26: Click the Select all check box.
STEP 27: It will ask you if you want to select all items from all pages for this update. Click the OK button.
STEP 28: Click the Update Budget button at the top of the screen
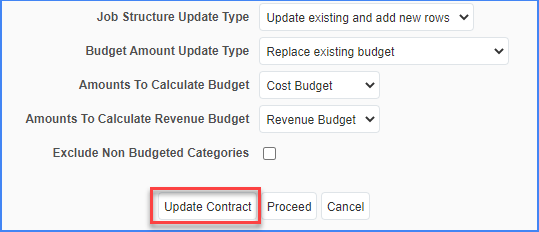
STEP 29: In the Popup Window, click Update Contract
STEP 30: Click Proceed
