Goods Out - From Inventory
Notes: Goods Out – From Inventory is used two remove items from inventory. It is critical not to dispose of Capitalized Assets that have not been fully depreciated without discussing with your Controller or the Fixed Asset team (fixedassets@swinerton.com).
Non-Capitalized Assets: items that are paid for at time of purchase and the cost is recognized in the Over Head Business Unit or the Project that purchased the asset. When non- capitalized items are disposed, there is no expense associated with the disposal and the non-capitalized item is therefore just removed from inventory without any cost transactions hitting the GL.
Capitalized Assets: items that are expensed over the life of the asset. In other words, the cost is recognized in small increments when asset depreciation is run each month. When a capitalized asset is disposed, there will always be a GL transaction that clears off the expense of that asset off of the Balance Sheet. Regardless of whether or not the asset is fully depreciated, there is always an accumulated expense that is included in the balance sheet that needs to be zero’d out if a capitalized asset is being disposed of. Whether you are disposing a non-capitalized or capitalized asset, you will use the same Goods Out – From Inventory disposal process. As mentioned in detail above the difference between the two is that the Capitalized asset will generate and integrate a GL expense transaction to CMiC and a Non-Capitalized will not generate any GL transactions.

STEP 1: Click Asset Ops
STEP 2: Click Goods Out - To Inventory

STEP 3: Click Create New
STEP 4: Enter a short description of reason for the Goods Out from Inventory transaction and click enter on your keyboard
STEP 5: Click OK

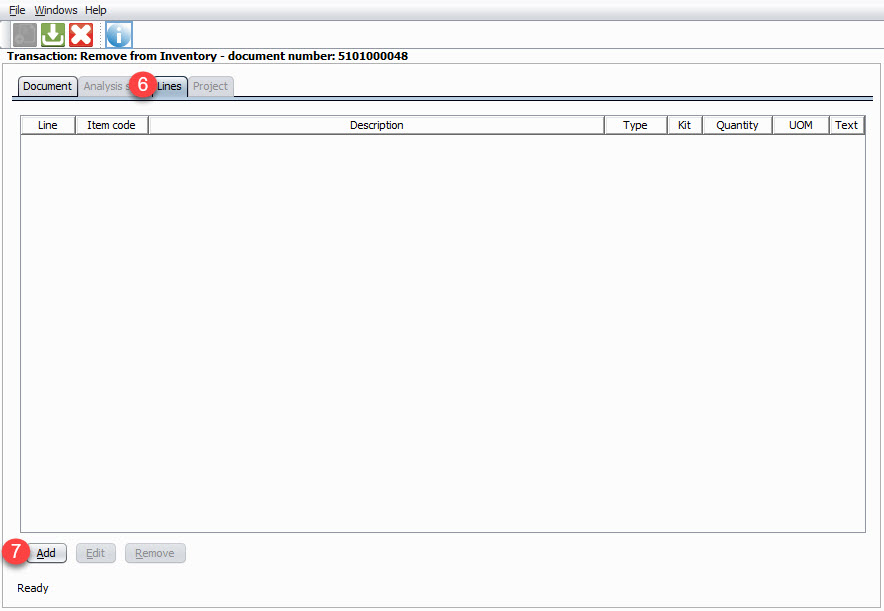
STEP 6: Click Lines tab
STEP 7: Click Add

STEP 8: Enter the Item code you are disposing
STEP 9: Enter the quantity of that item code you are disposing
STEP 10: Enter any additional information pertinent to this disposal (optional)
STEP 11: Click Close to Save

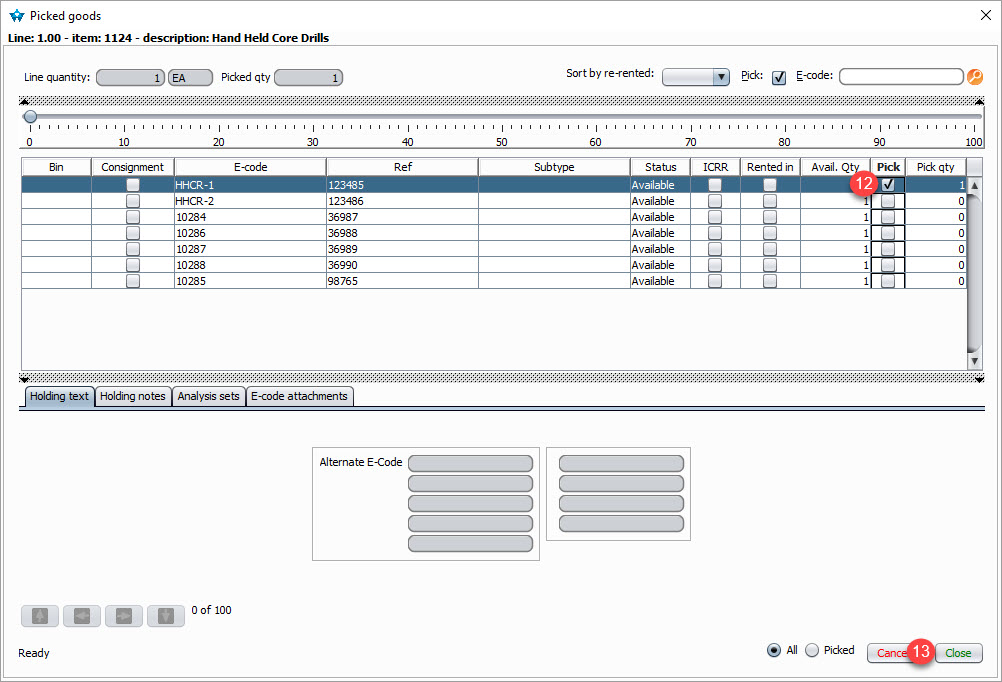
STEP 12: Click the check box in the Pick column of the E-Code and Ref number for the Item you are disposing of
STEP 13: Click Close to Save

STEP 14: Click the Close and Save Icon
STEP 15: Click Yes

STEP 16: Choose Preview document
STEP 17: Click OK to open the PDF
STEP 18: Save the document if required