Company Maintenance - Closing a Period
Company Maintenance - Closing a Period
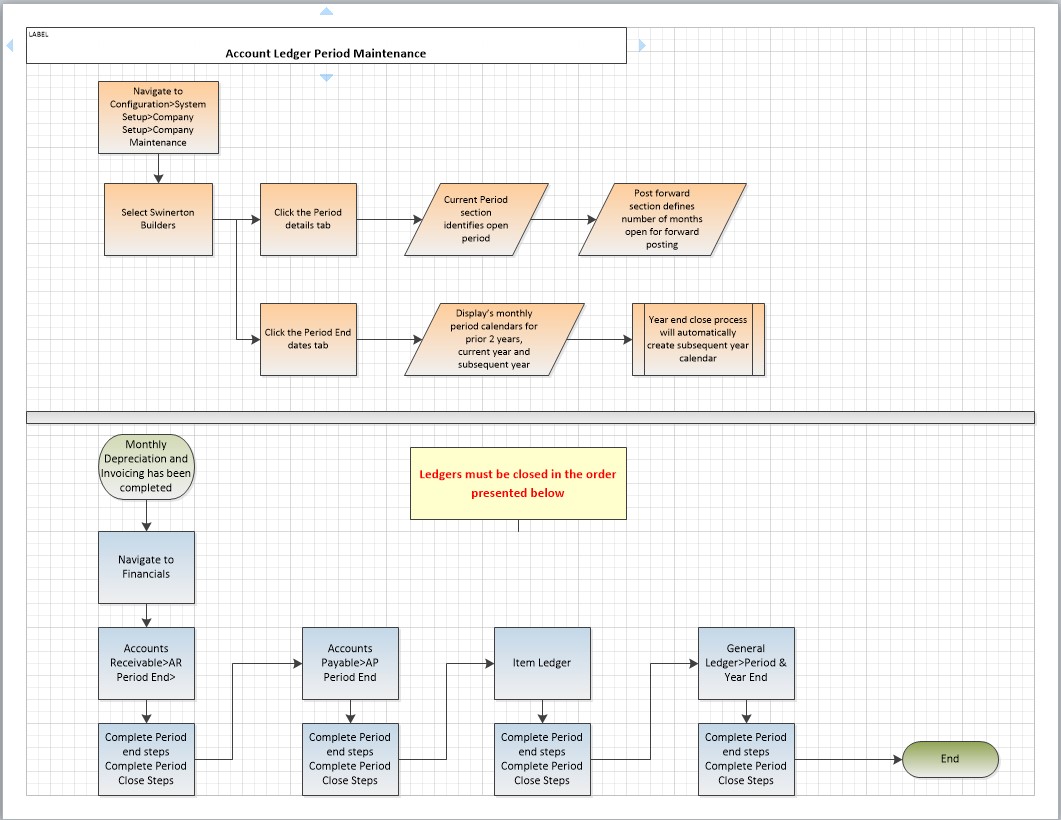
NOTE:This document is a guide for the Finance Department in maintaining account ledger periods (opened/closed) in Rental Results. There are four (4) ledgers used in Results, AR. AP, Item and GL. Each ledger period must be Ended and Closed to move the period calendars forward. The flowchart below is a high level view of the process. This material is based on the current Workshop Environment set up.
Each Ledger must be closed in the following order AR, AP, Item and GL. You cannot close GL if one of the other ledgers is still open. If there are any open transactions found when attempting to close any of the ledgers, these transactions must be completed using the “Utilities>Financial Batch Recovery” steps.
STEP 1: Log into Rental Results CORE
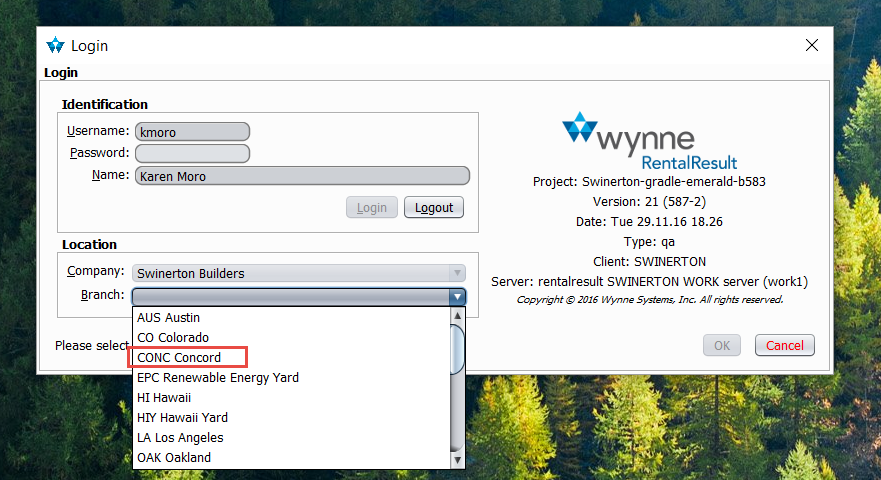
STEP 2: Choose Concord as the Branch
Closing AR
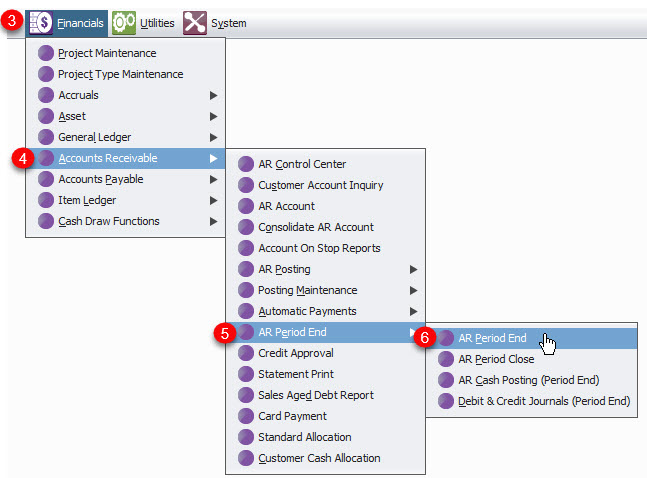
STEP 3: Click Financials
STEP 4: Click Accounts Receivable
STEP 5: Click AR Period end
STEP 6: Click AR Period end
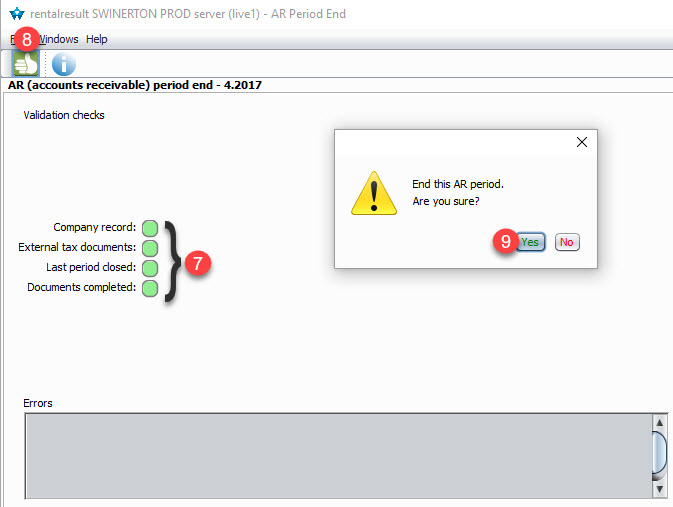
STEP 7: Validate that all checks are Green
STEP 8: Click the "Thumbs Up" icon
STEP 9: Click Yes
STEP 10: Click the X to exit
NOTE:Transactions that have not been completed or previous periods that have not been closed would be reflected with a “RED” circle. These transactions need to be completed prior to continuing with the current processes. The same applies to the Period Close processes
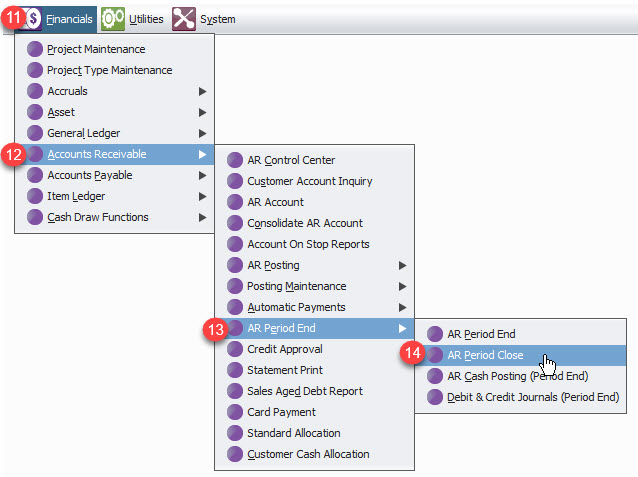
STEP 11: Click Financials
STEP 12: Click Accounts Receivable
STEP 13: Click AR Period End
STEP 14: Click AR Period Close
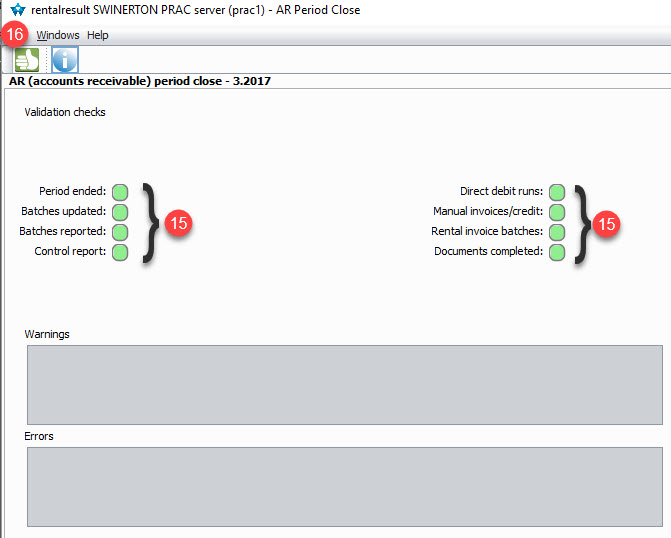
STEP 15: Validate that all boxes are Green
STEP 16: Click the "Thumbss Up" icon
STEP 17: Click Yes
STEP 18: Click the X to exit
Closing AP
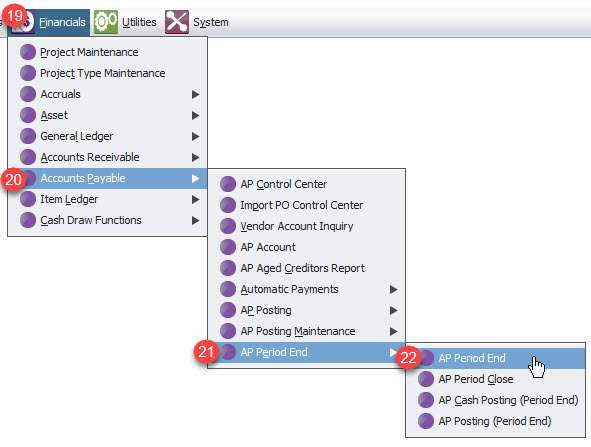
STEP 19: Click Financials
STEP 20: Click Accounts Payable
STEP 21: Click AP Period End
STEP 22: Click AP Period End
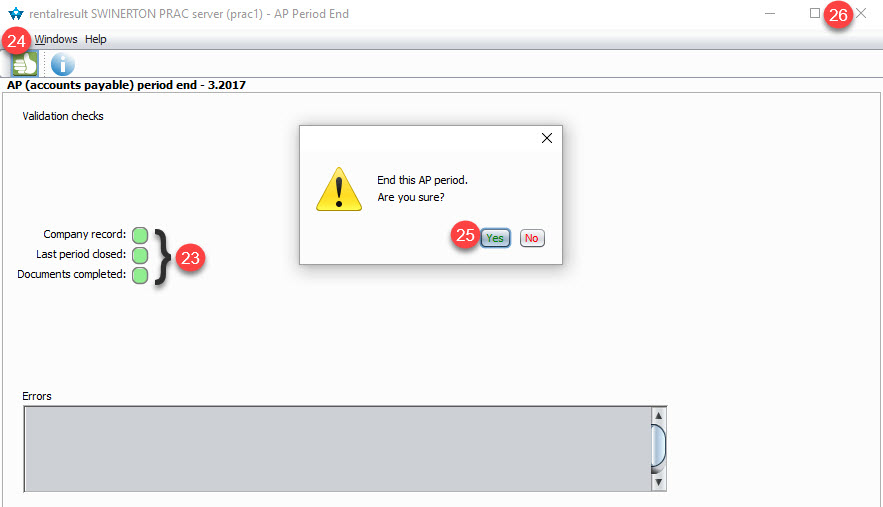
STEP 23: Validate that all boxes are Green
STEP 24: Click the "Thumbs Up" icon
STEP 25: Click Yes
STEP 26: Click the X to exit
NOTE:Transactions that have not been completed or previous periods that have not been closed would be reflected with a “RED” circle. These transactions need to be completed prior to continuing with the current processes. The same applies to the Period Close processes
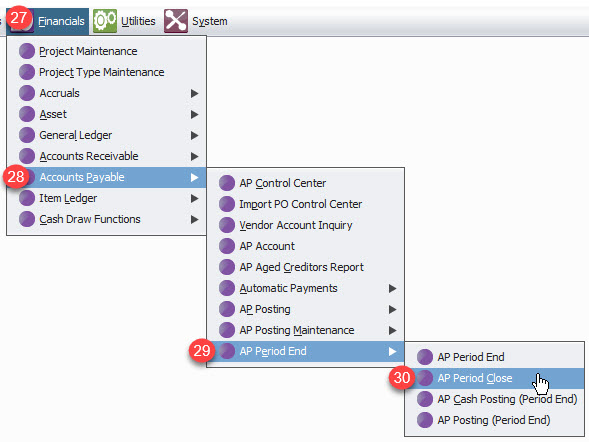
STEP 27: Click Financials
STEP 28: Click Accounts Payable
STEP 29: Click AP Period End
STEP 30: Click AP Period Close
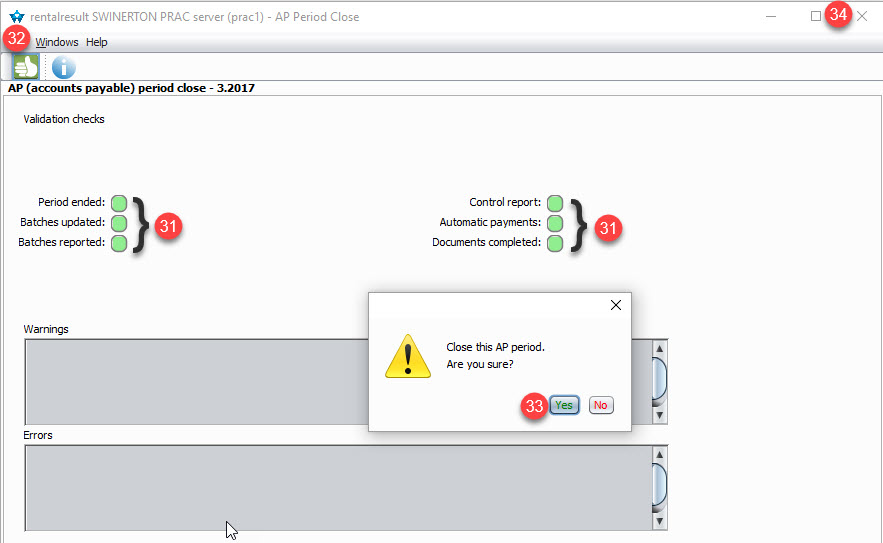
STEP 31: Validate that all boxes are Green
STEP 32: Click the "Thumbs Up" icon
STEP 33: Click Yes
STEP 34: Click the X to exit
Closing Item Ledger
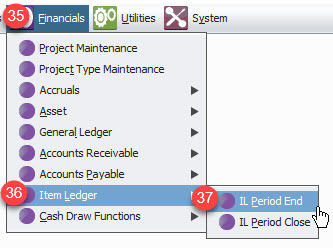
STEP 35: Click Financials
STEP 36: Click Item Ledger
STEP 37: Click IL Period End
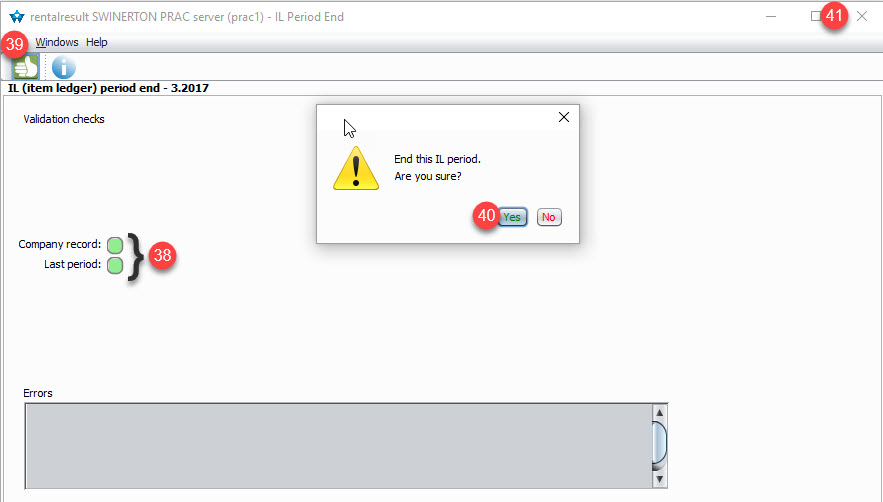
STEP 38: Validate that all boxes are Green
STEP 39: Click the "Thumbs Up" Icon
STEP 40: Click Yes
STEP 41: Click the X to exit
NOTE:Transactions that have not been completed or previous periods that have not been closed would be reflected with a “RED” circle. These transactions need to be completed prior to continuing with the current processes. The same applies to the Period Close processes.
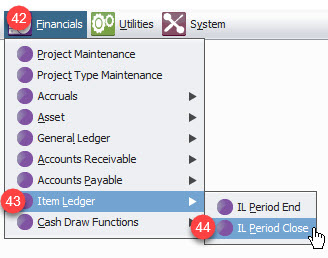
STEP 42: Click Financials
STEP 43: Click Item Ledger
STEP 44: Click IL Period Close
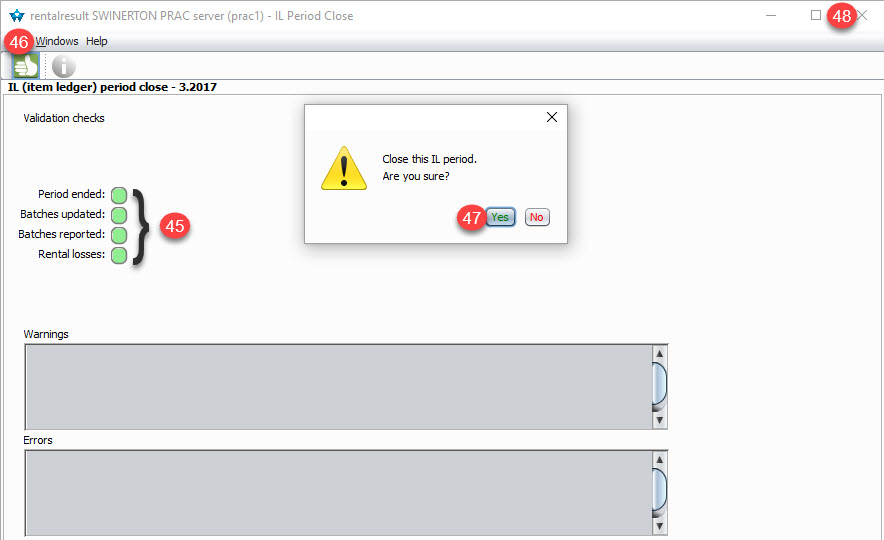
STEP 45: Validate that all boxes are Green
STEP 46: Click the "Thumbs Up" Icon
STEP 47: Click Yes
STEP 48: Click the X to exit
Closing General Ledger
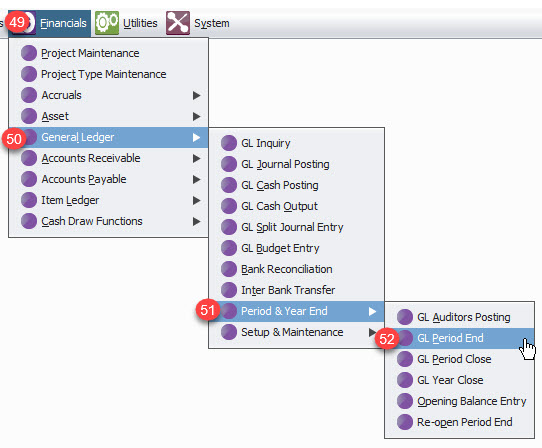
STEP 49: Click Financials
STEP 50: Click General Ledger
STEP 51: Click Period & Year End
STEP 52: Click GL Period End
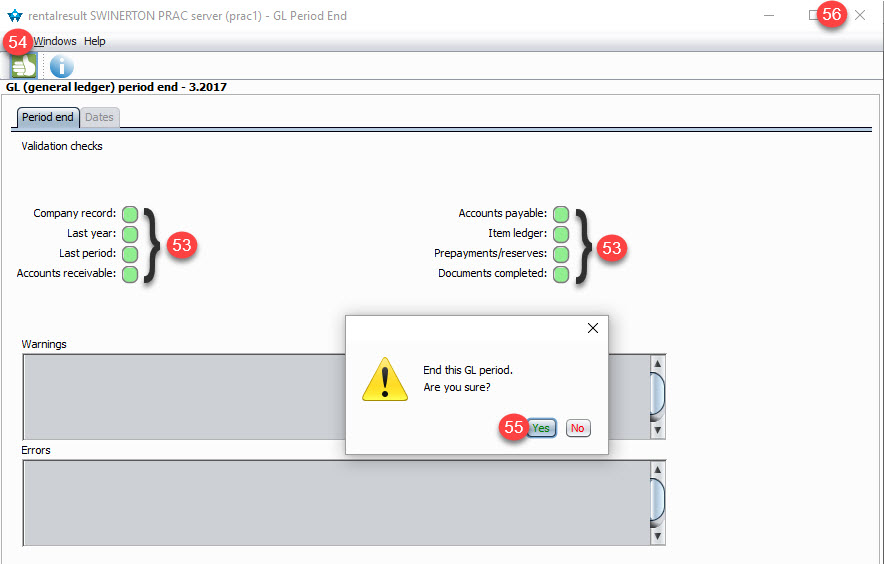
STEP 53: Validate that all boxes are Green
STEP 54: Click the "Thumbs Up" Icon
STEP 55: Click Yes
STEP 56: Click the X to exit
NOTE:Transactions that have not been completed or previous periods that have not been closed would be reflected with a “RED” circle. These transactions need to be completed prior to continuing with the current processes. The same applies to the Period Close processes
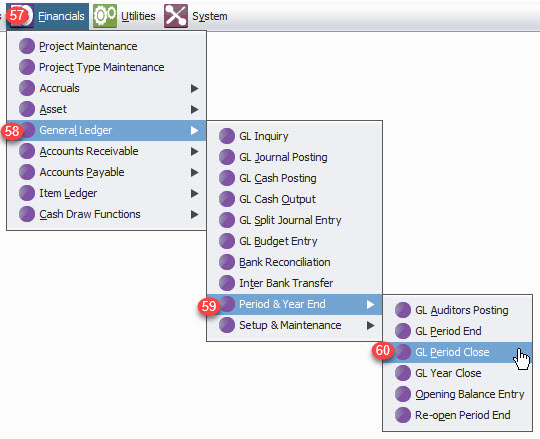
STEP 57: Click Financials
STEP 58: Click General Ledger
STEP 59: Click Period & Year End
STEP 60: Click GL Period End
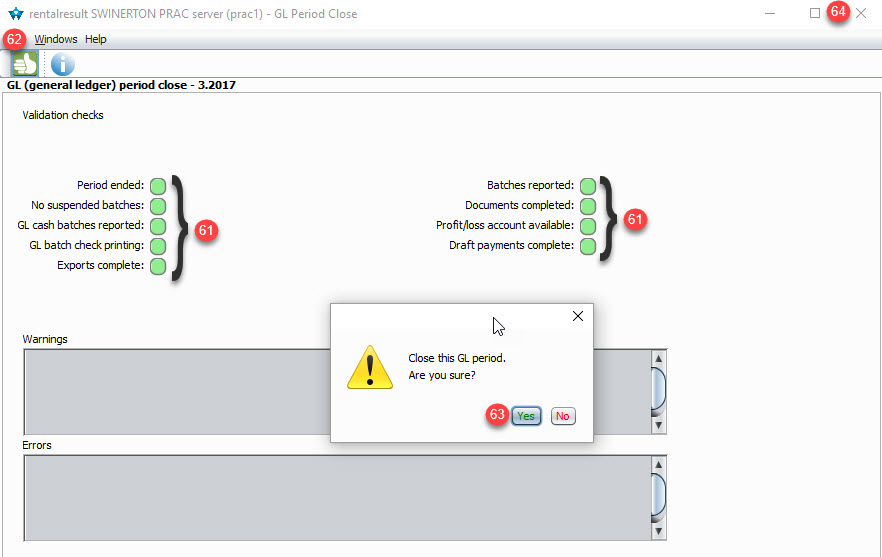
STEP 61: Validate that all boxes are Green
STEP 62: Click the "Thumbs Up" Icon
STEP 63: Click Yes
STEP 64: Click the X to exit