Additional Credits
Additional:
Additional Credits are used when you need to apply a credit to an existing Billing. A Billing MUST exist in order to apply a credit. There are four (4) Credit Options for entering a credit described in this document. A single credit option is required for each equipment line item receiving a credit. If applying credits to multiple equipment lines, you can use a different credit options for each line if you choose within a single Additional Credit document. Credit Option (a): Modifying Duration* (credits the duration entered and uses existing rate calculation) Credit Option (b): Modifying Rate Calculation (uses modified rate calculation) *however if you also modify duration it will use modified rate calculation by modified duration. Credit Option (c): Entering a Lump sum amount (bypass rate calculation much like a journal entry) Credit Option (d): Applying a Discount % or $ value (bypass rate calculation)
Additional Credits Billing:
Additional Credits Billing is automatically generated when the Additional Credit document is completed and saved. Additional Credit Billings will either run automatically on the scheduler for all yards or run manually at the request of the Financial Manager in the event the credit needs to be applied to the current billing period if that period has already run.

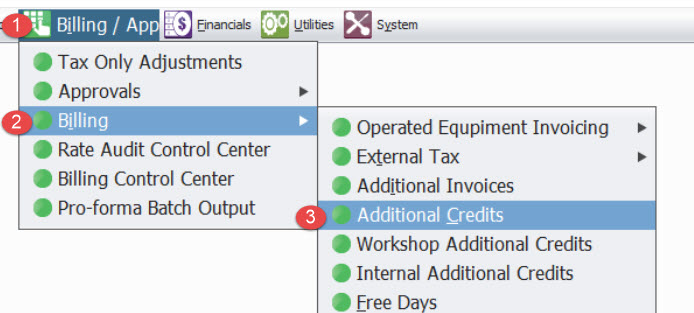
STEP 1: Click Billing / Approvals
STEP 2: Click Billing
STEP 3: Click Additional Credits

STEP 4: Click Create New

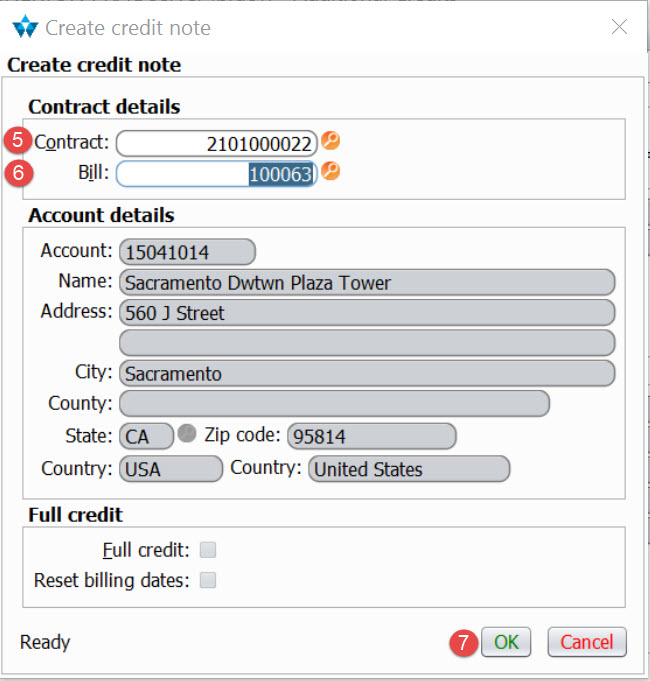
STEP 5: Contract: Enter the Contract this invoice will apply against. If you don’t know the contract, click the contract search icon to search by Job number to locate/select the contract. The Contract field will populate with the Contract number selected and populate Account details.
STEP 6: Bill: Enter the previously Billed Invoice number on this Contract this credit will apply against. If you don’t know the Invoice, click the Bill search icon to locate/select an existing invoice number. The Bill field will populate with the Bill number selected.
STEP 7: Click Ok

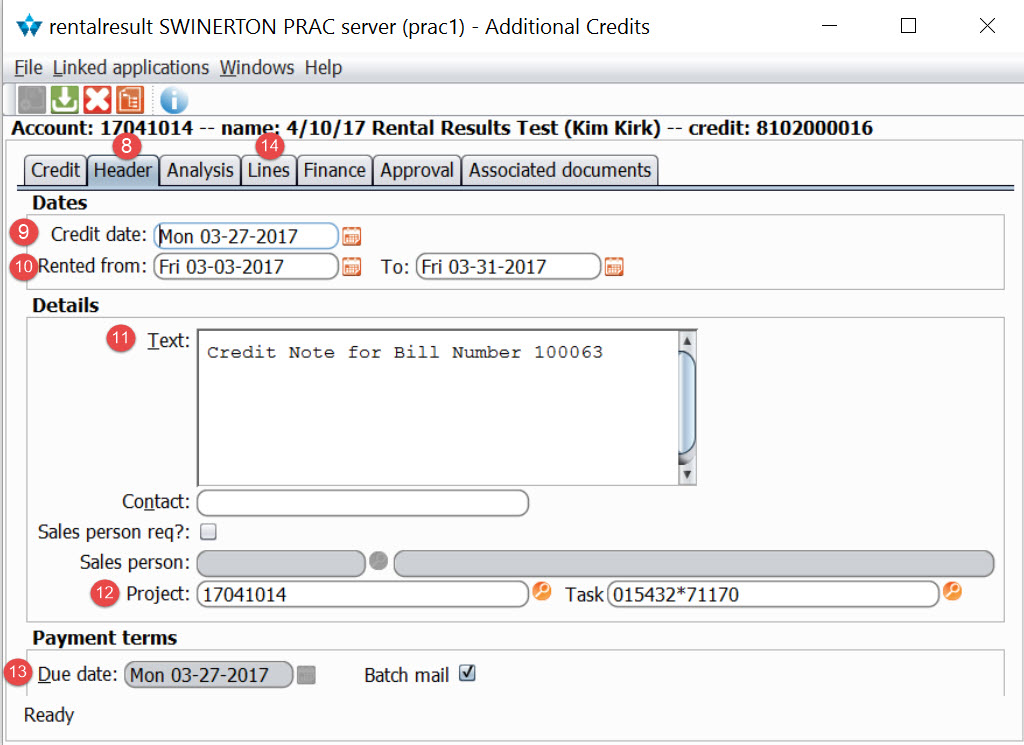
STEP 8: Click the Header tab if not already defaulted in
STEP 9: Credit date: Using the calendar Icon select the date this credit is to be applied.
STEP 10: Rented From and To dates will be populated with the existing billed contract On/Off rent dates. Validate the Rented from and to dates are consistent with the billing period the credit is to be applied against.
STEP 11: Text: The system will default a Credit Note for Bill Number. Add any additional notes as desired.
STEP 12: Project/Task: Validate the Project and Task (Phase/Category) fields are correct for this transaction. The system is pulling the Project and Task code from the original Order header
STEP 13: Validate Payment terms due date reflect credit date
STEP 14: Click the Lines tab

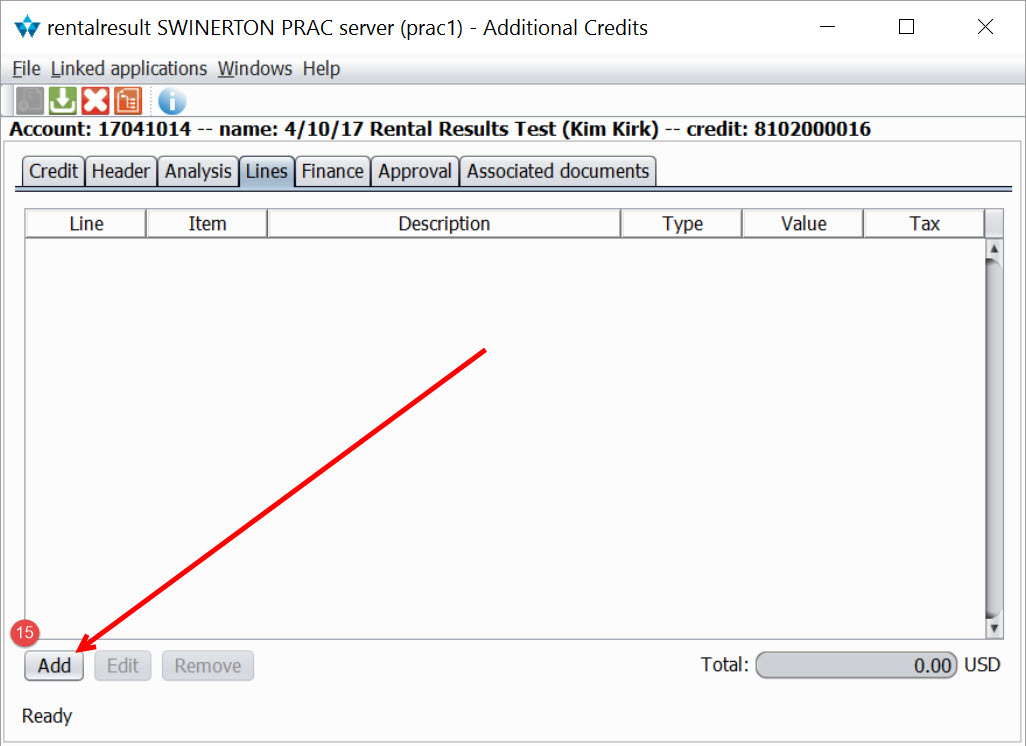
STEP 15: Click Add
STEP 16: Click and highlight the row for the item being credited (if you are crediting multiple rows you will have to repeat this process for each row)

STEP 17: Click Ok
STEP 18: On Rent/Off Rent: Time MUST be populated and cannot be 00.00 in order for calculation changes to take effect.
STEP 19: Duration: If you want to credit partial days of rental you can modify duration or on/off rent dates, the system will recalculate the credit based on the duration you enter (e.g., if you change your duration to 2 days, it will create a credit amount for 2 days it will NOT change the rental period to 2 days); If you want to credit the entire item charge do not modify rental dates section.
STEP 20: Quantity: Enter the quantity you want the system to use to calculate the rate. If Lump sum, enter 1. Once you enter the Quantity, the system will calculate the credit amount in the Total field.
STEP 21: Charging Calculation will default to the rate table applied to the item in the contract. There are four (4) Options in creating an additional credit. Determine which credit option (a,b,c or d) you will be using and jump to those Credit Option steps:
Credit Option (a) Changed Duration the total credit amount will calculate based on the default charge rates/qty/duration and display in the Total field.
(a) Charging Calculation: Accept default charge rates. System will auto calculate credit based on Charging Calculation/Duration/Rental Rates.
(a) Click OK and the Rent calculation dialog window will close and you will be returned to the Line Dialog Screen (jump to Step xx)
Credit Option (b) Change rates uses default charging calculation/qty /duration/updated rates:
(b) Charging Calculation: Accept default charge rates. System will auto calculate credit based on Charging Calculation/Duration/Rental Rates.
(b) Rental Rates: Modify the rate(s) by entering them in the applicable rate field, quantity must be populated for the total credit amount to calculate and display in the Total field.
(b) Click OK the Rent calculation dialog window will close and you will be returned to the Line Dialog Screen (jump to Step xx)
Credit Option (c) Charging Calculation Lump sum uses a lump sum value similar to a journal entry:
(c) Charging Calculation: Modify the Charging calculation by typing Lumpsum (one word) in the Charging Calculation field, Rental Rates W/D/M will be replaced with a single editable field labeled Each: for Lumpsum amount.
(c) Rental rates Each: Enter the total lump sum value of the credit, the total credit amount will display in the Total field
(c)Click OK the Rent calculation dialog window will close and you will be returned to the Line Dialog Screen (jump to Step xx)
Credit Option (d) Discount will calculate based on Discount % or value
(d) Charging Calculation: Accept default charge rates. System will auto calculate credit based on Charging Calculation/Duration/Rental Rates.
(d) Discount: select % or Value from the pull down selection
(d) Discount: If using %: Enter % value for % discount; If using Value: Enter dollar value for $ discount, the total credit amount will display in the Total field
(d) Click OK the Rent calculation dialog window will close and you will be returned to the Line Dialog Screen (jump to Step xx)
STEP 22: Regardless of which Credit Option you selected the Line Dialog window will reflect the a Details field reflects the credit option calculation b Quantity field reflects the quantity you entered to calculate against c Value field reflects the calculated credit amount. d Original value field reflects the Original invoiced amount e Available field reflects the difference between Original and Value (remaining invoice balance after credit)
STEP 23: Category: Using the search icon select the Category code off the list that this credit is to be applied against. The system will use the Phase (Task) you selected in the Invoice Header screen. This is a required field and the system will not allow save if Category is left blank.
STEP 24: Click Close and the Line dialog saves and closes and the Additional Credits, Lines tab grid displays
STEP 25: Validate the lines with and the credit amounts you just added.
NOTE: If you need to enter additional credits against same Bill, repeat this process beginning with Step 13. When all lines are complete continue to Step xx.
STEP 26: To see a summary of all lines combined, Click the [Finance] tab, the Finance screen will display. Review the summary of your Additional Credit to ensure it is complete prior to saving as saving auto creates the Credit Invoice and integrates it to CMiC a Value fields reflect the Total credit amount applied to the selected Bill b Invoice total reflects the previously Billed Total Invoice Amount c Net remaining reflects the Total Net remaining after credits applied
STEP 27: Click the save and close the current credit icon to save your new additional invoice, the Reason (for the credit) window will display
STEP 28: Reason: From the pull down menu select the Reason for the credit from the list displayed
STEP 29: Comment: Enter comment that further clarifies the Credit Reason
STEP 30: Click Enter on your keyboard to enable the OK button field
STEP 31: Click OK and the Reason window saves and closes and the Output options window will display on top of a blank Additional Credits screen, view, email, print as you desire
STEP 32: Output Options Click [close], you will be returned to a blank Additional Credits window
STEP 33: Click the X in the upper right hand corner to close