BIM 360 Field Cheat Sheet for iPad
BIM 360 Field
Cheat Sheet for iPad
Get Familiar with the Start Page
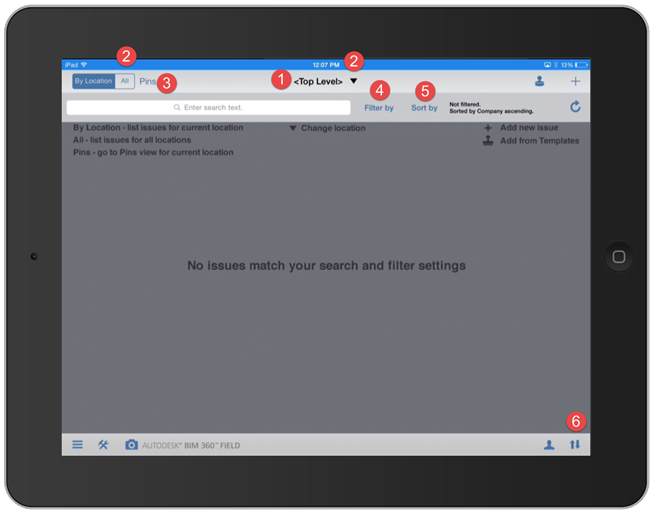
The first thing you will see is the main screen.
1. The
page is blank because you start at the Top Level.
2. At
this point you can either push “All” to see all issues entered everywhere, or touch
the Location Pull Down and set a location within your project.
3. You
can switch to pins (floorplan) view by touching “Pins”, but a location must be selected to do so.
4. Issues
can be filtered by a variety of pull down options such as by contractor, location, status,
etc. or combination of them all.
5. The
selected issues can be sorted by many options; by date entered is a common sort.
6. The
Sync button
allows you to upload the information you’ve entered and download information
that in the database
Pitfall
Alert! If you
find your issues and pins have disappeared, check your filter status. This
typically turns out to be the problem. Clear the issues and all your
pins/issues should reappear.
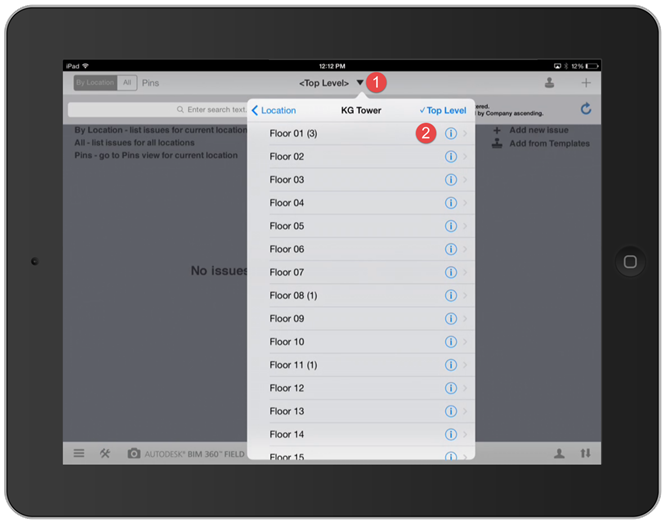
Location – Pull down menu
1. Once
you pull down the Location menu, you can narrow down to the desired location.
2. Click
on the “i”
button until you get down to the final room you are working in
Pitfall
Alert! Make sure you drill down to the final room
location. Selecting on an entire floor
will make it difficult to communicate and issue and its proper location
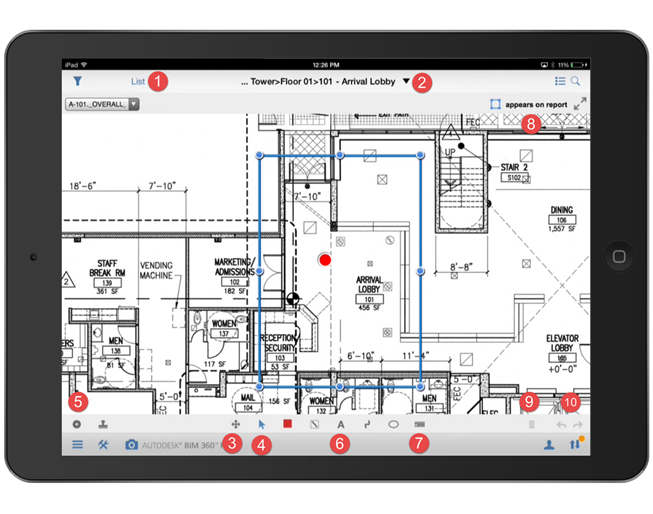
Pins view and functions
1. You
can toggle between list and pin
(floorplan) view with the button at middle top left. The filter option on this view is the funnel button at the
top left.
2. Project Room Location: This location designates the building and room
that you are currently working in
3. Pan function: Moves
objects such as blue report box and pins around the page
4. Arrow function: Allows for user to select a pin or blue report
box so it can be adjusted or edited
5. Pin function: Insert new
pins (Issues) inside of the blue report rectangle
6. The
markup tools
should only be used on pages that are attached to a specific issue. Do not mark up on a page that has a blue
report box that is assigned to a location or everyone on the project will see
those markups on the iPad and in the reports.
7. The
Measure tool
allows you to pull a crude measurement of a location on the drawings. You might need to set the scale by using a
known length on the drawing. Don’t
forget to erase these measurements or they will be visible on other user’s
iPads and on the reports
8. The
appears on report
box will insert a blue report box on the screen where you’ve zoomed into
9. The
trash can will
delete a selected issue, markup or measure tool
10. The undo and redo buttons allows you to quickly toggle forward or
backward between work
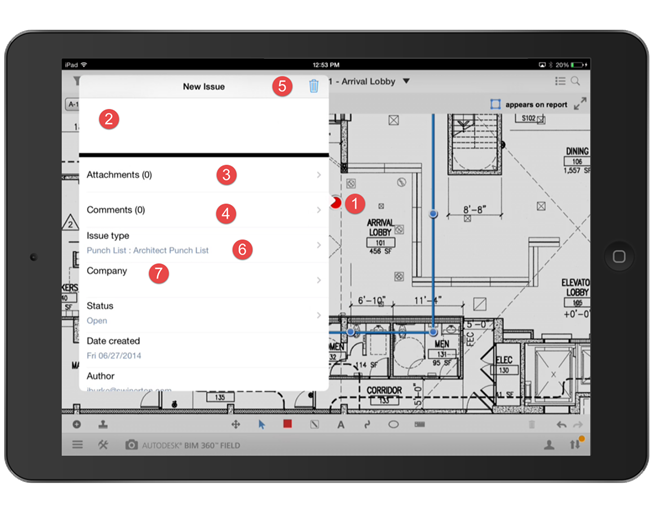
Entering an Issue
1. After
selecting the Pins tool touch the screen in close proximity to the
corresponding location of the issue being entered. A red pin will appear and menu will open and keyboard pops
up.
2. The
description
can be typed in
3. Attachments allows you to take a picture and include it in the
issue, select another document from the library or include a photo previously
taken from your photo library
4. Comments allows you to add a comment to this issue
5. The
trash can
lets you trash that issue if it has not been synchronized yet
6. Issue Type should also be checked to make sure it’s assigned
to the correct list
7. Assign
the issue to the correct subcontractor or party using the Company drop down menu
Pitfall Alert! When
entering a description, the iPad does not recognize typical construction
jargon. It will automatically correct your entries thinking they are
misspelled. You must press the “X” on the suggested correction or it will
automatically change your entry.
Pitfall
Alert! It is
critical that the correct company be assigned their issues. Before you sync
your data, double check the list of issues and ensure the correct assignments
have been made. Otherwise, the issues will be ignored by the incorrect sub who
received the data, and the correct sub will be unaware its existence and it
will remain uncorrected.
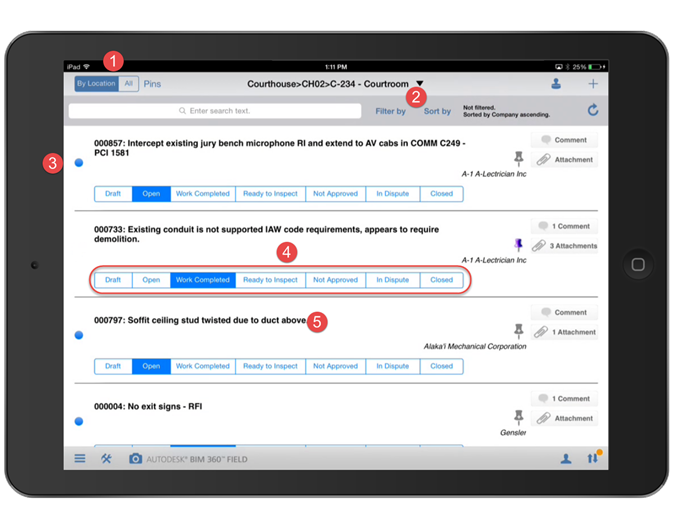
List View
The list view is convenient to see all the issues in list form. Status
can be changed, and attachments and comments can be viewed. You can
conveniently filter and/or sort the issues by company, location, etc. from the
buttons at the top.
1. Use
the By Location and
All toggle
to jump between issues throughout the entire project or specific to the
location on the location bar depending on what you are doing.
2. Use
the Filter by and Sort by options to narrow down your search to find a list
of specific issues. For example if you
only want to see the issues created for a specific subcontractor last week, you
could use these tools to narrow your search
3. The
Blue dot indicates that the issue has been synched with the system and others
can view it… when information about that issue is adjusted, the blue dot will
disappear until it has been synchronized
4. The
Status of the
issue can be adjusted from this view.
Note that the pin color will change as it’s adjusted. This is more prevalent in the reports that
are automatically generated. Also note
that subcontractors will only be able to toggle between the Open and Work Completed Status. Only the creator of the issue, whether it’s the Owner, Architect or
Swinerton will be able to Close an issue
5. To
view more options of an issue, just click on it to modify its details
Pitfall
Alert! Be
careful when scrolling through the issues that you do not inadvertently change
the status on some of the items with your finger’s touch.
Final Tips:
- If
zooming and entries become sluggish and slow, close the application completely
and reopen. This will solve the problem.
- iPad
battery life is limited (around 4 hours), so to extend your session, turn off
the screen between entries if possible. Keep the iPad plugged in when in the
office and overnight to maximize battery power available.
- Sync
your iPad at least first thing in the morning and before the end of the day.
This will keep the data in the “cloud” and on your iPad as current as possible,
especially when the project has multiple users. Also if a report is going out daily,
the most up-to-date information should be, and will be included.