BIM 360 Field Reports: Generating an Issue Details Report
BIM 360 Field Reports: Generating an Issue Details Report
You can use the BIM 360 Field Reporting
feature to create a report in .pdf, excel, or rich text format that
includes all issues with all custom fields, as well as any referenced photos,
documents or markups (pdf format only for photos and attachments). To create
this project snapshot of your issues, follow the steps below:
Generating
an Issue Details Report
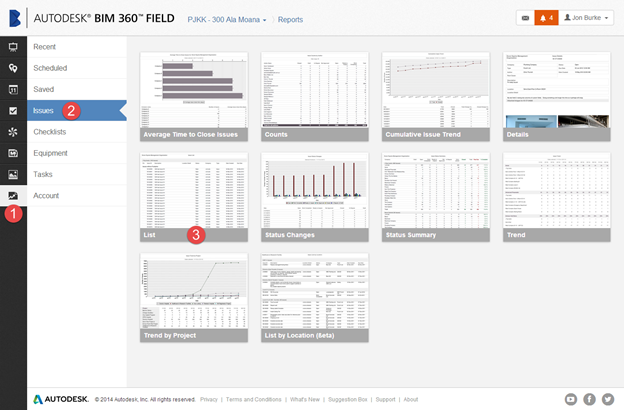
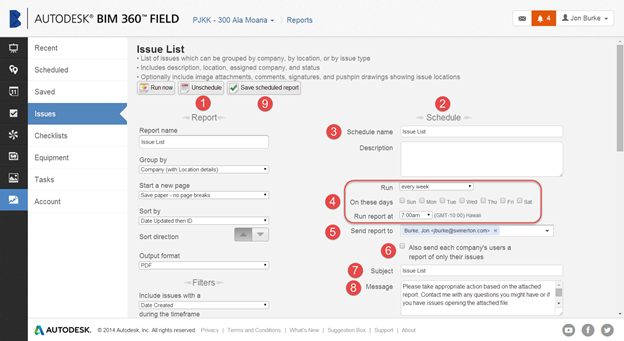
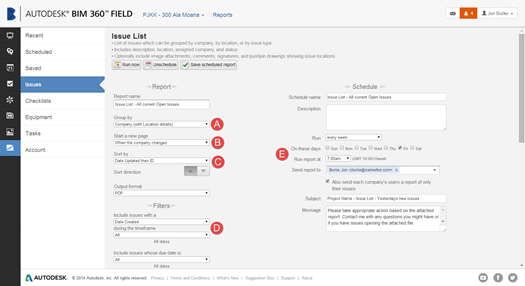
STEP 1: While logged into BIM 360 Field, click the Reports link
at the bottom of the menu on the Left side of the screen.
STEP 2: Click the Issues button located on the left.
STEP 3: Select the List button to load the report parameters of
the Issue List report.
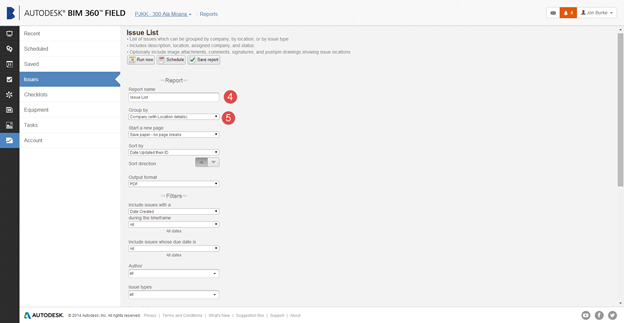
STEP 4: Change the Report Name to match the parameters you adjust below
STEP 5: Change the Group by drop down to Company (with Location details)
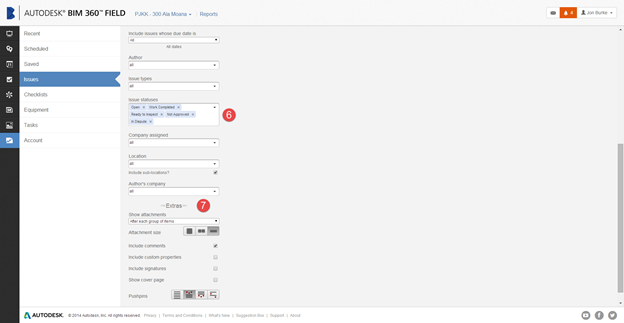
STEP 6: In the Issue Statuses drop down, select all the choices except
for closed – This will include only open issues in the report and will
not include all closed issues too
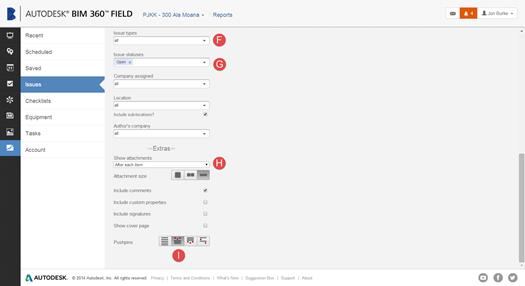
STEP 7: In the Extras section, select the appropriate option
from the Show attachments dropdown and then check the boxes to include
comments, custom fields, signatures and cover page as
desired. A favorite report of some
Swinerton projects includes the selection of After each group of items
in the show attachments selection box, small Attachment size, the
Inclusion of comments, and push pins included per group.
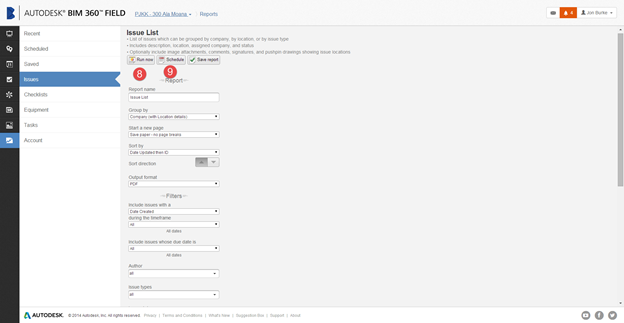
STEP 8: Click Run Now to generate the report for your
project data
STEP 9: Schedule this report to be
automatically sent to subcontractors or individuals working on the
project.
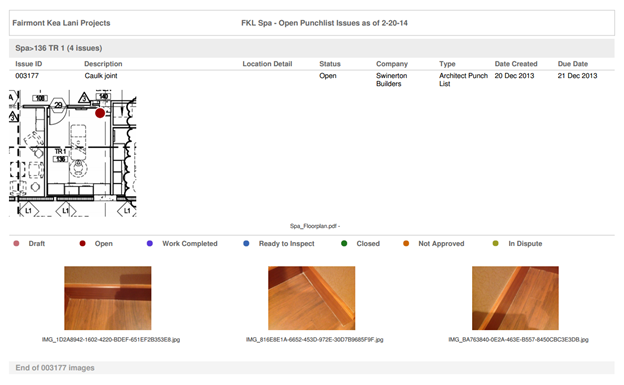
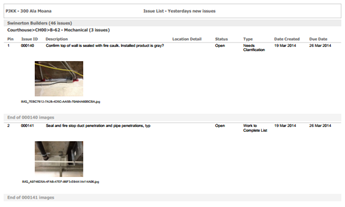
Below is an example of one issue with push pin location and photos:
Setting Up a
Reoccurring Automatic Report
Once you establish the parameters of your report, now
you would like it to automatically be issued and distributed periodically.
(Every day, every other day, every week, etc.)
STEP 1: On
the report page, press the Schedule
button at the top of the page.
STEP 2: The
schedule info will open to the right.
STEP 3: Change
the Schedule name to match the
parameters of the particular report you have setup.
STEP 4: Choose
how often the report will run and on which days and at what time
STEP 5: Select
all of the individuals that you would like to receive the ENTIRE report which includes all issues for all subcontractors
STEP 6: Select
this checkbox to send a report to
all individuals for each company of only their companies issues
STEP 7: Adjust
the Subject line as desired
STEP 8: Edit
the message to be sent as desired
STEP 9: Save the scheduled report so that it is in
the queue to be sent out
Suggested Report
Settings
There
are two reports that have been found to be of benefit to the project teams:
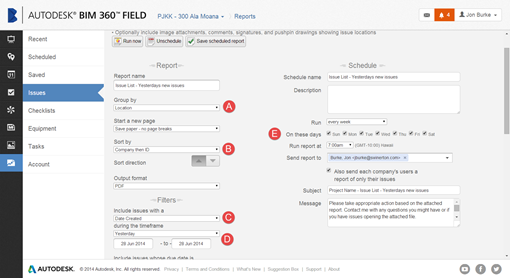
1. A report generated daily that
sends all of the new issues that were created the previous day. To do this adjust the following settings:
A. Group the report by the
Location –
This will make it easy to keep all issues in a particular location together in
the report
B. Sort by Company then ID – This will create the full
report in an organized manner
C. Include issues with a Date
Created
D. During the timeframe of
yesterday
E. Be
sure to select Saturday and Sunday if you are working on Friday and Saturday so
that the report provides the new issues found on the previous days
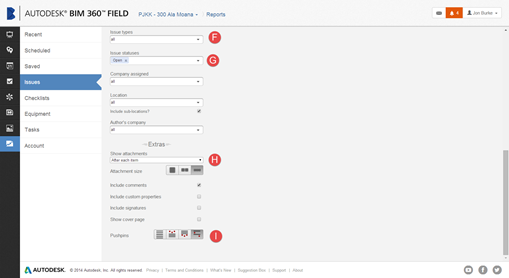
F. Select
all the related issue types
G. Select
the issue statuses you’d like to be
included
H. Show attachments after each
item
I. Select
the Pushpins setting Pins per issue
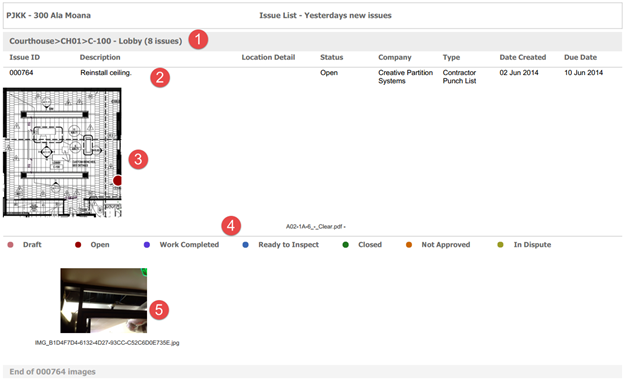
An
example of this report is below:
1. The
Location of the issue is identified
at the top of the report
2. The
Issue ID, Description, Location details,
Status, Company, Type of issue, date created and date due are all displayed
at the top of the report
3. A
plan view with a pin of the issue
location is shown if a pin is created by the issue creator
4. The
issue status bar shows what colors
represent that issues status
5. Any
attachments will show up here
2. A
report that is emailed out once a week with all of the subcontractors current
open issues gives them a recap of all of their open issues
A. Group
the report by Company (with Location
details) – This will make it easy to keep all issues for a particular
company and in a specific location organized
B. Start a new page – When the
company changes
C. Sort
by date updated then ID
D. Include
issues with a Date Created during
the timeframe of ALL
E. Select
the day and time you would like the
issue list to be sent
F. Select
all the related issue types
G. Select
the issue statuses you’d like to be
included
H. Show attachments after each
item
I. Select
the Pushpins setting Pins per group
An example of this report is
below:
|

Pitfall
Alerts!
1. If you
have multiple users, they must sync up
before the report’s scheduled
delivery, or that information will not be issued.
2. Any
errors in
assignments, print areas, etc. must be corrected prior to sync or delivery,
otherwise the report
will be issued with
the errors intact.
Final Tips:
1. One individual be responsible to prepare and issue scheduled reports to minimize duplication of effort and prevent
inundation of the receiving
parties with e-mail transmissions.
2. At the
bottom of the Autodesk
page, there is a link to Support
and Training for tutorials
and other resources. You can also submit a ticket
for help if you need to
do so.