Job Cost - How to Enter Transactions (Journal Entries)
Job Cost - How to Enter Transactions (Journal Entries)
Overview: How to enter transactions (Journal Entries)
Journal Entries are entered into CMiC using the Enter Cost
or Billing Transaction process. Journal Entries with a large number of detail lines
or entries from another source such as E1 can be imported into CMiC using the Foreign Batch (See Import Transactions
and Post (Foreign Batch Import)). This
document details:
· Entering a Journal Entry
· Entering an Accrual Journal Entry with Automatic
Reversal
· Printing JC Transaction Edit Listing
· Correcting an Unposted Batch
· Posting a Batch
Entering a
Transaction (Journal Entry)
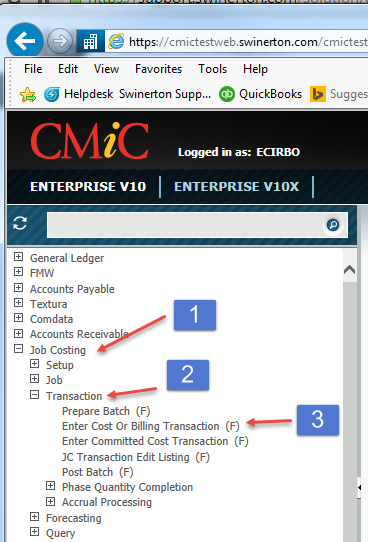
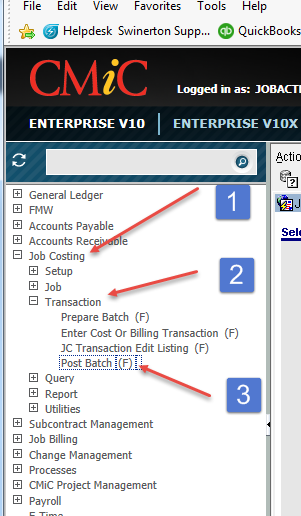
STEP 1: Click
Job Costing
STEP 2: Click
Transaction
STEP 3: Click
Enter Cost or Billing Transaction

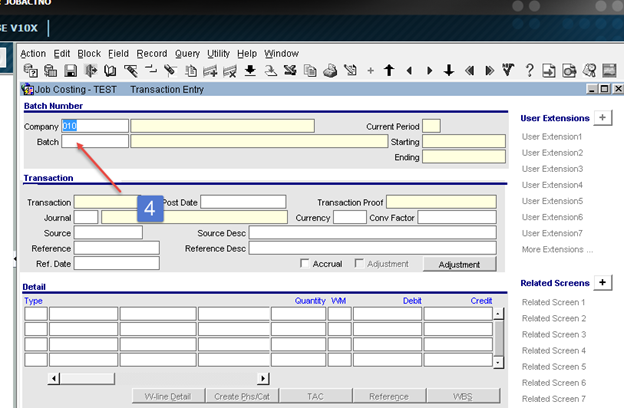
STEP 4: Company number will default based on User
Defaults. Can be changed in necessary.
STEP 5: Current Period will default based on
open period.
STEP 6: Click
in the Batch field and the Create Batch button will appear.
STEP 7: Click
Create Batch (See Creating a Batch in
Enterprise). Once batch is selected
or created, Page Down.
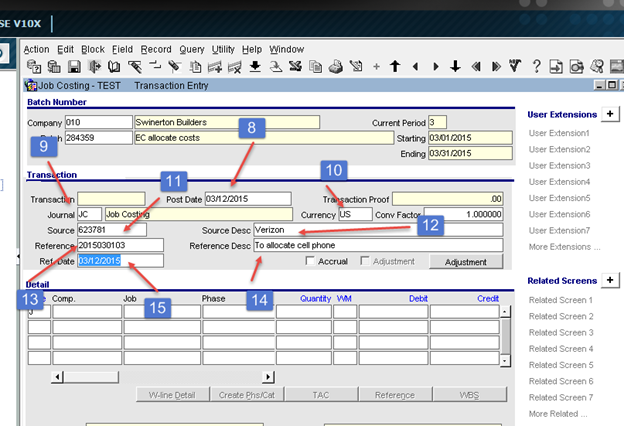
STEP 8: Post Date - System Date will default. Note: Post Date must be within the Current
Period and can be changed. Press Tab
STEP 9: Journal – Enter “JC”. Press Tab
STEP 10: Currency – Defaults “US”. Press Tab,
Press Tab
STEP 11: Source – Enter source of entry if
desired, i.e. Vendor Number. This will
appear on queries and reports. Press Tab
STEP 12: Source Desc – Enter source description
in desired, i.e. vendor’s name, invoice #, etc.
This will appear of queries and reports.
Press Tab
STEP 13: Reference – Enter JE number. Press Tab
STEP 14: Reference Desc – Enter JE description.
Press Tab
STEP 15: Ref.
Date - Defaults to system date. This
can be changed to the source date of the transaction. Press Tab
NOTE: If Accrual
box is checked this entry will automatically be reversed the following
period. See section below for using this
feature.
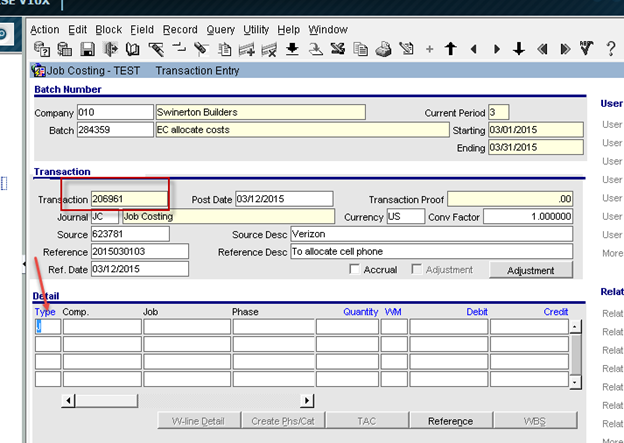
Transaction
number will populate and cursor will move to Detail Section of screen.

STEP 16: Type – Will default to “J”. Only change to “G” if posting entry to a
Balance Sheet account. Press Tab
STEP 17: Comp.
– Company number will default from Company in Header. This can be changed to another company if
this is an intercompany transaction. Press Tab
STEP 18: Job –
Enter job or overhead number. If this is
a “G” line, this field can be blank. Type “J” requires a job number. Press Tab
STEP 19: Phase
– Enter or query Phase number. Press Tab
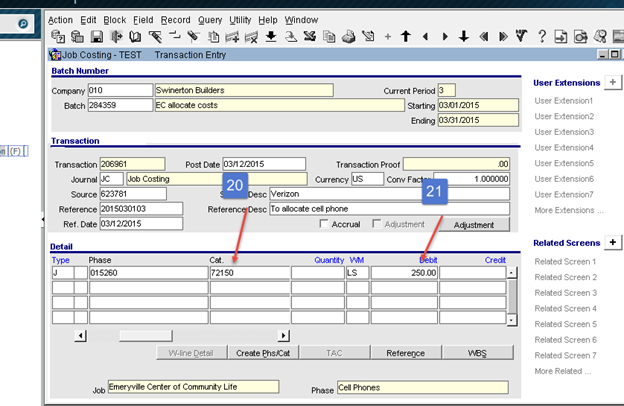
STEP 20: Cat. – Enter or query Category number. Tab
over to Debit field.
STEP 21: Debit - Enter amount of debit. Arrow down and you
will be taken to next line.
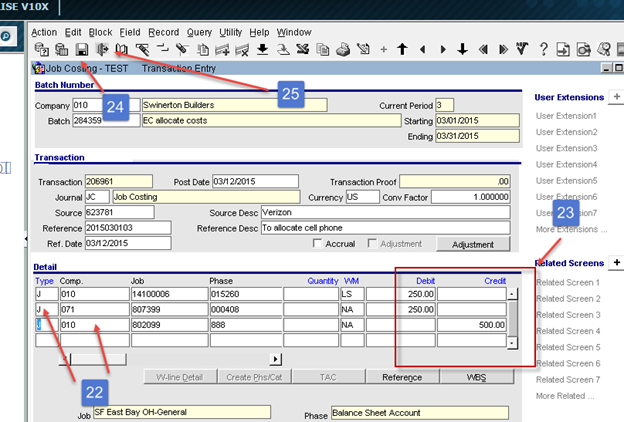
STEP 22: Continue
adding remaining lines.
STEP 23: When
all lines are entered, your Debits must equal Credits. You will not be able to save the record if
the entry does not balance.
STEP 24: Click
the Save Icon. The record will save and the screen will be blank. You can add another entry at this time
following the steps above.
STEP 25: Once
all the transactions have been entered, click the Close Icon.
Entering an Accrual with Automatic Reversal
Journal Entries can automatically be reversed the following period by checking the Accrual box in the Transaction section. Checking this box creates both the current transaction and the reversing transaction when the batch is posted.
Follow Steps
1 – 15 above.
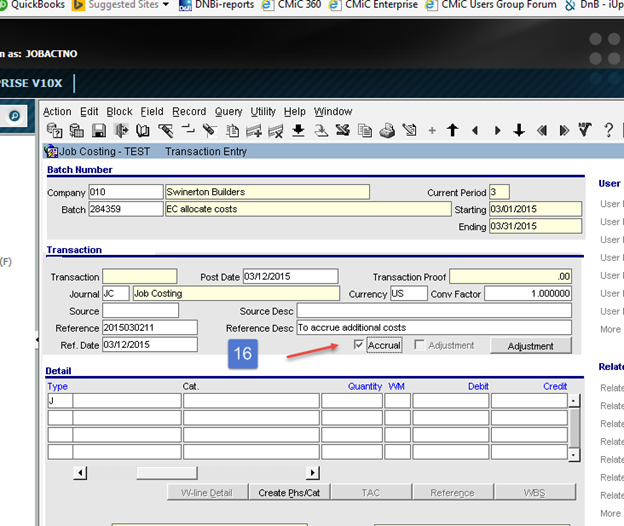
STEP 16: Click Accrual
box. Entry will automatically be
reversed and posted to the next period. Page down.
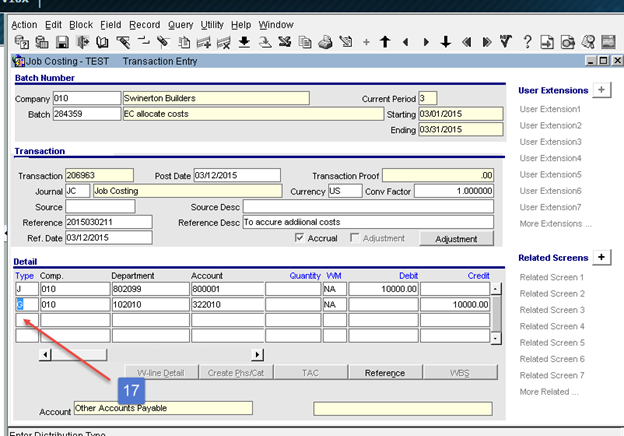
STEP 17: Enter
Details - Follow steps 16 – 25 above.
Note: In this example we are using
Type = “G” since the entry is a balance sheet item.
Print JC
Transaction Edit Listing
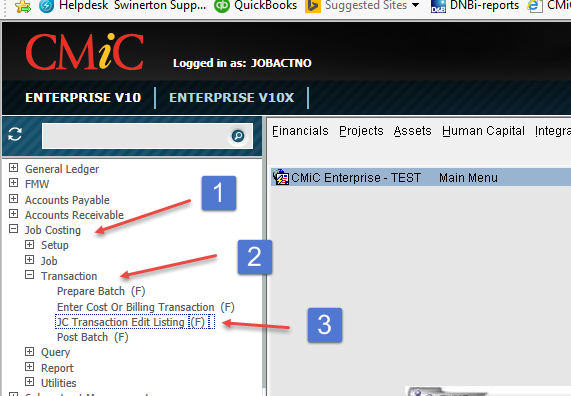
STEP 1: Click
Job Costing
STEP 2: Click
Transaction
STEP 3: Click
JC Transaction Edit Listing
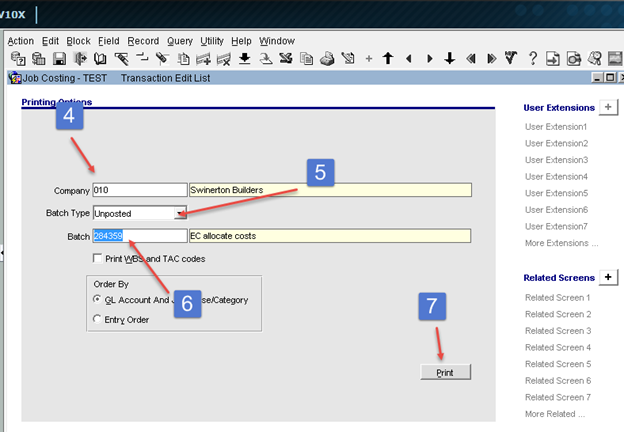
STEP 4: Company – Will default based on User Defaults.
STEP 5: Batch Type – Defaults to “Unposted”. “Posted” can be selected for previously posted
batches.
STEP 6: Enter
or query Batch number.
STEP 7: Click
Print.
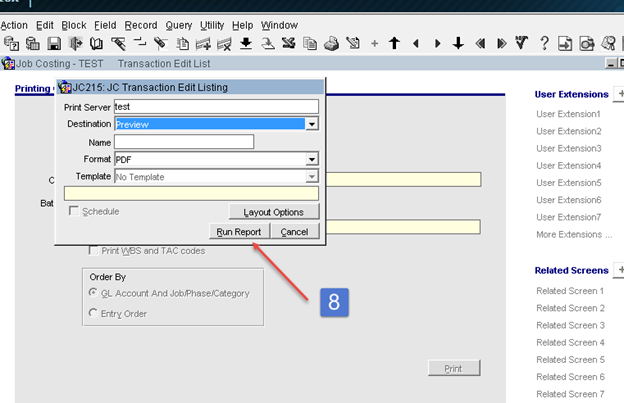
STEP 8: Click
Run Report.
· Do not change Destination to “Printer”, leave as
“Preview”. This will open in PDF and you
can print to printer at that time.
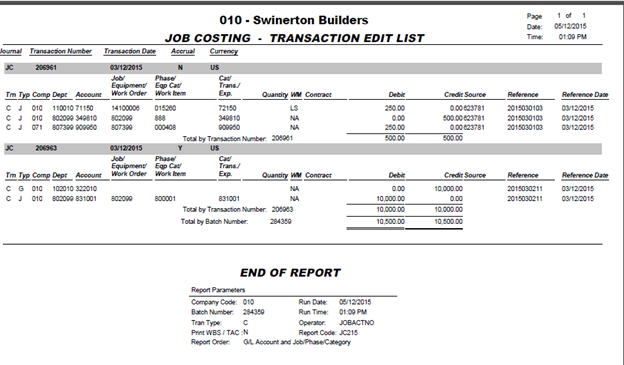
Review Report for accuracy (See Correcting Unposted Batches below).
Correcting an Unposted Batch
Transactions can be edited or deleted prior to posting by
querying the batch and making the necessary corrections. Additional entries can also be added to the
batch prior to posting.

STEP 1: Click
Job Costing
STEP 2: Click
Transaction
STEP 3: Click
Enter Cost or Billing Transaction
STEP 4: Double
click in the Batch field.
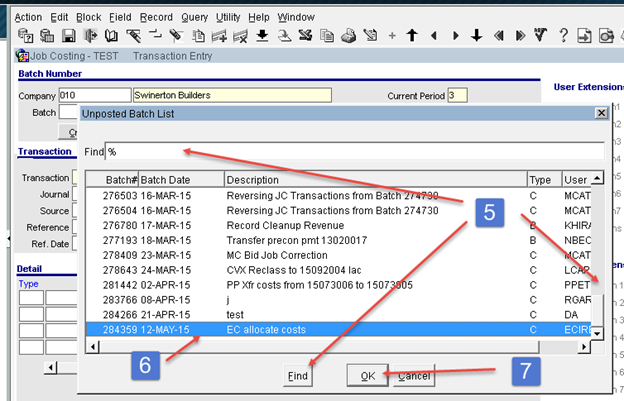
STEP 5: Locate
Batch by using scrollbar or querying and then clicking Find.
STEP 6: Highlight
Batch.
STEP 7: Click
OK. Page Down
Screen will be blank. If you want to add a transaction, you
can do so at this time. If correcting
entry, you must locate the Transaction to change.
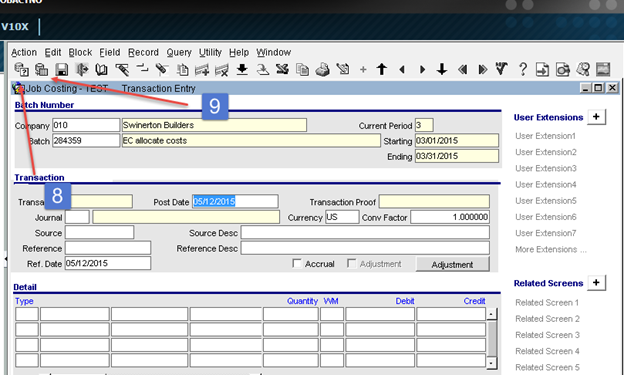
STEP 8: Click
the Enter Icon or F11. Screen will turn blue.
STEP 9: Click
the Execute Icon or F12. The first
record in the batch will populate the screen.

STEP 10: Locate
the Transaction by using the Previous and Next record Icons.
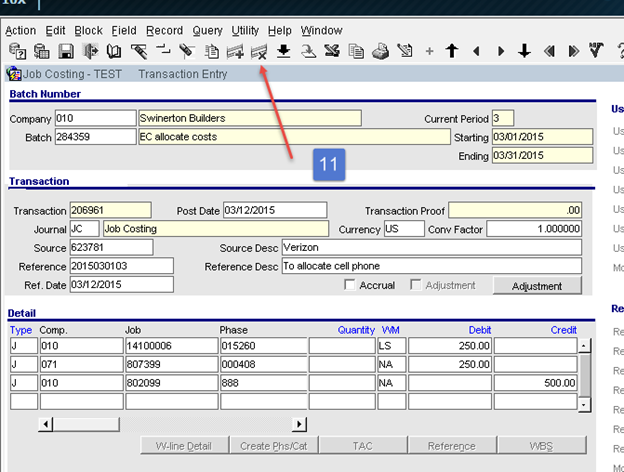
Make any necessary corrections.
STEP 11: Records
can be deleted by clicking the Remove Icon.
STEP 12: Once
editing is completed, Save and Close screen.
Post Batch
STEP 1: Click
Job Costing
STEP 2: Click
Transaction
STEP 3: Click
Post Batch

STEP 4: Company – Defaults based on User
Default setting.
STEP 5: GL Current Year Period – Defaults to
open period.
STEP 6: Enter
or Query Batch.
STEP 7: Post Overhead Transactions – Defaults checked.
Leave check.
STEP 8: Automatic Accrual Reversal – Defaults checked. This will create and post the reversing entry
if you checked the Accrual box on a Transaction. If you remove the check, your accrual must be
manually reversed.
STEP 9: Preview Posting – Only check this box
if you want to view the report prior to posting. Checking this box and click “Post” does not
post the batch.
STEP 10: Print Reports Immediately – Check this
box to review posting reports.
STEP 11: Click Post.

STEP 12: Click
Run Report.
· Do not change Destination to Printer. This will open in PDF and you can print to
printer at that time.
Job Cost Report will open.
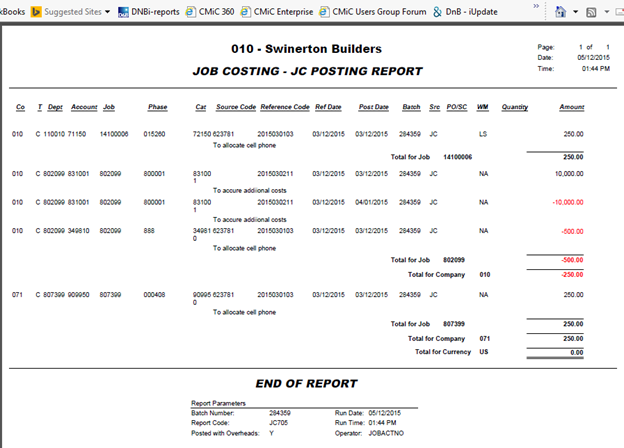
STEP 13: Click
Run Report again.
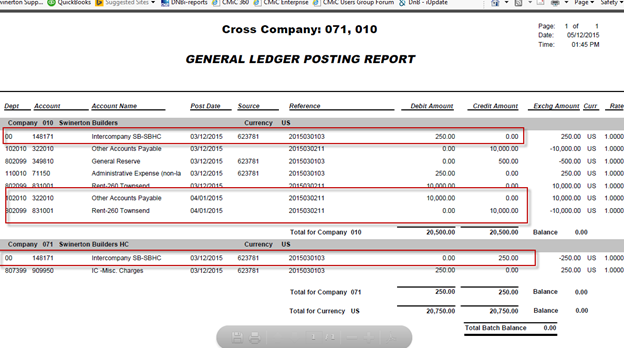
General Ledger Report will open.
· NOTE: Accrual Reversal for following month was
posted.
· System automatically created Intercompany
Transaction.