Compliance Management in Enterprise
This document provides the steps necessary to manage
compliance in CMiC Enterprise and is intended for Project Accountants. It is important to understand the compliance
process in CMiC to ensure subcontractor’s payments are being held and released
appropriately in Textura and CMiC.
Compliance can be managed in Enterprise through the
Subcontract Module by Project Accountants or in the Project Management (JSP)
module by Project Administrators. The two platforms share the same data (table)
so changes made to subcontract compliance in either environment are reflected
in both.
Note: If the Project Administrator manages subcontract
compliance for your Division, the Project Accountant should not update
compliance on the subcontract in Enterprise unless you have coordinated the
change with the Project Administrator.
Items to
note:
-
CMiC
- There is a separate compliance table that is attached to the vouchers in CMiC. Voucher Compliance is updated based on the information entered in the Subcontract Compliance screen. Please read the steps below in detail so you understand how the two compliance tables work together.
- On expiring certification, do not update the Start Date. After the initial certification is received and the Start Date is entered, only the End Date should be updated on expired documents.
- For date sensitive codes to be compliant, both the compliant box and the Date Complaint box must be checked.
-
Textura
- Compliance is maintained in CMiC and exports to Textura. If compliance is entered correctly in CMiC, Textura will update properly. The Project Accountant is responsible for managing compliance in Textura and the need to make updates in Textura should be minimal. Textura provides training for Project Accountants.
- Once a subcontract is posted, ‘In Process’, compliance exports to Textura on a daily basis.
- Do not enter Start Dates and End Dates for Compliance Codes that are not Date Sensitive in CMiC. This creates an issue with the Project Requirement Setup in Textura and places incorrect holds.
- If a Compliance Code is deleted from a subcontract in CMiC after the subcontract was exported to Textura, you must manually delete the requirement from Textura.
This
document assumes you are familiar with general navigation in Enterprise. If you are new to CMiC Enterprise, refer to Navigation in Enterprise (located on
Swinnet).
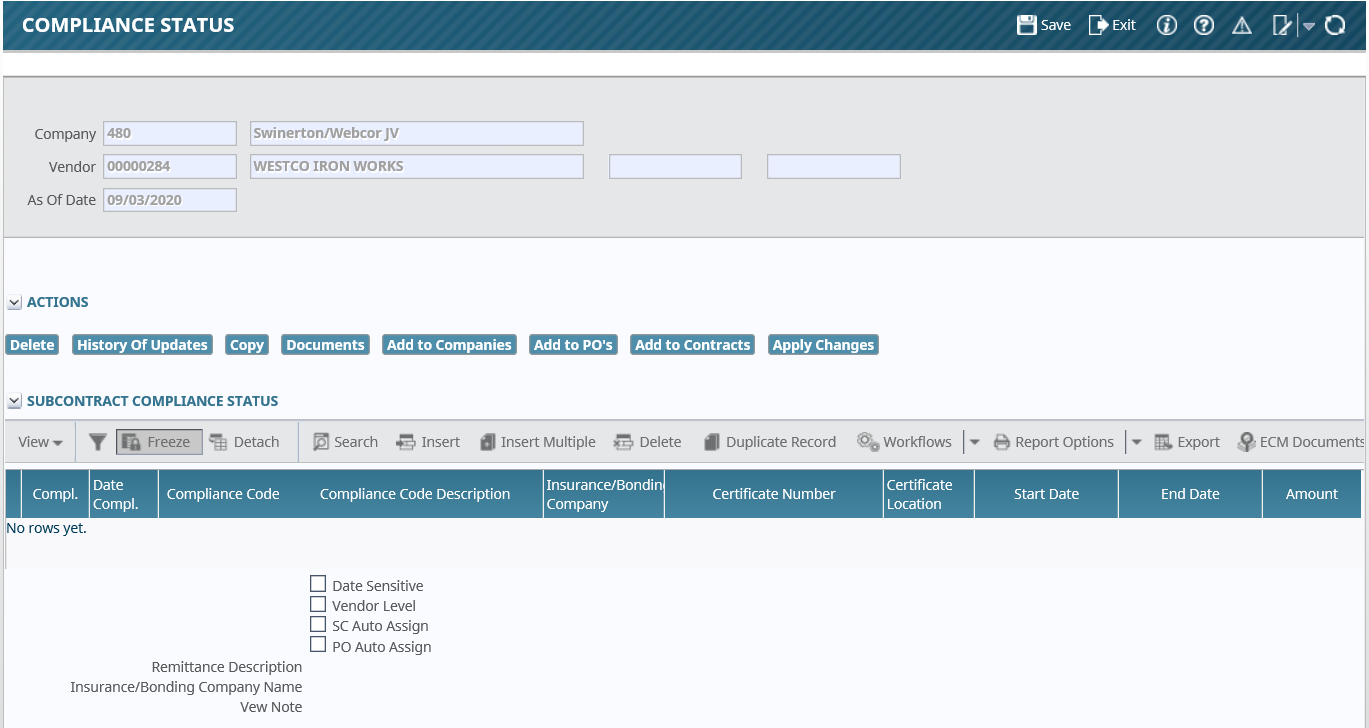
Locating Subcontract Compliance
This is
where compliance is managed at the subcontract level.
NOTE: This section is intended for those groups where the Job Accountant manages compliance. However, compliance can also be view from this location to research discrepancies between the subcontract compliance and voucher compliance.
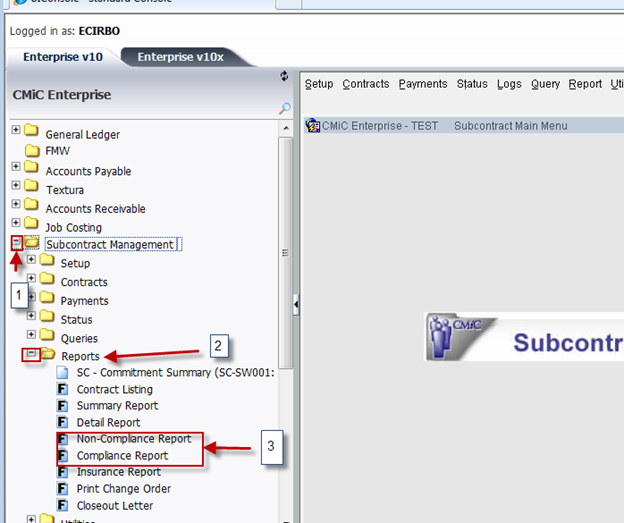
STEP 1: Click the Plus sign to the left of Subcontract Management on the tree view.
STEP 2: Click the Status link.
STEP 3: Click on Change Compliance Status and compliance
screen will open
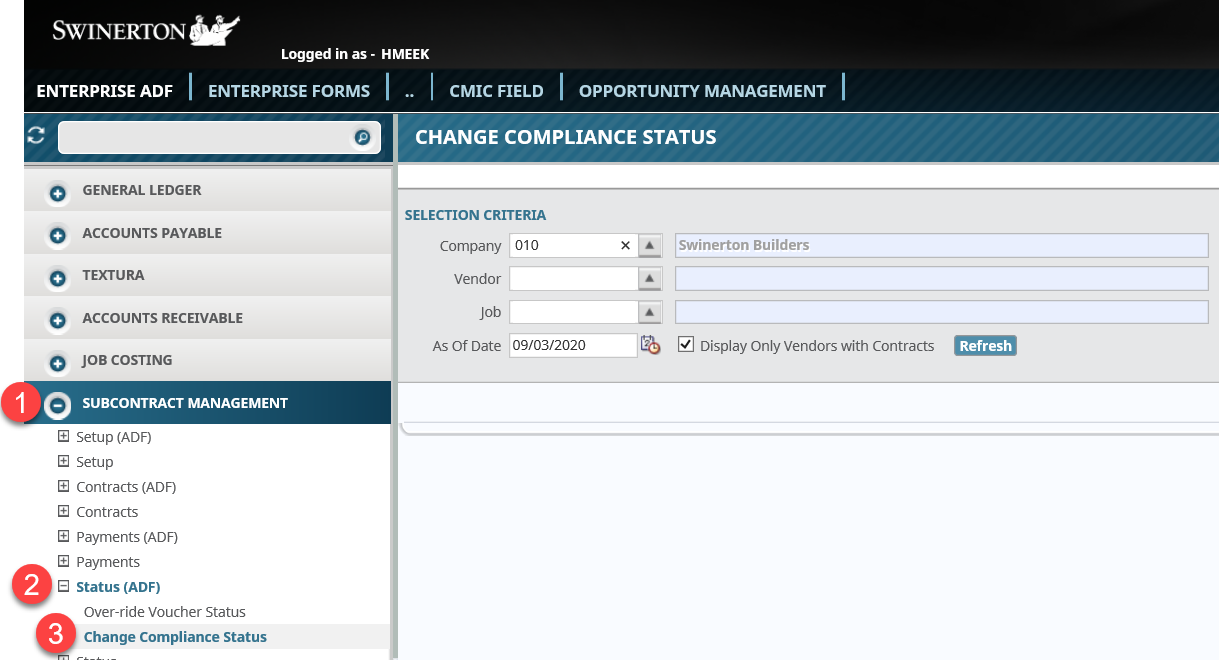
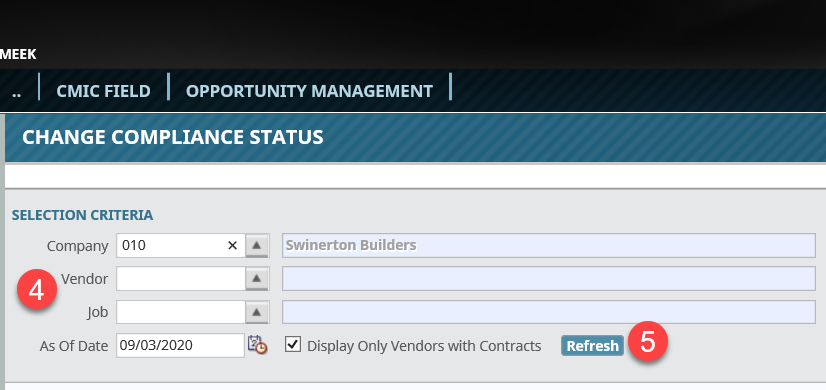
STEP 4: Search for Subcontract by entering the Vendor or Job number: (Company will default based on user Default Company and can be changed if needed)
STEP 5: Click Refresh
STEP 6: Select the row for the Subcontract you need
STEP 7: Click Compliance
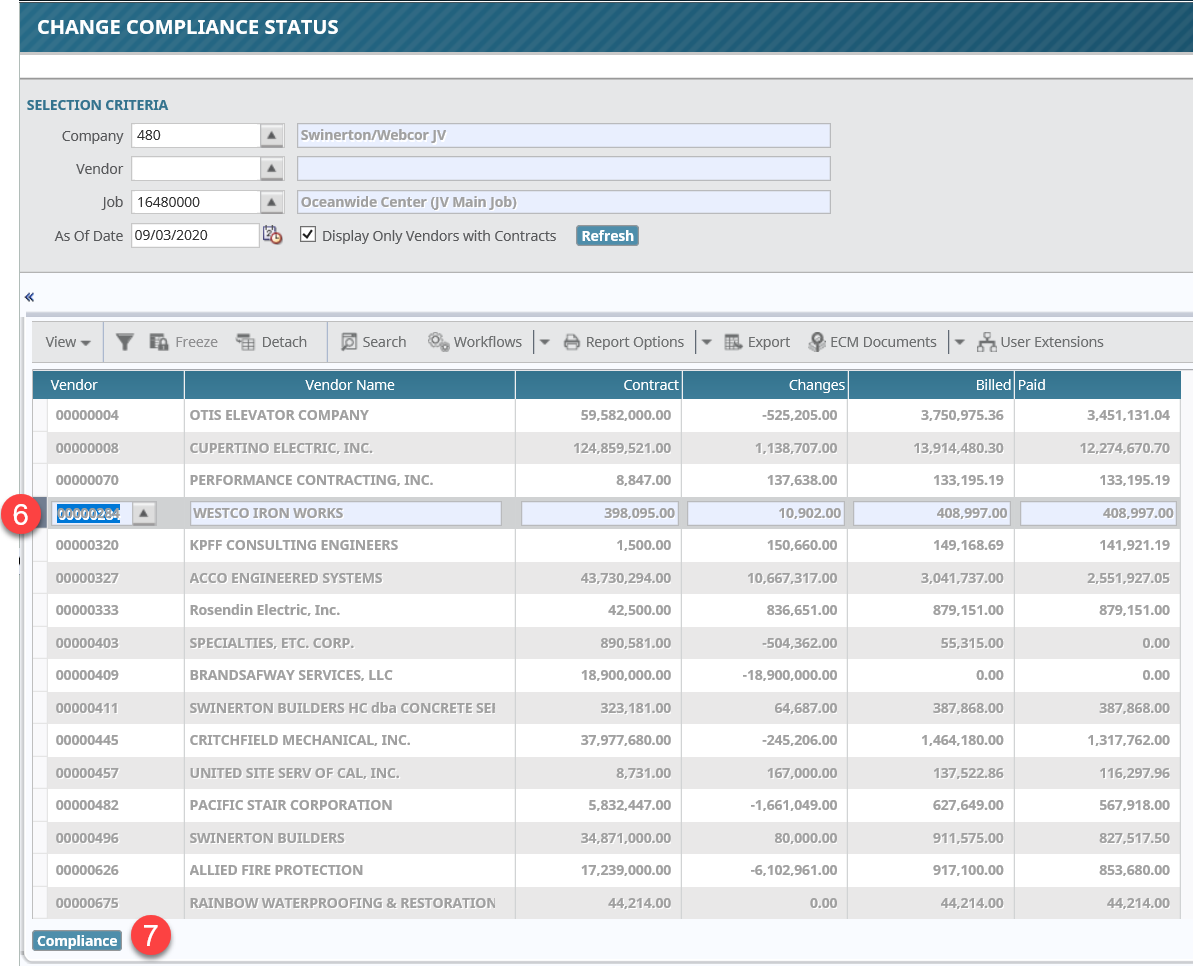
Compliance screen for the subcontract will open.
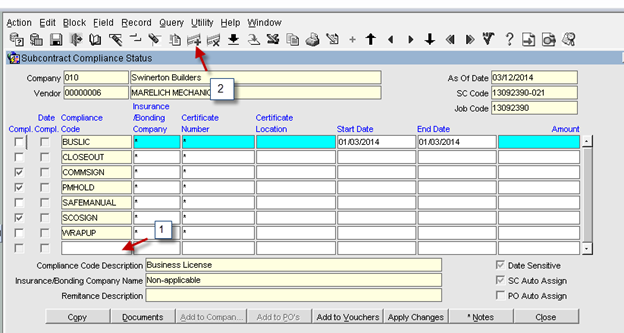
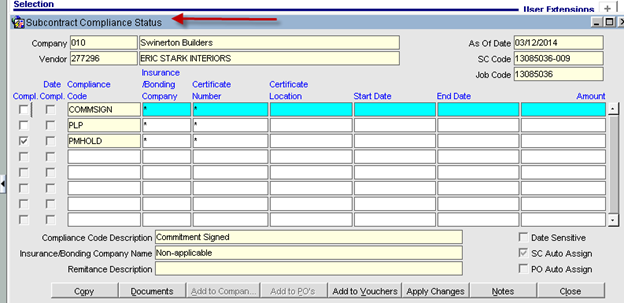
Understanding the Compliance Screen
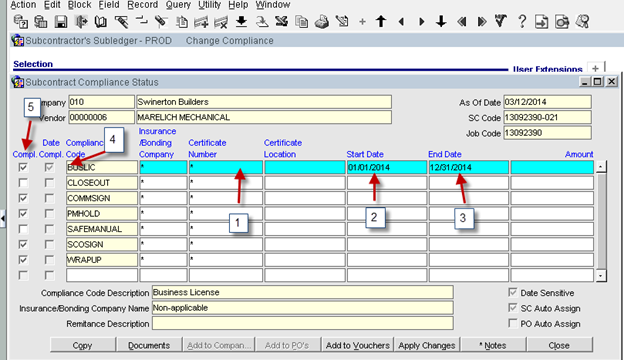
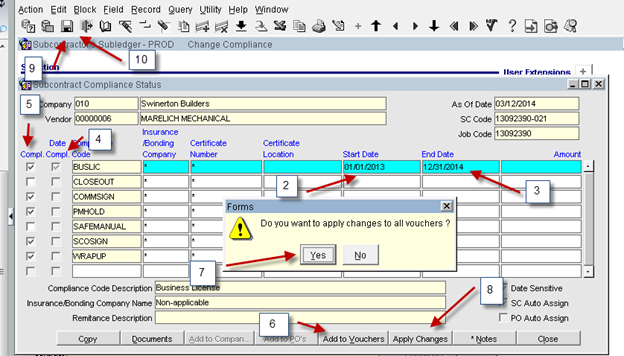
1) Date Sensitive – If a code is setup to track expirations dates, the Date Sensitive box will be checked when you click on the line.
2) Start Date and End
Date – If a code is Date Sensitive, a Start Date and End Date is required. Do not enter dates for non-date sensitive
items.
3) Date Compl. – The system will check this box if the code
is date compliant meaning the ‘As of
Date’ falls between the Start Date and the End Date. This box cannot be updated by the user.
4) Compl. – When a requirement is met, the user must check this box to make the code compliant.
Note: For a date
sensitive code to be compliant both Date Compl. and Compl. box must be
checked.
5) Insurance Bonding
Company – This field is not used.
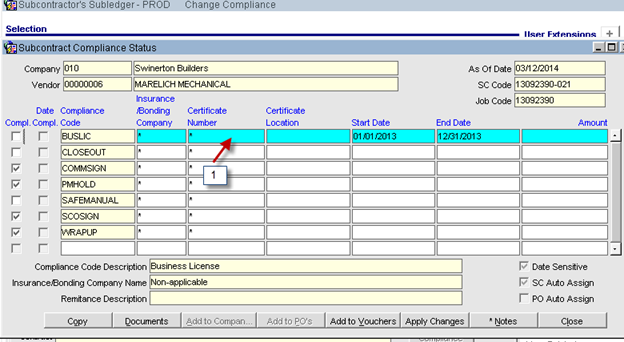
6) Certification Number, Certification Location and Amount – These fields are optional and can be used for tracking insurance information.
7) Documents and Notes – These fields are optional and can be used as needed. You cannot upload documents. If Documents or Notes exists, an * will be shown on the tab when you click on a line.
8) Click + to add insert additional lines for adding codes. Click X to delete codes.
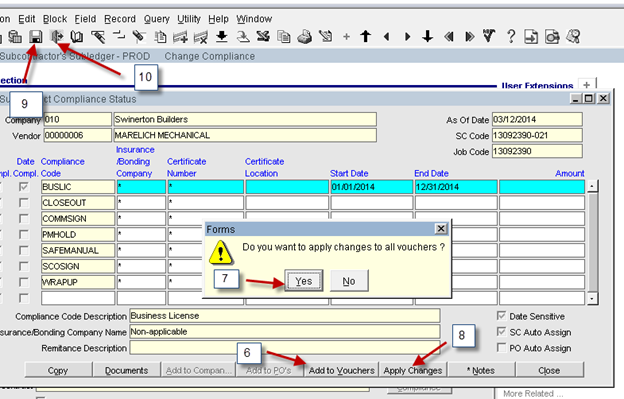
9) Add to Vouchers – Clicking this box updates vouchers posted in CMiC for this subcontract and applies the changes. If this is not clicked, compliance attached to any unpaid vouchers will not be updated. Note is only applies to the highlighted line.
10) Apply Changes – Save the Compliance changes and applies to new vouchers
entered. Does not apply changes to unpaid
vouchers currently in the system. Note
is only applies to the highlighted line.
11) Copy – Allows you to copy a compliance code to another subcontract.
12) SC Auto Assign – Box will be checked if this code was automatically assigned to all
subcontracts when entered into CMiC.
Compliance Codes Automatically Assigned to Subcontracts
Risk Management requires certain compliance
codes be added to all subcontracts entered in CMiC. These codes are set up in CMiC to automatically
assign to a subcontract when the subcontract is created. These codes vary based on the location of the job and the information entered into Opportunity Management at the time of job setup. Some codes such as PMHOLD and SCOSIGN default
as being compliant. If a code is Date
Sensitive, the date the subcontract was created will default as the Start Date and
End Date. Additional codes can be added
as needed. See separate section for this process.

If a compliance code is automatically assigned, the SC Auto
Assign box wil be checked when the line is highlighted.
When a SCO has been signed, this code can be added to the Compliance tab in Job Setup and the SC Auto Assign flag removed so the code will no longer automatically be added when a subcontract is added to a job. SCOSIGN is the only code that should be removed from subcontracts.
This process will only remove the SCOSIGN code
from future subcontracts entered. Note: even though the steps below show BUSLIC as an example, do not remove BUSLIC.

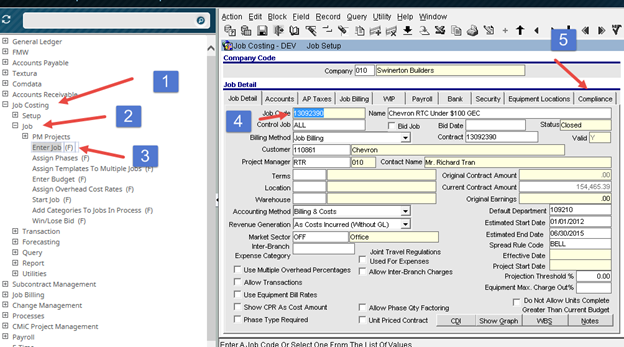
1) Click the Plus sign to the left of Job Costing on the tree view.
2)Click Job.
3)Click Enter Job.
4)Query Job Code.
5)Click the Compliance tab
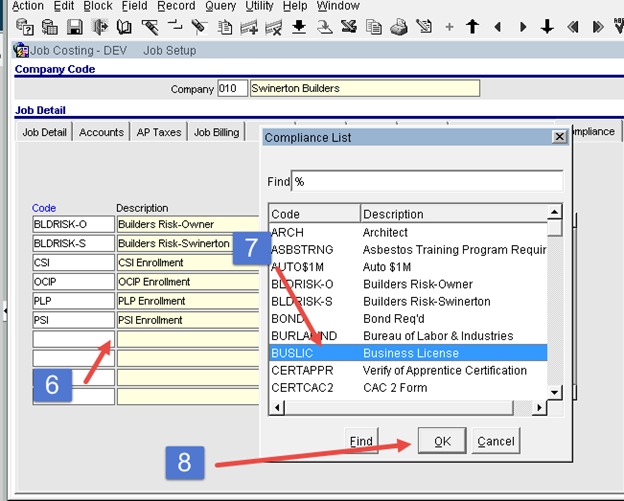
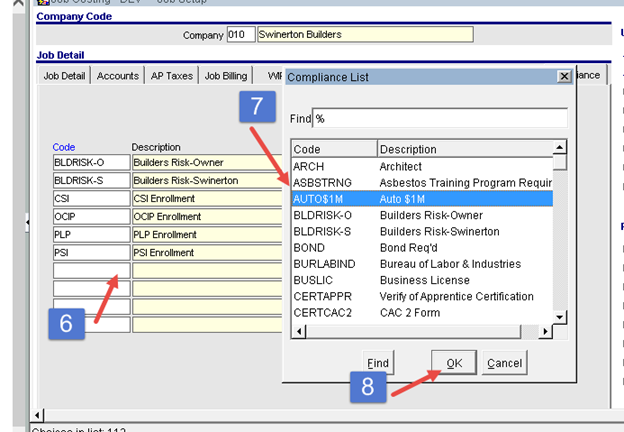
6) Double click on empty line to get List of
Values.
7) Locate and highlight the code you wish to add to
the job.
8) Click OK.
In the
screenshot below SCOSIGN was added. If you tab through the fields, the Compliant
and SC Auto Assign flags will default based on the global Compliance Setup.
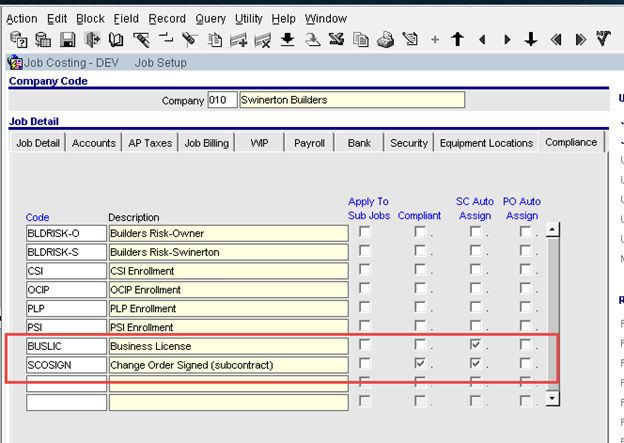
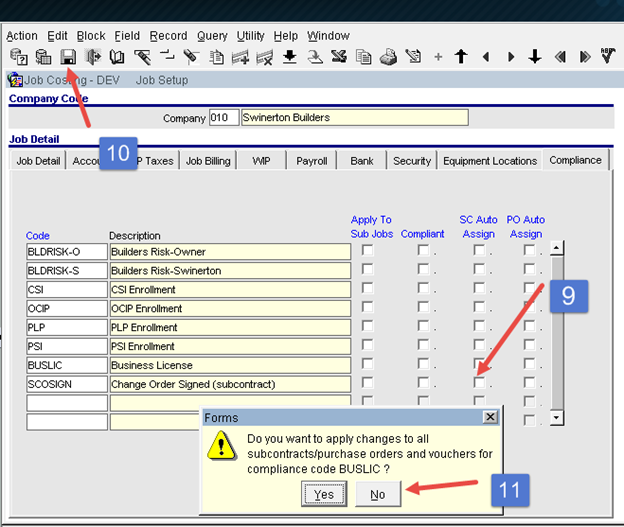
9) Remove the SC
Auto Assign and Compliant flag from SCOSIGN. This will override the SC Auto Assign at the global level.
10) Click Save
11) Click No. DO NOT click Yes. Clicking “Yes” removes all the other automatic system assigned codes from existing subcontracts and adds only SCOSIGN.
If this code needs to be removed from existing subcontracts, they need to be deleted
from the individual subcontracts and updated properly so any existing vouchers
are also updated.
Compliance Codes Assigned to Subcontracts - Job Specific
If
subcontracts for a specific job have a code that is required and not
automatically assigned at a global level as detailed above, the Financial
Manager (at the job level) has the ability to add any other compliance codes
and automatically assign them to all subcontracts on the job. This can also be
done for a job already in process. The
Financial Manager can add a Compliance Code at the job level and have the code
added to all subcontract for the job.
1) Click the Plus sign to the left of Job Costing on
the tree view.
2) Click Job.
3) Click Enter
Job.
4) Query Job
Code.
5) Click the Compliance tab.
6) Double click on empty line to get List of
Values.
7) Locate and highlight the code you wish to add to
the job.
8) Click OK.
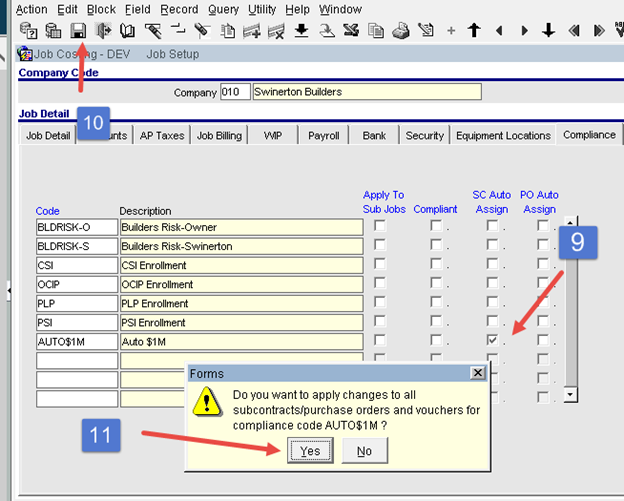
9) Check SC Auto Assign box.
10) Click Save.
11) Click Yes if you want the new code added to
existing subcontracts and vouchers.
Adding Compliance Codes to Subcontract
Select the subcontract. See Locating Subcontract Compliance above.
STEP 1: Click on an empty line or
STEP 2: Click + to insert another line for a new compliance
requirement. NOTE: once saved the list
will sort in alphabetical order.
STEP 3: Click on the Compliance Code or query for the LOV.
STEP 4: Select the code you want to add by clicking on the Code or using the Find option to
search. If you have received the
requirement information for the code you are adding, you can complete the
information at this time.
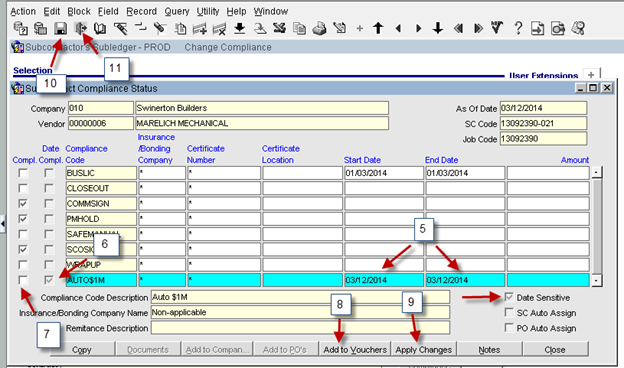
STEP 5: Note: The Compliance Code added in this example is Date Sensitive so Start Date and End Date must be entered. If you have not received the insurance certification, enter the current date in both fields. Do not use Start Date and End Date of requirements that are not Date Sensitive.
STEP 6: The system automatically checks the Date Compl. box because the systems
views the requirement as being compliant for the day.
STEP 7: The Compl. box is not checked so the requirement will hold payment. For a date sensitive requirement to be compliant, both boxes must be checked.
STEP 8: If you want to apply changes to all unpaid vouchers for this subcontract, click Add
to Vouchers. If this is not clicked,
compliance attached to any unpaid vouchers will not be updated.
STEP 9: Click Apply Changes – Save the Compliance changes and applies to new vouchers
entered. Does not apply changes to
unpaid vouchers currently in the system.
STEP 10: You can add additional requirements if you need to or Click the Save icon.
STEP 11: Click the Close icon.
If the requirement has not been met at the time you add the code to the subcontract, you can update the record at a later time. See Updating Compliance.
Deleting Compliance Codes from a Subcontract
If a compliance code was added to a subcontract in error, it can be deleted from the subcontract. Note: If the subcontract has been posted “In Process” and has exported to Textura, you will need to manually remove the compliance code from the subcontract and/or the Project Requirements in Textura. Deleting a code in CMiC does not remove the code from Textura.
Do
not delete PMHOLD. PMHOLD must remain on the subcontract for an image in Workflow to be
placed on PMHOLD.
Select the subcontract. See Locating Subcontract Compliance above.
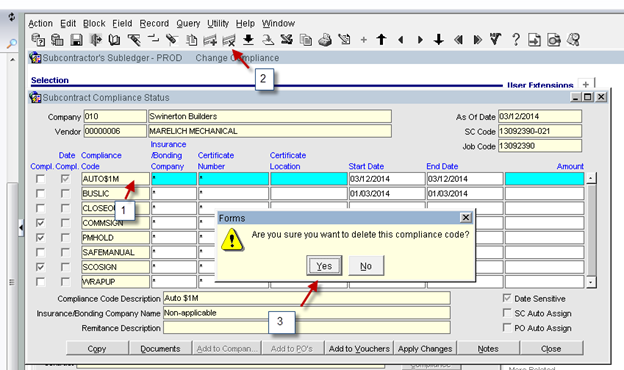
STEP 1: Click on the line you want to delete. It will turn blue.
STEP 2: Click the X.
STEP 3: Confirm this is the requirement you want to remove and click Yes. If you have selected this in error, click No
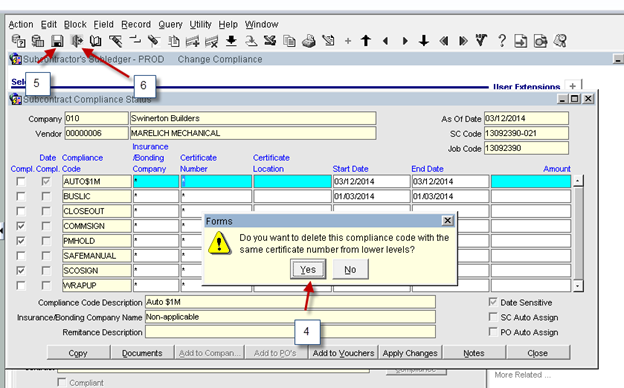
STEP 4: You will receive the message above. By
selecting Yes, you will delete the compliance code from all unpaid vouchers. If you do not want this requirement to hold payment on any unpaid vouchers in the system, click Yes. Note: If you click No, the compliance code will remain on the voucher compliance. If No was click in error or it is decided later it needs to be removed from the voucher, you must go into compliance in Accounts Payable and manually remove the code.
STEP 5: Click the Save icon.
STEP 6: Click the Close icon.
Updating Compliance Codes on a Subcontract
Select the subcontract. See Locating Subcontract Compliance above.
STEP 1: Click on the line you want to update. It will turn blue.
STEP 2: Click Compl.
STEP 3: Depending on keystrokes, you may get the pop-up message asking if you want to apply the changes to all vouchers. If you do not receive this message, click Add
to Vouchers. This will remove the hold from any unpaid vouchers in CMiC. If the change is not applied to vouchers, unpaid vouchers for this subcontract will remain on hold. See Resolving Discrepancies between Compliance
on Subcontract and Compliance of Vouchers.
STEP 4: Click Apply
Changes.
STEP 5: Click Save icon.
STEP 6: Click Close icon.
· Updating Date Sensitive Compliance Codes
o Updating Compliance when initial certification is received.
STEP 1: Click on the line to be updated.
STEP 2: Start
Date - Enter the effective date of the certification into the Start Date field. This field should only be entered when the initial requirement is met. When a certification has expired and a new certification has been received, only the End Date should be updated. See Updating Compliance for Expired
Certifications.
STEP 3: End Date - Enter the expiration date of the certification. Once this date passes, any unpaid vouchers will be placed on hold.
STEP 4: Date
Compl. Since the ‘As of Date’ falls between the Start Date and the End Date, CMiC has automatically checked this box.
STEP 5: Compl. – Click the box.
STEP 6: Add to
Vouchers – Click the box to update compliance attached to vouchers.
STEP 7: Click Yes.
STEP 8: Click Apply
Changes.
Prior
to saving, any additional updates can also be made at this time.
STEP 9: Click the Save icon.
STEP 10: Click to Close icon.
o Updating Compliance for Expired Certificates
STEP 1: Click on the line to be updated.
STEP 2: Start
Date – Do not update this field unless this is the initial certification received for this requirement. Updating the Start Date with the new effective date of the certification will place any unpaid vouchers with an invoice date prior to the new effective date on hold.
STEP 3: End Date - Enter the expiration date of the certification. Once this date passes, any vouchers will be placed on hold.
STEP 4: Date
Compl. Since the ‘As of Date’ falls between the Start Date and the End Date, CMiC has automatically checked this box.
STEP 5: Compl. – Click the box.
STEP 6: Add to
Vouchers – Click the box to update compliance attached to vouchers.
STEP 7: Click Yes.
STEP 8: Click Apply
Changes.
Prior
to saving, any additional updates can also be made at this time.
STEP 9: Click the Save icon.
STEP 10: Click to Close icon.
Voucher
Compliance
Compliance is attached to vouchers based on the Subcontract Compliance. This is a separate table than the compliance attached to the subcontract. When compliance for the subcontract is properly managed, Voucher Compliance updates so that payments are accurately held and released.
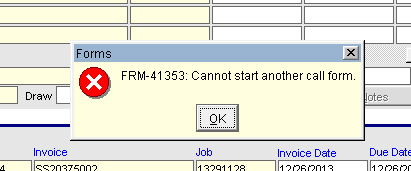
Note: You cannot have the Subcontract Compliance screen and the Voucher Compliance screen for the same subcontract opened at the same time. Even though these are separate tables, they cannot be access at the same time because of the update link between the two. If you attempt to open both, you will receive the error message below.
Voucher compliance is viewed from the
Accounts Payable Module.
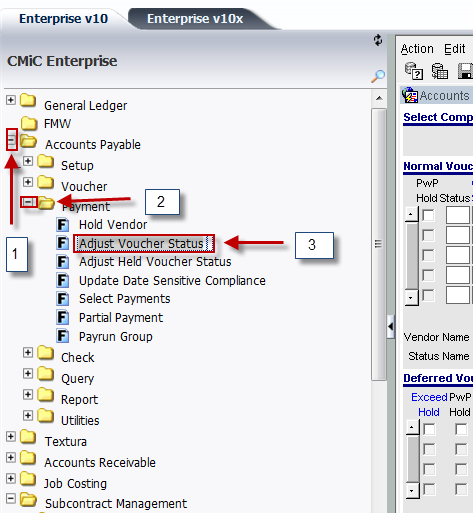
STEP 1: Click the Plus sign to the left of Accounts Payable on
the tree view.
STEP 2: Click the Payment link.
STEP 3: Click on Adjust Voucher Status and the screen will open.
There is separate documentation that details
the use of this screen. This document
addresses compliance only.

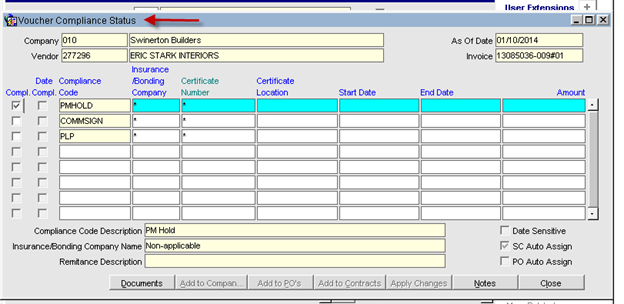
You can view the Voucher Compliance screen by
querying a voucher. Note, the screen above as two separate sections, Normal
Vouchers and Deferred Vouchers.
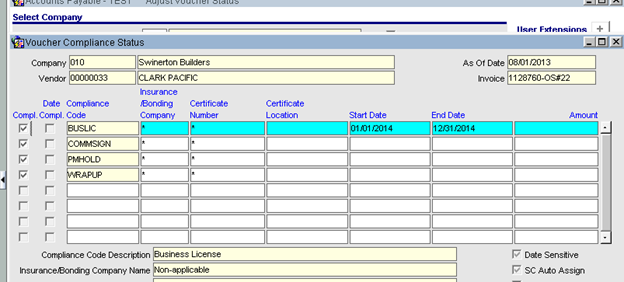
The Voucher Compliance is shown below.
The Subcontract Compliance is shown below.
Resolving
Discrepancies between Compliance on Subcontract and Compliance on Vouchers
Below are examples of
instances where a voucher is on compliance hold but the compliance attached to
the subcontract shows the sub is compliant.
· Date Issue
Compliance
on subcontract shows compliant.
Voucher is on compliance hold because the Invoice Date of the
voucher was 08/01/2013, prior to the Start Date. The BUSLIC Start Date was updated. The Start Date should not have need updated
when the business license expired.
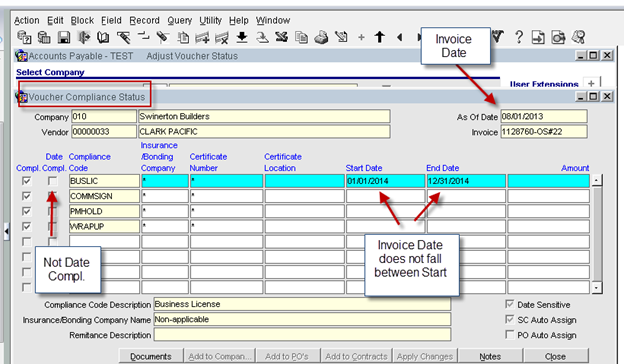
Resolution: Change the Start Date on the Subcontract Compliance to reflect the initial start date. If Add to Vouchers is click, the voucher will update and hold will be removed.
· Changed to Compliance on Subcontract did not
update Compliance on the Voucher
Start
Date was updated on subcontract compliance.
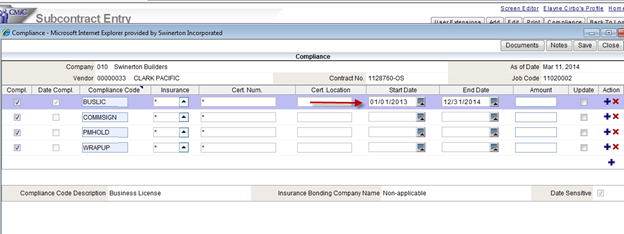
Start Date did not update on Voucher Compliance.
Resolution: Go back into the subcontract compliance, click Update and Save.
Note: If compliance is updated on the voucher screen, it does not update the compliance on the subcontract. If the subcontract compliance is updated and changes are added to vouchers, any changes made to the voucher compliance will be over-written. All updates should be made to the Subcontract Compliance and properly update the voucher compliance.
Compliance Queries
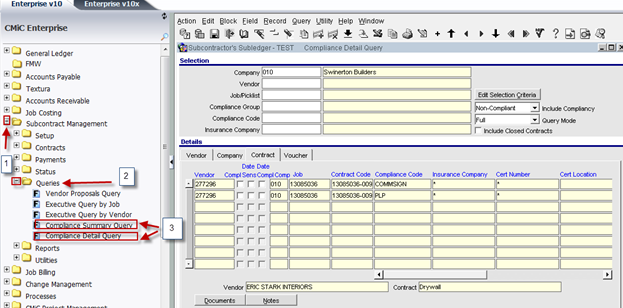
Queries are available as shown above. Compliance can be view but not changed from this screen.
Compliance Reports
Compliance
reports can be generated for Compliant and Non-Compliant subcontracts.