Import Transactions and Post (Foreign Batch Import)
Foreign Batch Import Process
Overview: How to import Transactions into CMiC and post
Transactions or Journal Entries can be entered directly into CMiC using the
Foreign Batch Import Utility. Transactions can also be imported by creating
transactions in Excel and importing the file into CMiC using the Foreign Batch
process. This is useful when you have
multiple transactions or transactions with many lines of distribution.
The following
steps detail how to create the import file and how to import and post the file
in CMiC.
Generate Excel
Import File
For a file to successfully import and post in CMiC, it must be created using the attached template and must include
all mandatory fields with data in the correct format.
Foreign Batch Template can be saved for future use. The file Foreign Batch Example will be used
for the following process.
STEP 1: Open Foreign Batch Example file for testing. This file contains field descriptions and example transactions. Foreign Batch Template is a clean copy to use in future.
STEP 2: Complete all mandatory fields as noted on file.
· Yellow = Mandatory all lines
· Orange = Mandatory J-Lines
· Blue = Mandatory G-Lines
J or G
must be in caps

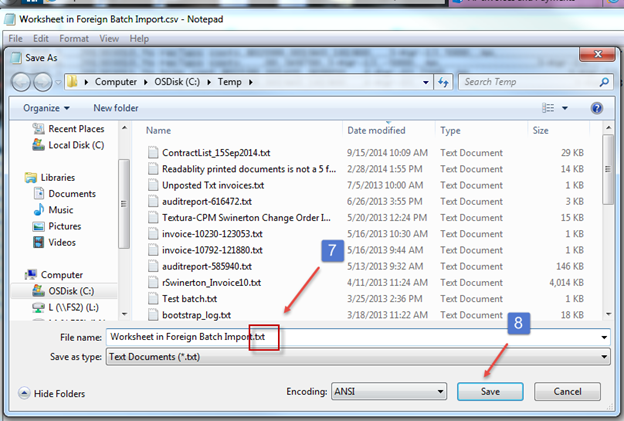
STEP 3: Save File as .csv (comma delimited) – Note location where saved.
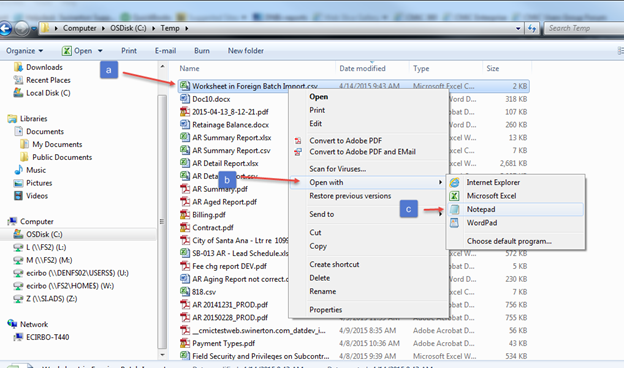
STEP 4: Convert the .csv file to .txt file using Notepad
OR
Right-click on file > select "Open with" > choose Notepad
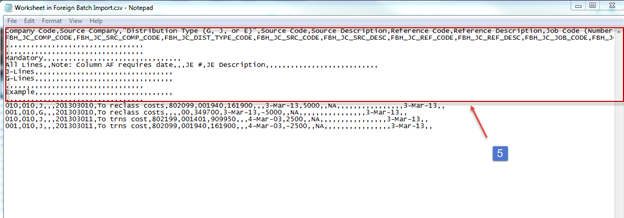
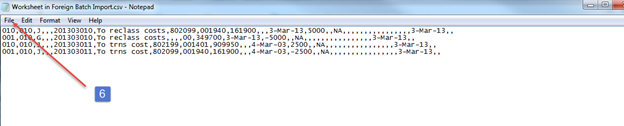
STEP 5: Highlight and delete all lines other than detail lines (including header). Leave only the coded JE lines.
STEP 6: Save as .txt file
STEP 7: Enter File Name. Change extension from “csv” to “txt”
STEP 8: Click Save
CMiC Foreign Batch Import
STEP 1: Click Job Costing
STEP 2: Click Utilities
STEP 3: Click Import
STEP 4: Click Foreign Batch
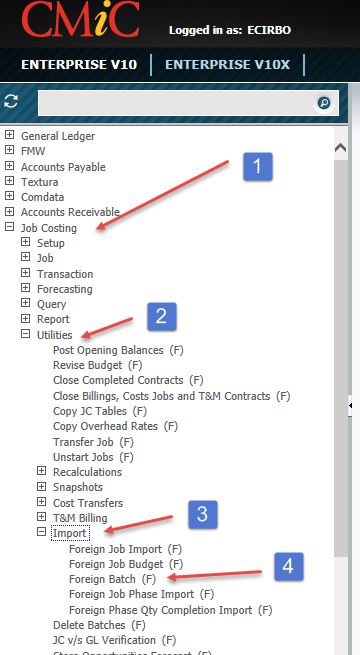
STEP 5: Click Import
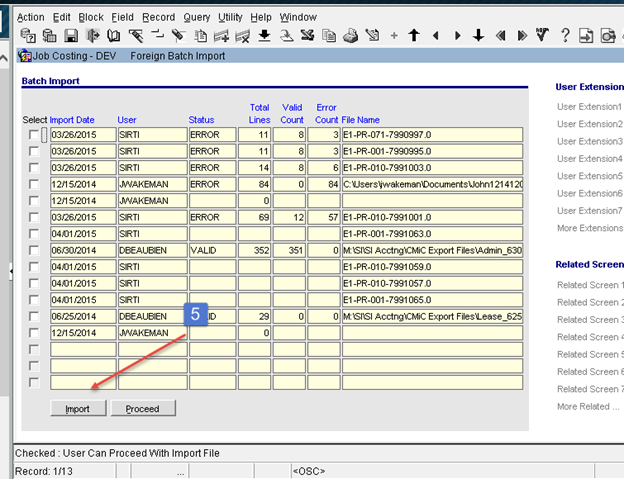
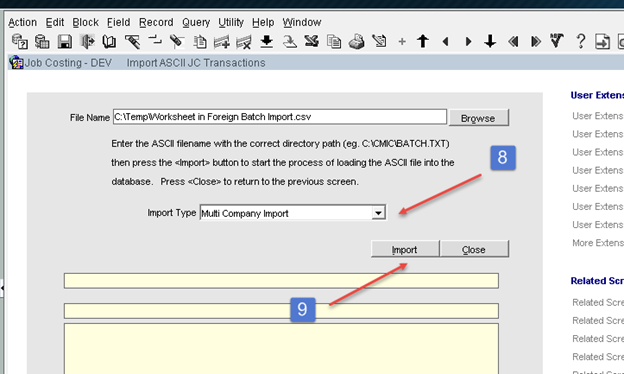
STEP 6: Click Browse and locate file saved in steps above.

STEP 7: Highlight file and click Open

STEP 8: Import Type defaults to Multi Company Import.
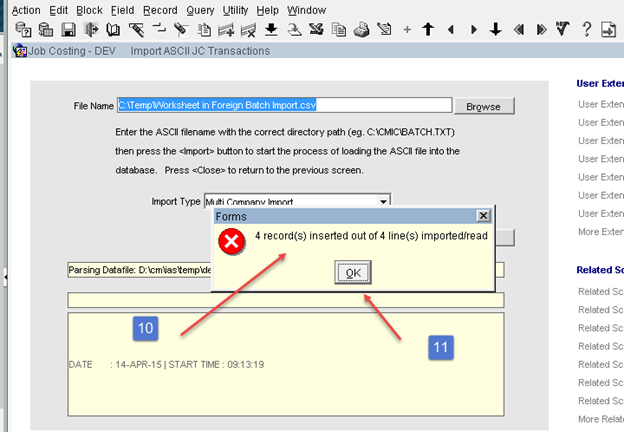
STEP 9: Click Import
STEP 10: Confirm all lines imported
STEP 11: Click OK
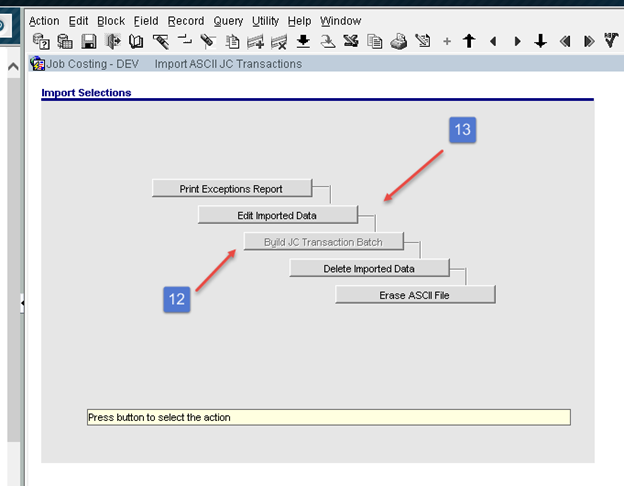
STEP 12: If Batch is not in error, Build JC Transaction Batch will not be grayed out. In this case there is an error in the batch that must be corrected. If ‘Build JC Transaction is accessible skip to the step 31 below. Steps 13 – 30 show how to correct a file.
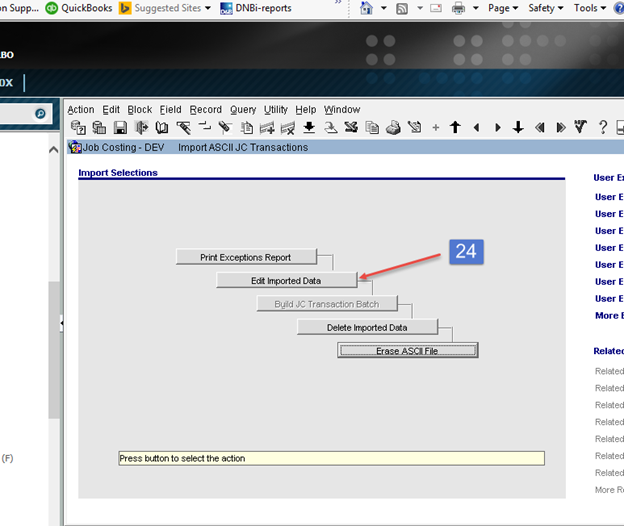
STEP 13: Click Edit Imported Data
STEP 14:Source Company Code - Enter Company # used as Source company in file.
STEP 15: Page down or click the Next Block icon. Data will populate.
STEP 16: Records with errors will not have a check mark in the Valid box. See error(s) at bottom of page.
STEP 17: In this case, a record three has an invalid Phase Code. This must be corrected prior to proceeding.
STEP 18: Once corrected, Click Save
STEP 19: Click Close
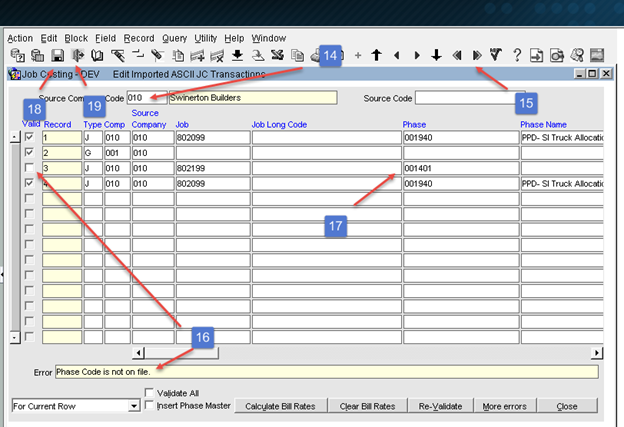
STEP 20: Click Close
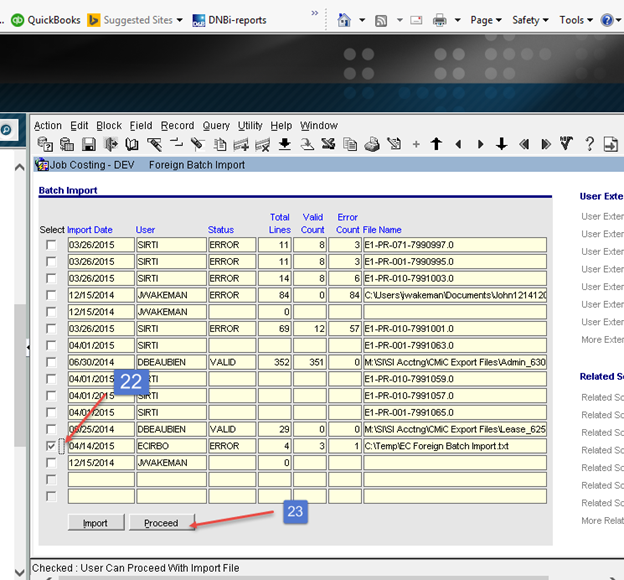
STEP 21: Go back into Job Cost, Import, Foreign Batch (see above Steps 1 -4 above).

STEP 22: Locate your batch and click the Select box
STEP 23:Click Proceed
STEP 24:Click Edit Imported Data
STEP 25: Source Company Code – Enter source code used in your file
STEP 26: Page down or click the Next Block icon
STEP 27: Check Validate All box
STEP 28: Click Re-Validate
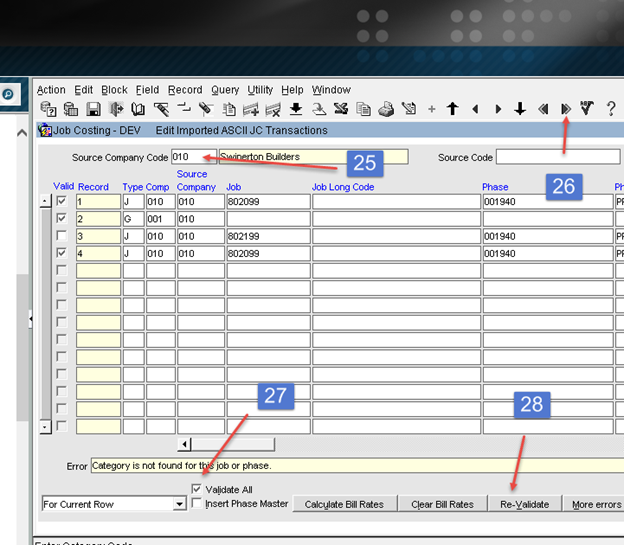
All boxes should be valid. If not, repeat the steps above.
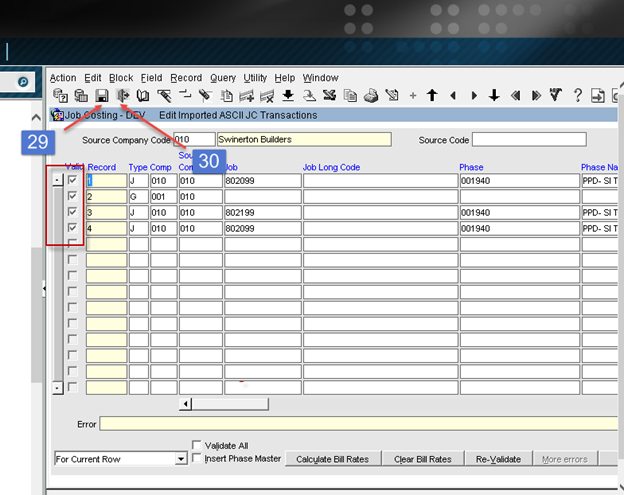
STEP 29: Click Save
STEP 30: Click Close
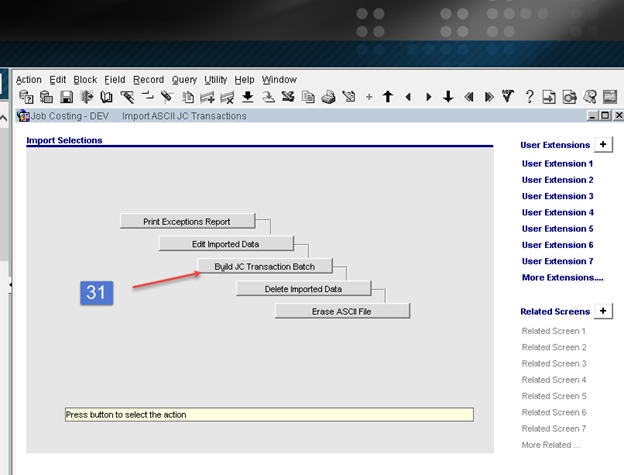
Build JC Transaction Batch should be available if no errors are found.
STEP 31: Click Build JC Transaction Batch
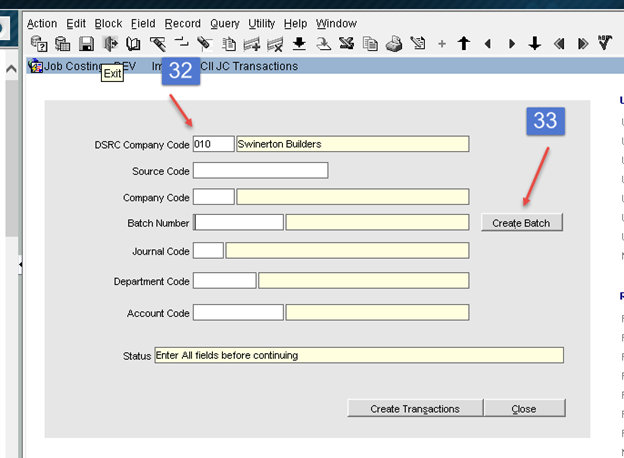
STEP 32: Enter DSRC Company Code
STEP 33: Click Create Batch
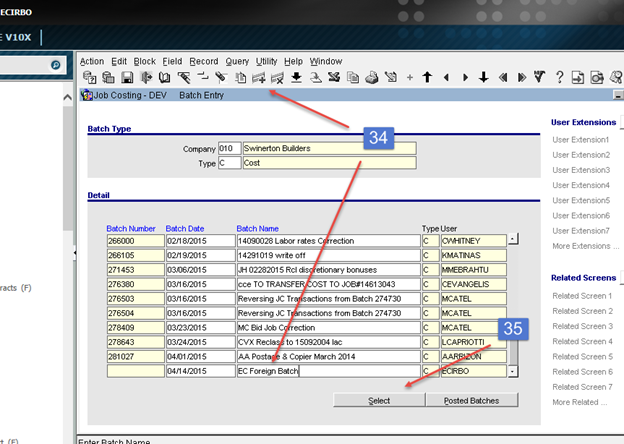
STEP 34: Enter Batch Name on last line or click insert icon to add batch
STEP 35: Click Select
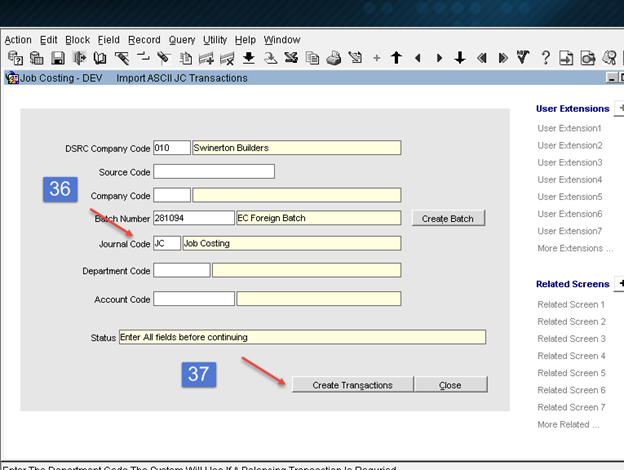
STEP 36: Journal Code – Enter JC
STEP 37: Click Create Transactions
STEP 38: Click OK.
Note that correct number of records were inserted and note batch number.
STEP 39: Click Close.

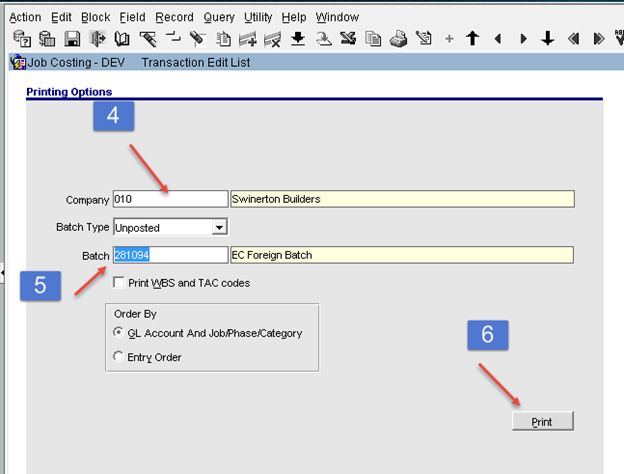
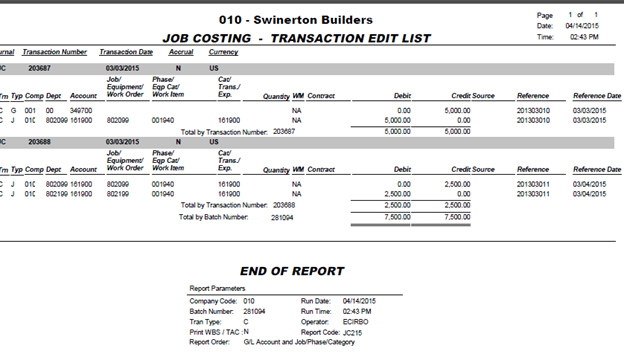
Print JC
Transaction Edit Listing – Validate Data
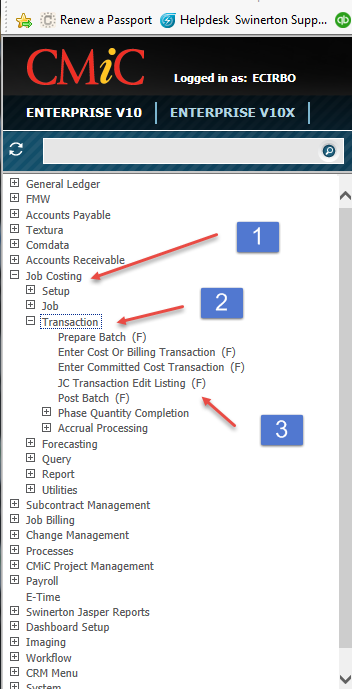
STEP 1: Click Job Costing
STEP 2: Click Transaction
STEP 3: Click JC Transaction Edit
Listing
STEP 4: Confirm Company number. Defaults from setup. Change if necessary.
STEP 5: Enter Batch number create above or query
STEP 6: Click Print
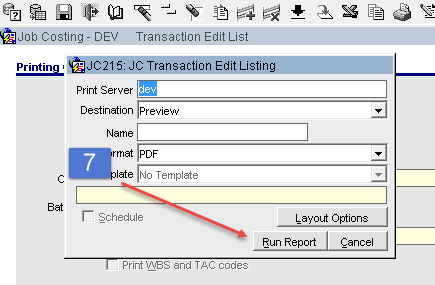
STEP 7: Click Run Report and
validate data prior to posting.
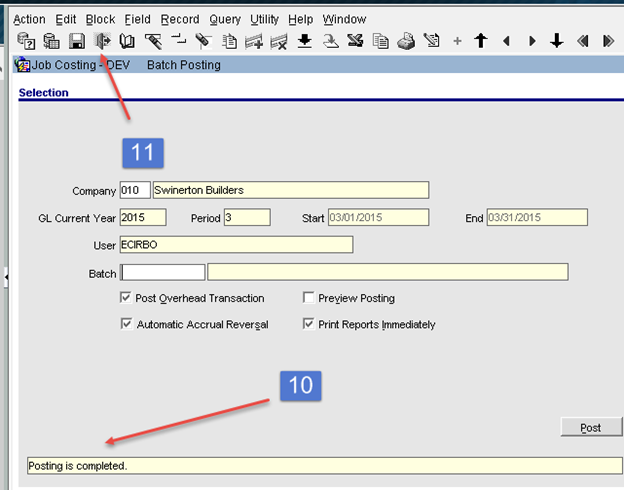
Post
Batch
STEP 1: Click Job Costing
STEP 2: Click Transaction
STEP 3: Click Post Batch

STEP 4: Confirm Company number. Defaults from setup. Change if necessary.
STEP 5: GL
Current Year and Period – Defaults to
open period
STEP 6: Enter Batch number create above or query
STEP 7: Automatic Accrual Reversal –
Uncheck
STEP 8: Print Reports Immediately – Check if you would like to view posting reports
STEP 9: Click Post

If you checked Print
Reports Immediately, you will be prompted to run reports.
STEP 10: You will receive a message that Posting is completed.
STEP 11: Click Close